When it comes to ceramics, sometimes you may not have the time or resources to consider going all the way out to a studio. If you’re someone who spends a lot of time at home, whether you’re watching kids or otherwise, sometimes home is really the only option. If that’s the case, you should consider learning how to make ceramics at home, and this article will tell you how to get into this, and any tips and tricks that will allow you to get the job done quickly and effectively.
Benefits of Ceramics at Home
There are some benefits to making ceramics at home. There is a reason why the home market is super popular, and some of the benefits include the following:
-
Can be cheaper in the long run since no studio rental
-
You can have all of your supplies easily at hand
-
It saves time as well, no driving or anything
-
If you’re starting out, it’s less of an investment
-
Can be good if you’re looking to learn pottery, but are not ready to invest in it completely
-
Allows for you to do things in a more comfortable space
There are a few downsides to doing it at home, however, and they are the following:
-
You won’t have a teacher to assist you
-
You have to learn it all on your own
-
You may not have the super professional items studios have
-
You may be limited on projects
If you are just learning how to build your pottery, the best thing to do is to work on the techniques, and honestly, doing it at home is a good way to create a good space, and learn the ropes of it. Personally, if you’re a professional, unless you have an at-home studio, I think it’s best to try out at a studio if you don’t have the materials to see if you can create a better environment for yourself and learn the techniques.
Choosing the Clay
One thing that you’ll want to figure out, is the type of clay. Now, if you were working in a regular studio, I would say just get the regular clay that’s used to fire, depending on what temperature your kiln goes up to, you can even work with porcelain.
Clay and ceramic are different materials that are widely used for pottery. However, the major difference between these two materials is that clay is a natural material that is found in the ground naturally. On the other hand, ceramics are various substances that are added to the clay to harden it when heated.
Since ceramics contain metal oxides, it changes the molecular structure of clay when heated. Hence, all clays can be considered ceramic, but not all ceramics are considered clay. While there are various types of ceramic clays, Porcelain, Earthenware, and Stoneware are the majorly used in pottery.
Earthenware
Earthenware clay is low-fired and consists of fine-grain particles. They are supposed to be used for years. This kind of clay can be easily worked on and are sticky and highly plastic in nature. It is fired at 1100°C. It results in a hard but fragile material that is porous in nature. In order to make the object non-porous, a glaze is added to the pottery & then, it is fired in the kiln for the second time.
Porcelain
Porcelain is a white-colored finely-grained clay that is used for making ceramics. They are highly durable and bestow white color owing to higher levels of kaolin concentration. Porcelain can be fired at a very high temperature, ranges from 1200 to 1450°C. The result is a very hard, white-translucent, shiny material.
Stoneware
The color of stoneware ranges between dark brown and buff color. The difference in color occurs due to the presence of impurities and iron content in the clay. Stoneware has coarse grain particles that are fired at 1200°C. The result is a denser, more durable material, which is waterproof in nature. It need not be glazed.
While these are the best ceramic clays that are used for pottery, if you are a beginner and planning to try some pottery art, then Activa Plus Self-Hardening Clay is the best option. Its plasticity is of an exceptional level that allows you to make versatile pottery items.
However, in a setting at home, this might be a bit different. You will choose one of three different types:
-
Oven-baked
-
Polymer
-
Air-Dry
Now, there are good and bad points for each of these, and I’ll tell you about them here. Oven-baked has a few advantageous and disadvantageous points that you’ll need to consider, including the following:
-
It’s easy to use since you can bake it in the oven
-
Typically can handle higher temperatures
-
Is better for ceramics used for consumption, since they can be “fired”
-
Typically has a longer-lasting life
-
The biggest disadvantage is that it’s harder to work with, and typically you won’t be able to fire it even to levels of earthenware for the most part
With air-dried clay, there are advantages and disadvantages too, and they are the following:
-
You don’t need an oven or heat source
-
You typically can create most things from this
-
The big disadvantage is that it typically isn’t as strong as oven-fired clay
-
It also typically doesn’t hold as well as oven-fired clay and tends to break more
-
It does also take forever to dry, and if you’re not willing to wait, that’s a problem
The air-dried way usually feels less like you’re doing real pottery, but I do like this for when you just want to have something dry in an easier manner.
Finally, there is polymer clay, which does have similar advantages and disadvantages to the second option, and they include the following:
-
It’s a great beginner clay
-
Allows you to work with shapes
-
Typically holds decently, but not as well as oven-baked
-
Is not the most malleable compared to the other two
-
Typically is used for shaping and not much more
-
Is not as strong as the other two
The ideal situation would be if you had a kiln you get the official clay, but if you’re a bit strapped for cash and don’t want to invest in all of those expensive pieces of equipment yet, this is the way to do it.
Oven Firing
Now, oven firing is an option if you’re working with oven-baked clay. But, if you’re willing to spend a little bit more money, you can get a cheap kiln.
The advantages of oven firing include the following:
-
Is cheap, since you already have it
-
Typically creates decent pottery
-
It will hold for a respectable amount of time
But, if you want to be legit, you need a kiln, because your home oven won’t get to the temperature that you want from this. If you do want to go this route, you won’t be able to completely make everything at home, but, if you do choose this route, it does have advantages over the oven in terms of the following:
-
You can do SO MUCH more
-
You can create the right atmosphere for your pottery
-
You can work with more versatile glazes and clays
-
It’s easier to manage since it is a slow and arduous process
-
Allows you to bisque fire, which makes the pottery stronger
An oven is a good start if you’re considering learning how to make these at home, but I do suggest that, once you’ve managed to learn a bit about this, you consider getting a kiln yourself, or from there, when the clay is leather-hard, you take it to a studio nearby.
How to create Ceramics at Home
So how do you make pottery at home? How can you work with ceramics in such a limited space? Well, it’s quite simple really, and we’ll talk about how you can utilize different techniques based on the environment you’re working in.
First, let’s talk about creating pottery, to do so you begin with the following:
-
Take your clay and roll it out
-
Get it to the desired length and width you’d like
-
If you’re pinching, roll it to the ball shape and from there pinch the inside of it
-
Choose the type of means you want to create this type of pottery
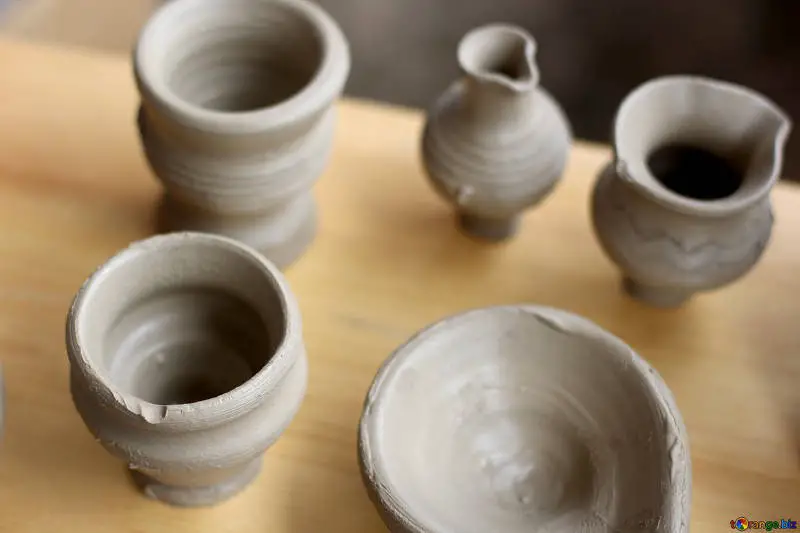
Now if you’re creating pottery that doesn’t involve the wheel, then that’s hand-building pottery. Handbuilding, in my opinion, is the best way to build pottery since it’s simple and requires fewer types of materials.
The three ways to build pottery in that fashion are as follows:
-
Slab pottery
-
Coil Pottery
-
Pinch pottery
At this point, with your clay, you can start with slab pottery. To do this, you begin with the following:
-
Roll out your clay
-
Cut it out to the desired length/width/height
-
From there, put it off to the side and repeat
-
When all parts are out, form the joints by creating a slurry and then pushing the two joints together
-
Smooth both of these out
-
From here, you’ll want to create coils and pinch them into the wall there, pressing them together and then pushing them into the edge to smooth it out
-
Repeat all of this on each side
-
Put coils on there to reinforce it
-
Smooth the jointed locations to look a bit nicer
-
If you’re creating a ribbed edge, you flatten out the clay, cut it out, and then connect it to the top, smoothing it out
And that’s it! That’s essentially how you put slabs together.
For coils, you do something a bit similar at the beginning, but it involves a lot more details and work, and they include the following:
-
Smooth out the piece of clay so that it’s at the desired thickness and consistency you wanted it to be.
-
You then roll out a coil that works for this
-
Put the coil around the clay, covering this
-
When you get to the very end, cut off the excess, and then push it together
-
Blend each part of this as needed so that it blends into the pot
-
Continue each of this for every single part of the coil, blending it together
-
Make sure everything is pretty even, and no two joints are ending at the same point, because that creates openings
-
From here, when you’re done, you can make one final coil that’s a little bit thinner, stick it on the outside, and smooth it out
-
From there, let everything air dry until it’s at least leather hard
When it comes to pottery, personally I like coiling for bowls, cups, and the like, and if you’re working with oven-baked clay, this is a great one to utilize, since it’s so easy to work with, and you can build a lot.
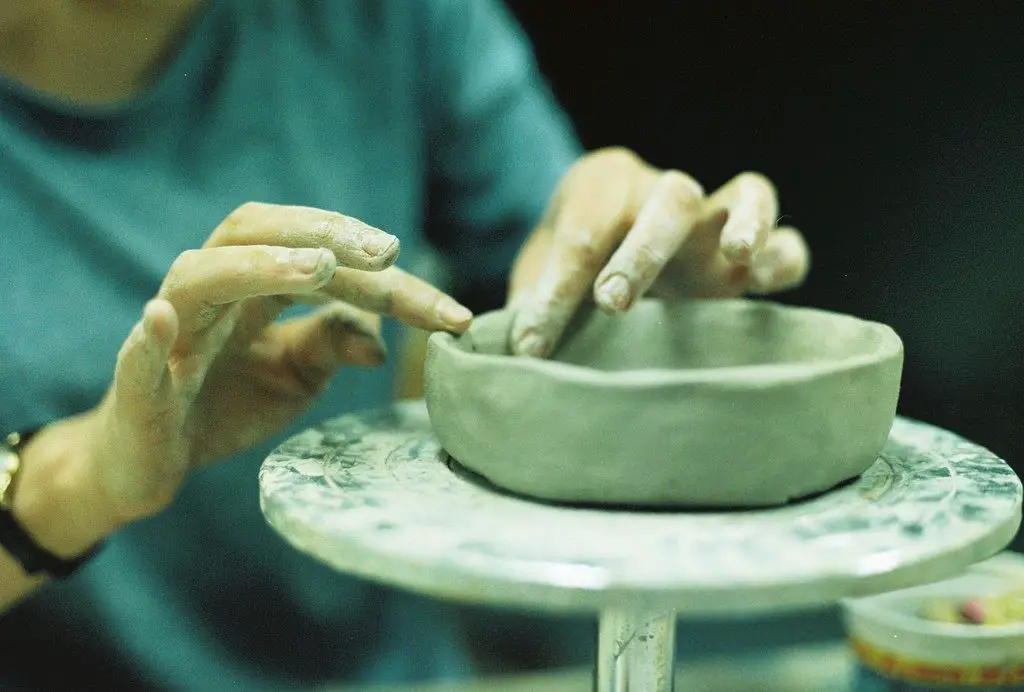
Finally, you’ve got pinching, which in my opinion is probably the easiest, but it makes it the most uneven of each type of pottery. There are some good, yet some not-so-great things about this, but if you’re working on this as a beginner, it’s quite easy.
-
With this one, instead of rolling it out and smoothing it with a rolling pin, you make a ball of clay
-
From there pinch in all the way to get to the bottom
-
Continue to pinch out from the bottom out to the width of the bowl or cup you’re making
-
You can from there pinch it all the way out to the desired size and height
-
Ideally, keep all the walls as even as possible to make it easy for you
-
From there, you can then take your fingers and lightly smooth everything out to blend it
And there you have it, you have a pinched pot. They’re quite easy, and they’re a fun art project.
Now all of these can be done at home with your materials, and they’re quite simple, so you’re ultimately getting an amazing product that does work for you.
What about the Wheel?
Yes, you can create ceramics at home with a wheel, but if you don’t have one, I suggest going the hand-building route first. If you’ve never worked with pottery before, I also suggest going hand-building rather than the wheel. Why is that? Well, there are a few reasons, and they are as follows:
-
These are expensive, minimally at least 50-100 for a basic wheel
-
They take some getting used to
-
You need to know how to throw a pot on the wheel before you do this
-
There is more room to screw up
Yes, you can build pottery at home with the wheel, but do remember that there are a few limitations to this, and you’ll want to know how to use the pottery wheel before you begin with this.
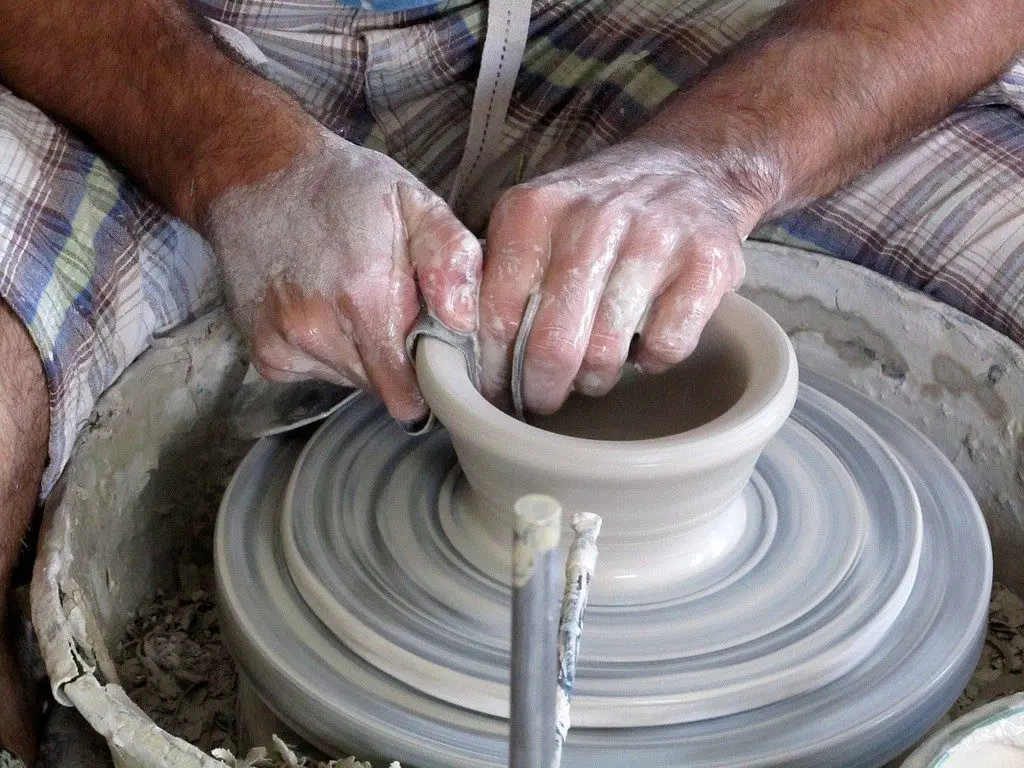
Using a Pottery Wheel at Home
Yes, you can do this, although for starting I don’t condone it. But, we’ll talk a little bit about some tips to make it easy for you.
-
First, you want a pottery wheel that can hold at least 2 pounds of clay for a basic project
-
You should consider an electric pottery wheel since they’re easier to use
-
Make sure that you know how to use the clay that you’re working with, so you can keep it wet and know what the drying and firing process it
-
You can from there, knead and roll the clay into a cone with a rounded point, since this will help create a base
-
Remove all air bubbles period in this, since it will prevent the item from cracking in the kiln
-
Keep the clay on the wheel with the tip down, and the wheel dry
-
Press it down, and from there, slide it around to shape to make it planted
-
If it’s hard, do continue to knead and add water as follows
-
From here, slowly move the hands around to set the clay and center it. Keep it slow so that you don’t dent your clay
-
Wet your hands, and from there, you begin to move your clay forward and plow it. If it dries out, wet your hands again
-
Increase the speed and pull the clay upward, smoothing the sides as well
-
Open the clay up as needed
-
Keep the sides as even as possible
This is what you need to do to throw the clay, and it’s ultimately something that you can work on to get better with and something you can really master for yourself.
Can You Add Decorations?
Yes, you totally can! There are a few ways you can do so ideally, and we’ll talk about some ways you can really benefit from decorating.
-
Stamps: get those from the craft store, and with slightly wet clay, press into them to make the markings, which is great for patterns or even “signatures” on something
-
Stencils: you can use various stickers as stencils available in the stores. You need to glue these stickers on the ceramic surface, and then fill the gaps with colors. After that, remove the stencil paper or the label to finish off creating your decorative motif.
-
Tools: forks, knives, needles, combs, or whatever can create some amazing designs and some rough textures that your pottery will benefit from. Here are some of the essential tips on how you will do carvings on your ceramic ware using pottery tools.
-
Start with marking the rim of the clay pot. Mark divisions using a marker or pencil in several sections. These segments must be done depending on the type of design you want to create on your ceramic surface.
-
Mark the bottom rim of the pot also. And then, using needles, join the markings starting from the top rim to the bottom edge to create lines on the pottery body.
-
Proceed by measuring the width of the vertical lines drawn on the pottery surface. Continue marking to keep the design even and neat.
-
Connect the markings based on what kind of carving design you want to create on your ceramic surface. This method will help you if you’re going to carve geometric patterns on the clay body. But, in case you want to create something else, make sure that you are marking it appropriately before starting.
-
Use flexible rulers to mark the pottery body properly.
-
Start carving out, with a finely sharp knife and small tool to create detailed and intricate designs. Using a bigger tool might scrap an unwanted area, which will ruin the entire effort.
-
Once you are done with carving, use a damp sponge to rub onto the carved edges and smoothen them.
-
You can utilize other tools to increase the sharpness of the carvings. Refine those carved areas to make them look prominent and catchy.
-
You can use a slip-trailing bottle to give the carving design a more prominent and raised effect.
-
Imprints: anything from leaves, stones, twigs, or the like do well here. You can press them against the clay in a soft fashion to create an imprint before you do bake it or dry it
Decorating is really nice, and if you’re not using pottery that requires glazes or stains, these are little additions you can utilize to make your pottery pop even more.
Drying the clay
Now, if you’re not kiln firing, chances are you’re going to be drying your clay via air drying, or oven baking. There are a couple of ways to do each of these, and I’ll go over the following.
For oven-baked, you do the following:
-
Look at your instructions and preheat the oven as needed
-
Place the clay there on a tray
-
Let it sit there as needed for the amount of time
-
Check the hardness of it when you’re done
It is simple, but again, it doesn’t really get as hot as you need it if you’re making porcelain or earthenware. If so, you’ll need to get that to a kiln.
For air drying, it becomes the following:
-
Put it in a secure place
-
Read the directions to air dry it
-
Literally just let it sit and chill for however long you need to, which can be up to 24 hours
-
Check the clay, see its hardness, and if it needs more time, you can do so
-
If you’re air drying, use fine-grain sandpaper to remove the tiny imperfections before you paint it
-
If you can use it in a kiln and have access, throw it in there whenever you’re done in a careful fashion
Drying pottery takes its own time and effort, and you can benefit from this with the right techniques as well.
Painting Clay
You can paint the clay with either acrylic or latex paint if it’s air-dried and you want to add color to this. It’s important that you choose the right options for this, and make the right decisions when painting the clay.
There are various types of painting options available, which you can use to make your ceramic ware dazzle. Following are some of the kinds of paints that you can use easily to give your pottery a unique touch of yours:
-
Acrylic Paints: There are many acrylic paints available in the market, which you can easily choose for painting your pot. They are durable and water-proof, and most importantly, very easy to apply. These paints also come at an affordable price.
-
Ceramic Paints: These types of paints are specially meant for potteries. Available in multiple vibrant shades, the ceramic colors are easy to apply and entirely safe for use. Also, they don’t require too much of coats to bring out the bright shades.
-
Chalk Paints and Mica Powders: Chalk paints and mica powders are ideal for painting your clay pots. These kinds of paints bring out a chalky texture on the pottery surface and make it look great in beautiful hues. You can create a wide range of shades with this painting technique. These elements are quite readily available at any craft store.
-
Colored Markers and Pens: There are different types of colorful markers and pens available at the shops that you can purchase to create stunning designs on your pots. These pens and markers are easy to hold and allow you to create detailed decorations easily.
-
Crayons: You can use ceramic crayons to create gorgeous decorations on the ceramic piece. They are safe to use and easy to have a grip on. Also, they are available in multiple beautiful ranges of shades.
-
Spray Paints: Spraying paint all over the clay body is another easy way to decorate your clay pot. You can use spray bottles of different colors to paint your project within minutes. The best part about spray paints is that it covers a large area quite quickly, without putting much effort. Use multiple colors of spray paints to create pretty coloring effects on your ceramic ware.
-
Colorants: You can use combustibles or chemicals as colorants while pit-firing your clay pot. Adding colorants during pit firing results in oxidation and reduction that causes the flames and sparks to imprint different colors on the pottery body. You can use any readily available natural objects, like salts or chemicals, to serve the purpose of coloring.
Some tips to utilize include the following:
-
Make sure if you are baking or firing it, the paint is safe for the kiln
-
Some paint doesn’t require firing, so it might be a good option
-
Choose a paint that fits the temperatures since air-dried clay can’t really be fired, and you may not want to use a paint made for that
-
Put the paint on with either brush, sponges, or other sorts of techniques
-
Let this air dry according to the directions that you have
-
If you’re going to kiln fire for eating and drinking, use paint and sealant all over that and then you can fire after it’s all dried
-
If you’re using a kiln, and you’re painting, use a glaze to completely seal all of this
Painting adds that extra touch to your pieces, and while it is something that might be a bit optional right now, you’ll be able to truly benefit from this if you’ve got the right sorts of ideas in place to make it look good. Some people can do it after if it’s oven-baked, due to the texture of it, and that’s something that’s ultimately up to the person to decide, and it’s something that you can choose for yourself.
Glazing the Clay:
Painting your clay adds some beautiful decorations to your ceramic ware, which increases the aesthetic value of your piece. But applying some glaze on your ceramic piece is not only going to decorate it with beautiful color effects, but also make your pottery water-proof and durable. The fusion of complex compounds on the pottery body provides the ceramic ware with a durable protective shield that upgrades the texture of the surface, thereby making it food-safe.
Though it takes a bit long time and patience to learn the technique of glazing, it becomes quite fun, once you are good with the tricks. Add a complete touch to your ceramic ware by applying glaze to it. The process may seem a bit difficult at the beginning. But all you need to do is understand the basics about glazing first, then go on experimenting with different colors, effects, and multiple glazes.
Nothing is much difficult, once you grab the interest in it. So, start with easy steps first, then slightly move on to conquer the difficulties. Here is how you can simply apply glazing to your ceramic ware, on your own, in your home’s comfort.
-
Take an unglazed bisque-fired clay pot. A bisque-fired clay is ideal for applying glazes, as it has an apt absorbent surface, which helps to absorb the glazing mixture quite quickly, and that too without harming the clay.
-
You can buy pre-mixed glazes, or you can make it on your own. Remember to gather all the necessary glazing compounds from your nearest store. Choose the glazing elements based on what kind of color and effect you want. Also, choose your compounds smartly, if you want to make your pottery food-safe.
-
You need to use compounds like silica, Wollastonite, alumina, etc. to prepare your homemade glazing mixture. The ingredients, however, vary from one glaze to another. Here is a glazing recipe, we are going to share with you. In case you are a beginner, you can start with it:
Ingredients |
Measurement in percentage |
Measurement for 2kg batch |
Calcium borate frit |
10 % |
200g |
Soda feldspar |
35 % |
700g |
China clay |
20 % |
400g |
Wollastonite |
20% |
400g |
Quartz |
15 % |
300g |
Total |
100% |
2kg |
-
Then you need to take a large container and pour all the glazing compounds into it. Mix all the ingredients properly with the help of a spatula. Add water if needed. Whisk the mixture properly and let it sit overnight for 24 hours. After that, check if the mix has settled completely. Once it has settled, you need to whisk it again. Make sure your mixture has developed a creamy milky texture. The consistency of the mix must not be too thin or very thick.
-
After that, you need to prepare your ceramic for glazing. Take sandpaper, and rub it onto the pottery surface to make it smooth and even. Then, sponge it with a slightly damp cloth or piece of a wet sponge to make sure that there is no oil, dust, or debris remaining on the ceramic surface.
-
Now, it’s time for applying the glaze. Stir the glazing mixture properly, and then apply it to the clay body. You can use paintbrushes to apply the glaze on the ceramic wares. Or, you can opt for the method of dipping and pouring to cover the entire pottery surface with glaze adequately. Make sure you have applied the glazing evenly on the whole pottery piece.
-
Then let the clay pot become dry for some time. If you are thinking of adding more layering, then add another coat of glazing, once the first coating is completely dry. Repeat the process for as much layering as you want to add. Finally, let the glazing sit for some more time to become completely dry.
-
Finish it up by firing your glaze inside a kiln. You might not have a kiln of your own, as it is quite expensive to buy one. But considering your regular home oven is not going to help you much. It is so because the temperature of your oven is not enough for fusing and oxidizing the glazing chemicals. So, it’s better to seek access to a public kiln. You can fire your glazed ceramic ware there at the required cone, after considering the right temperature for it. Also, for your own safety, never forget to maintain all the instructions properly while firing.
So, this was a short glimpse of how you can easily glaze your pottery piece at home. The process is not that intricate. You just need to be patient while glazing. It may take several attempts to achieve perfection in this task. Follow the proper instructions to achieve excellence in it.
However, following the key instructions only are not going to help you. There are various small tricks and tips that you need to master to avoid making any kind of mistakes in glazing. Here are some of the vital tips that you need to keep in mind while opting for glazing:
-
Always consider using gloves to avoid direct touching the glazing ingredients. They might cause harm to your skin. Also, if there is any dirt present in your hands, it will get incorporated into your glazing mixture, thus, ruining it.
-
Wear a mask while rubbing the surface of your ceramic ware with sandpaper. The dust might cause harm to your respiratory tract.
-
Make sure that the equipment or tools you are using for the glazing purpose are completely clean. Unclean tools might contaminate your fresh glazing mixture.
-
Before applying glaze on the pottery body, always make sure there is no oil or dust left on it. Clean it with a damp cloth before moving on to further processes. If oil or dirt persists on the ceramic surface, it might not allow the glaze to stick to the surface properly.
-
Apply the glazing mixture uniformly everywhere to avoid unevenness or thickness. Always start with glazing from the inside of the pot, and then move to the outside area to avoid any mess.
-
Always consider applying the next coating only once the previous one is completely dry.
-
Your glazing mix must not be too thick or too thin; else it can promote crazing on the pottery surface.
-
It is essential to stir the glazing mixture properly before applying it to prevent any crystal formation or bubble creation.
-
Don’t add too much water to your glaze. If your glazing mixture becomes too runny, it might stick to the kiln surface, which will break the clay pot.
-
Try to avoid using too much lead, as it is extremely harmful and toxic. A considerable amount of lead in your glazing mixture can be allowed to make your ceramic ware resistant to acid attacks. But too much use of lead is going to increase the toxicity of your pottery piece. If you want to make your pottery food-safe, then you should strictly avoid using lead in your glazing mixture.
-
Consider drying your ceramic ware totally after applying the glaze. Even if a little amount of moisture is present, during firing, it is going to cause an explosion. Thus, it can cost you the breaking of your pottery piece, ruining all your efforts. So, make sure your clay pot is completely dry before placing it in the kiln for firing.
-
Choose your glaze based on the type of clay that you are using. If the firing temperature of your clay doesn’t go compatibly with the firing temperature of your glaze, it will crack your ceramic ware.
-
Always understand the right temperature for glazing. Know the maturing temperature of your glaze correctly, as it varies from one glaze to another. Go through the instructions provided by the manufacturer of the clay and glaze properly, before firing your glazed clay pot.
-
You can also consider using overglazing to make your pottery piece much more durable, and it will also provide a shiny appearance on the surface.
These are a few things that you must consider while applying some glaze on your ordinary ceramic piece to make it an extraordinary one. Also, feel free to experiment with multiple numbers of glazing and ingredients. There does not exist any hard and fast rule about glazing. So, everything depends on adding your own authentic touch.
Cautions to Consider
With all of these, make sure to exercise a few cautions here and there:
-
Know your materials and read the directions
-
Understand that the kiln you’re using is hot, so you should be careful
-
Be careful when shaping clay so you don’t hurt yourself
-
Research and know what chemicals are in everything you’re working with
-
Don’t be afraid to ask for help if needed
By following this, you can create some amazing pottery, and ultimately make it the best thing that you’ve ever put together.
You can Make Your Own!
Lots of people are benefitting from making ceramics at home, and this post told you how to do it, and any other considerations you may have. If you’re looking to get into pottery, and you’re worried about whether or not what you’re making will create the right impact that you want, the best thing for you to do, is to work on this and try to make the best pottery possible. Pottery can be done at home, especially if you’re someone that doesn’t want to go out to a studio and spend money, and sure enough, if you’re learning the hobby, you can make your own quite easily, and you’ll be able to craft wonderful pieces from this too.


