Glazing your ceramics is undoubtedly exciting! Especially when you plan to do it at your house, it is absolutely a great idea as you get more time for experimentation than too at home’s comfort. Also, if you are a beginner, then glazing your pottery at your home gives you more opportunities to get better at it.
But glazing ceramics at home brings forth a few problems too! Issues like unavailability of all the required ingredients, not getting access to a high range of temperature, etc., turn up when you try glazing at home. However, these must not refrain you from trying glazing at your home.
So, here is how you can do it.
How to glaze your pottery at home?
Glazing your ceramic at your home is not much different from the way you do it at your studio. The initial steps are almost the same here.

Allow your greenware to become bone dry:
In case you are not working with bisque-fired pottery, you need to allow it to become totally bone dry before you opt for any glaze application. After forming the pottery, let it rest for a few days until it becomes totally dry. Keep checking the pottery. If it feels cold to touch, you need to allow ut to sit for some more time to become completely dry.
Prepare the glaze mixture:
Before applying the glaze, you need to ensure that you are preparing a properly textured glaze mixture. Mix all the ingredients of the glaze and then mix it using a spatula properly. While mixing the glaze mixture, ensure that there is no crystallization of the components. Ensure seven mixings to get rid of all the bubbles or lumps. Then you need to let it sit for 24 hours. After that, again, whisk the glaze mixture and make it pass through a sieve to get rid of any solid particles. You can use readymade glazes like Mayco Stroke and Coat Wonderglaze for Bisque Set for better glazing results.
Application of the glazing:
As you are done blending the glaze mixture properly, you need to apply it evenly on the ceramic surface.

Here is the various application method that you can use to cover up your pottery surface. Have a look.
Method |
How to do it? |
Brushing |
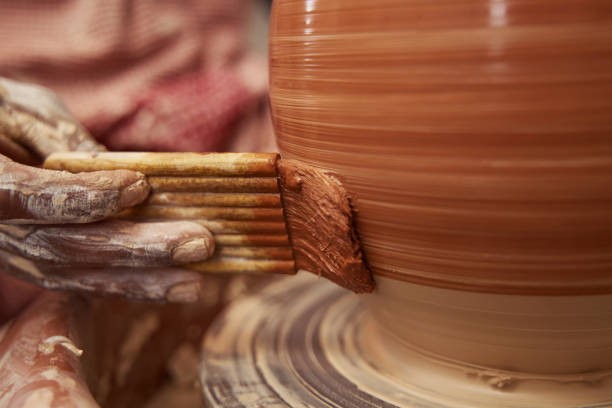
The simplest way to apply a glazing mixture to your pottery surface is by using a brush. There are a variety of brushes available. You can pick any size based on the size of your ceramic. Start with evenly applying the glaze to the ceramic body. In case you are thinking of working with multiple layers, apply one layer first and let it become adequately dry before applying the second layer. |
Dipping |
Dipping is also a very effective and easier way to apply glazing to your pottery. You can use a tong to dip the pottery piece in a bucket of the glazing mixture. |
Spraying |
Spraying is another very effective way to apply glazing to your pottery. You can use a spray bottle and spray it evenly on all the areas of the ceramicware. However, it is a very messier technique compared to the other ones. |
Drying the ceramic:
As you are done applying the glaze, you need to ensure that you are drying it properly. As you are done with applying the glaze, let it sit for one or two days to become completely dry, or else it can react abnormally when it comes in contact with the high temperature. It is why it is essential to dry your glazed pottery evenly.
How to glaze ceramics at your home with a kiln?
If you want to make your glazed ceramic compatible to get used for food and drinking purposes, then opting for a kiln is the best way to ensure the firing. However, it may be difficult to have a kiln at your home as it is too costly. At the same time, it is riskier enough to install a kiln at your home that works at a very high temperature.

But there are options for you to pick from. You can either take note of your nearby public kiln. It is a very cost-effective and safe way to fire your glazed pottery. Or, if you solely want to complete all the procedures at your home, then you can simply buy a used kiln. Second-hand kilns are not so costly.
Also, you can buy small domestic kilns that are safe enough to use. All you need to do is do the wiring and connect it to the power using the standard socket. Also, pay attention to the temperature range of the kiln. On the other hand, if you are not bothered about the price factor, then you can merely buy a new kiln. Just put your pot inside the kiln and let it fire for the required time until the glaze reaches maturation.
Considering a home oven for glaze firing:
In case you want to create ceramics for decoration purposes, then opting for the home oven is enough. Though the home oven is not going to give you the desired result you can get from a kiln, it is good enough for beginners.
While using a home oven, ensure that you are preheating it properly before keeping your glazed pottery inside it. Make sure you are firing small ceramics inside the home oven. It may take 45-60 minutes for your glaze to become properly fused inside the microwave oven. After firing, do not open the oven immediately. Wait for some time for the microwave to become cool to avoid breaking your ceramicware due to rapid thermal change.
Conclusion:
Glazing your pottery at home is the best idea to get your pottery projects done with proper comfort. However, make sure that you are not using many complex glazing mixtures that require too high a temperature to get the maturation range. It is also recommended to fire your pottery at a public kiln, as buying a kiln at your home may come with various risks.
Moreover, if you are using the oven to fire your pottery, make sure you are not using it for food and drinking purposes. So, go on glazing ceramics at your home as much as you can.
Happy sculpting!

