There are many ways to make decorative clay pots and coffee mugs at home. If you have the right equipment in your home, then you can easily do your job exactly the way you would have done it at a professional studio. Starting from clay preparation to the final decoration of the pot through glazing or painting, all can be achieved right at your home. However, you must not expect excellent quality pot while doing the entire pottery crafting process at home, but you would get a somewhat satisfactory outcome.
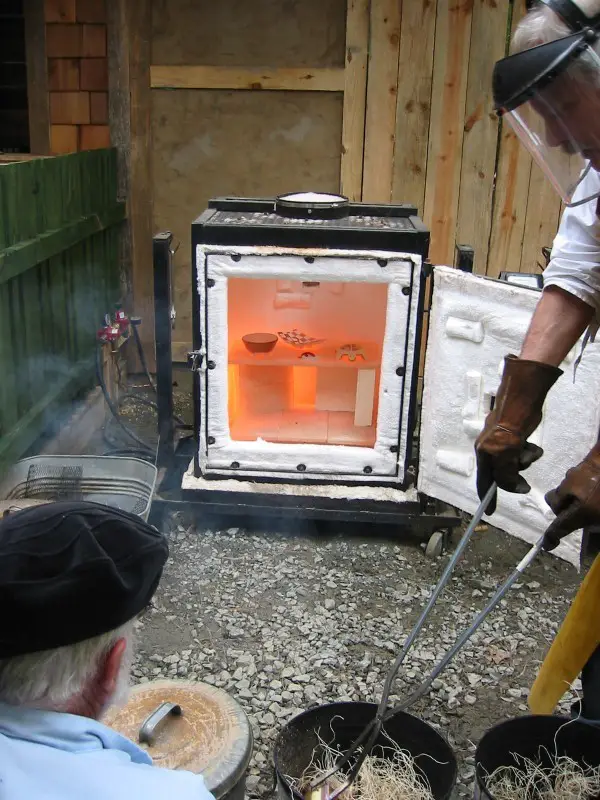
Now, to make a food-safe pottery piece, like a coffee mug or cup, you would have to access heavy firing; because without the adequate firing of your clay, it won’t turn into ideal ceramic ware. A basic clay work requires a firing temperature of cone 5-6 or 1200°C to turn into a ceramic. Serving this hot temperature is only possible by a kiln. A home oven can’t even reach up to that temperature.
Nevertheless, if you still try to achieve that high-temperature range forcefully on your home oven, you would end up either ruining your entire pottery piece or destroying your home appliance. So, in this article, we will discuss why it is essential to fire your clay and glaze at a high temperature inside a kiln to make it food safe. Also, we’ll talk about a few alternative ways that you can try, if you don’t have access to any kiln. So, let’s get started.
Why is Kiln not Accessible to All?
Potters, who work on a large scale, have easier access to kilns. However, there are public kilns available for rent, where potters can fire their ceramics anytime. But for that, the amount of money they have to pay is too high. Also, paying such a high cost won’t be worth enough unless you have enough items to fire. Spending a large sum for firing a smaller number of pottery items won’t be budget-friendly.
So, here lies a problem, especially for those who want to do ceramics for their personal use and decorative purposes or gift their handmade cups to someone as a token of love. It is not always possible to get access to a public kiln. Also, buying a kiln of your own is an expensive solution. Besides, handling a kiln, many safety-related issues are to be considered at home.
But all these problems can be solved partially by using a home oven to fire your clay objects at your home. But it won’t be sufficient to create a wholly food-safe and durable enough pottery. Especially if you want to glaze your pottery, a home oven won’t help much. Home ovens are mainly made for crafting minute projects, and they won’t be suitable to be used for food-safe and dishwasher-safe purposes.
So, when you want to make strong and food-safe pottery, you would need to fire your clay body at a high enough temperature to let the clay and glaze go through some changes like shrinking, oxidation, reduction, fusing, and many more. And achieving these characteristics in a home oven would be nearly impossible.
Everything You Need to Know About Firing Your Clay in Regular Oven:
It’s fine if you want to make little mugs or bowls at your home. If you are a beginner, it’s better to learn to build potteries at a lower scale, as you must not want to spend a lot of money on buying equipment and ingredients. So, starting with a little amount of clay, and working on miniature projects would be quite helpful. Especially if you intend to make pottery for your personal household use or to gift someone, it would be better not to spend much money. But again, firing pots at a higher temperature is imperative to craft food-safe pots.
Why Firing at a High Temperature is Important for Your Clay?
Now let us know the reasons why firing your clay demands for high temperature as that offered by a kiln.
- The firing gives the initial soft clay, a robust, hard, and durable transformation. A clay piece can survive for ages if it meets adequate firing requirements. In other words, firing gives the clay piece a longer life, which makes it remain intact for years.
- A typical soft clay or hard earthenware turns into ceramic ware, only after it is fired at a high enough temperature of about 1500° F and more.
- Firing makes your clay piece highly resistant to water and prevents turning it into a soft clay lump again. No matter how much time you leave your wet clay to become super dry and rock hard, it can be still brought back to its soft condition by putting in a little effort. You can break the dry clay at any time and soak it in the water to make it muddy again. But once your pottery comes across the fire, your clay won’t become too runny again while coming in contact with water.
- Firing eliminates the water and moisture content present in the clay and makes it dry completely.
Here are the different stages of firing and what they do to your clay pot.
| Firing Stages | Temp | Changes that happen |
Bisque firing | 660°F | Water present in the clay starts evaporating, after breaking off the chemical bond. |
| 930°F | The clay becomes completely dry, as it turns into a completely dehydrated structure. At this moment, the characteristics of the clay change forever and transform into ceramic ware. | |
| 1730°F | The clay becomes hard enough and less fragile. It remains a little porous to absorb the glazing compounds. | |
Glaze firing | Cone 6-8 | Once you have applied glaze on your bisque-fired pottery, it needs to undergo firing again. So, many chemical changes, fluxes, and fuses happen at this stage, which makes the clay food-safe and waterproof. |
Is It Possible to Get the Same Temperature as That of the Kiln in a Home Oven?
It is obviously not possible to get the same temperature in a home oven as they are explicitly designed for domestic usage purposes. You can’t create that high temperature at your home without meeting any risk. A kiln can generate more than 2500°F temperature, whereas a home oven can reach up to a maximum temperature of 1000° F.
So, firing in a home oven won’t bring much-required changes to your clay, that firing at a high temperature inside a kiln would do. You won’t be able to create strong and durable ceramic ware at your home using a regular oven to fire the clay.
What is the Alternative to Firing Pottery in a Kiln?
Though your home oven won’t give you the satisfactory result that a kiln can provide, you can still count on it for your little projects. If you need to create small school projects or little projects for personal use, then you can use your regular oven for baking the clay. But those projects won’t be able to withstand rough usage.
So, if you are considering using an oven for firing, then you need to follow the right steps to do it. There are a few correct techniques to fire your clay at your home comfort if you want a reliable result. Let’s talk about how these tactics in detail.
Here are the steps that you need to follow to oven-fire your clay.
Make sure your pottery is dry:
Check if your clay is completely dry before placing it in the oven. Once you are done with shaping your clay, leave it for the required time to get dry. When your clay turns leather hard, there exists still a small amount of water in the clay, which can react in an unfriendly manner when heated. Touch your clay to feel if it’s totally dry. If your clay still feels cold, then you need to let it sit for some more time to let the remaining dampness evaporate totally. Once your clay is bone-dry, you can proceed further to make your pottery ready for firing.
-
Put the pottery piece in the right manner inside the oven:
You need to keep your pottery inside the oven in the right way. No matter what you are firing, whether it is a coffee mug or bowl, always place that upside down on the oven rack. You might need to set your rack correctly to make sure that there is enough space for your stuff to get fired. Besides, it is essential to distribute the same amount of heat throughout your pot to prevent cracking due to uneven heating. Putting the pottery upside down distributes an equal amount of heat everywhere in your pot.
-
Use Parchment Paper:
When placing your pottery piece inside the oven, make sure you place parchment paper on top of the baking tray to ensure that it doesn’t stick to the same. This will also help you remove the paper with ease and ensure that the piece is baked evenly on all sides. Make sure you use high-quality parchment paper that can handle high temperatures with ease. The Baker’s Signature parchment paper is designed to reduce any curling or burning that happens during clay baking. This non-toxic paper comes in a convenient size to help set with ease on your baking tray.
-
Set the required temperature for bisque firing:
For bisque firing your clay in a regular oven, you need to set the temperature at 325°F to dry the pottery entirely after baking. Set the temperature and allow it to sit for about 30 minutes inside the oven for heating. Firing at this temperature will bring the necessary changes into the clay, which will allow you to take a few steps ahead to turn your clay into ceramic ware. Based on the thickness and size of your pottery, you would need to decide the heat time. If your pottery is thick enough, then you might need to set it inside the oven for more than 30 minutes.
-
Replace your pottery from the oven:
Once you are done with heating your pottery inside the oven, you will need to turn it off. After 30 minutes or more, turn off your home oven and let your pottery sit there for some more time until your oven cools down. Taking out the pot right after heating might lead to the cracking of your piece, because of the sudden temperature change.
Also, it is not safe to put your hands inside the hot oven to bring out your baked pot. Wait for 10-20 minutes after turning off the oven, and then replace your pottery from it using a potholder. Also, do not forget to wear a mitten glove and protect your hands from getting burnt off. You can use IXO 6Pcs Oven Mitts and Pot Holders to take out your fired pottery piece safely from the home oven.
How to Choose a Low-Temperature Clay?
For baking your coffee mug in a regular home oven, you need to choose a clay that is compatible with low temperatures. Any usual clay is not going to withstand that much lower range of temperature. They have much moisture content and building particles in them that require high enough temperature to reach the maturation stage to become ceramic ware. That is why it is very crucial to choose a low-temperature clay to work on little projects in your home oven. Here we’ve given a temperature guide to display the various temperatures required for particular types of clay.
| Clay type | Bisque firing temperature |
| Polymer clay | Less than 900°F |
| Earthenware clay | 1000°F |
| Stoneware clay | 1200-1500°F |
Depending on the temperature variations, choosing polymer clay for your oven baking will be an ideal choice. Polymer clay is a plastic-based clay, which reaches maturation at a low set of temperatures. You can bake your polymer clay pottery in a regular oven at around 260-325°F to bisque fire the pot. It will take 20-30 minutes for the polymer clay to become a bisque-fired one, based on the thickness of the clay body.
However, you need to keep in mind that all these clay variants might not be food-safe. This is especially true for polymer clay which is made of plastic and various other materials. So, ensure that you don’t use them as coffee mugs.

Things to Know Before You Start Glazing Using Your Home Oven:
Glazing your pot is pretty essential, as it gives your ceramic piece a finishing touch and a beautiful appearance. There are more than thousands of glazing recipes to create multiple shades, color palettes, and texture effects. Once you are done with bisque firing, you need to glaze your pottery, which is followed by another firing session. Though you can leave your pottery, and remain unglazed after bisque firing, some benefits make it worth glazing your piece. Here’s why you need to glaze your pottery.
- There are multiple variations of glazing colors and effects like glossy, matte, satin, shiny, transparent, etc. And this is what varies from potter to potter, which makes every pottery piece unique. Giving a beautiful and different attribute to your pot is the primary purpose of glazing.
- Glazing works as an additional coating on the pottery body, which provides it with extra protection and support to stay sturdy.
- After bisque firing, your pottery remains partially porous, which allows it to absorb much water. Glazing blocks those pores and makes sure that your pottery becomes completely waterproof, which adds to its durability.
- Most importantly, what glazing does to your pottery is that it makes your pot food safe. After glazing, you can make use of your pottery for eating food and drinking purposes.
Now, these are the benefits that glazing lends to your favorite pottery piece. But your glazing won’t be able to do any of these if it is not fired at a high enough temperature. To reach the maturation stage, you need to set your kiln at 2200-2300°F, which will eventually allow the glaze to melt properly. But generating such a high heating temperature in a regular home oven is not at all possible.
Here’s why firing your glazing at a high enough temperature is extremely important.
- After meeting the high temperature, the glazing reaches its maturation stage, which allows it to stick correctly onto the clay body.
- While firing, glazing undergoes fluxing and fusing of chemicals that ensure the toxic compounds eliminate their harmfulness from the pottery.
- The more you fire it, the more it contributes to the durability of both the clay and glazing.
- A glazing mixture contains a lot of silica, which doesn’t flux properly until it meets high temperature. Firing at a high temperature allows the glazing to become food-safe after fluxing harmful chemicals like silica, lead, etc.
Is It Possible to do glazing in a Home Oven?
Well, it is not entirely impossible to glaze your pottery in a home oven as an alternative to the kiln. If you don’t have access to any kiln, then you are left with no choice but to rely upon a home oven for firing. But you must follow a few simple steps to glaze your pottery in your home oven.
-
Even Application of the Glaze:
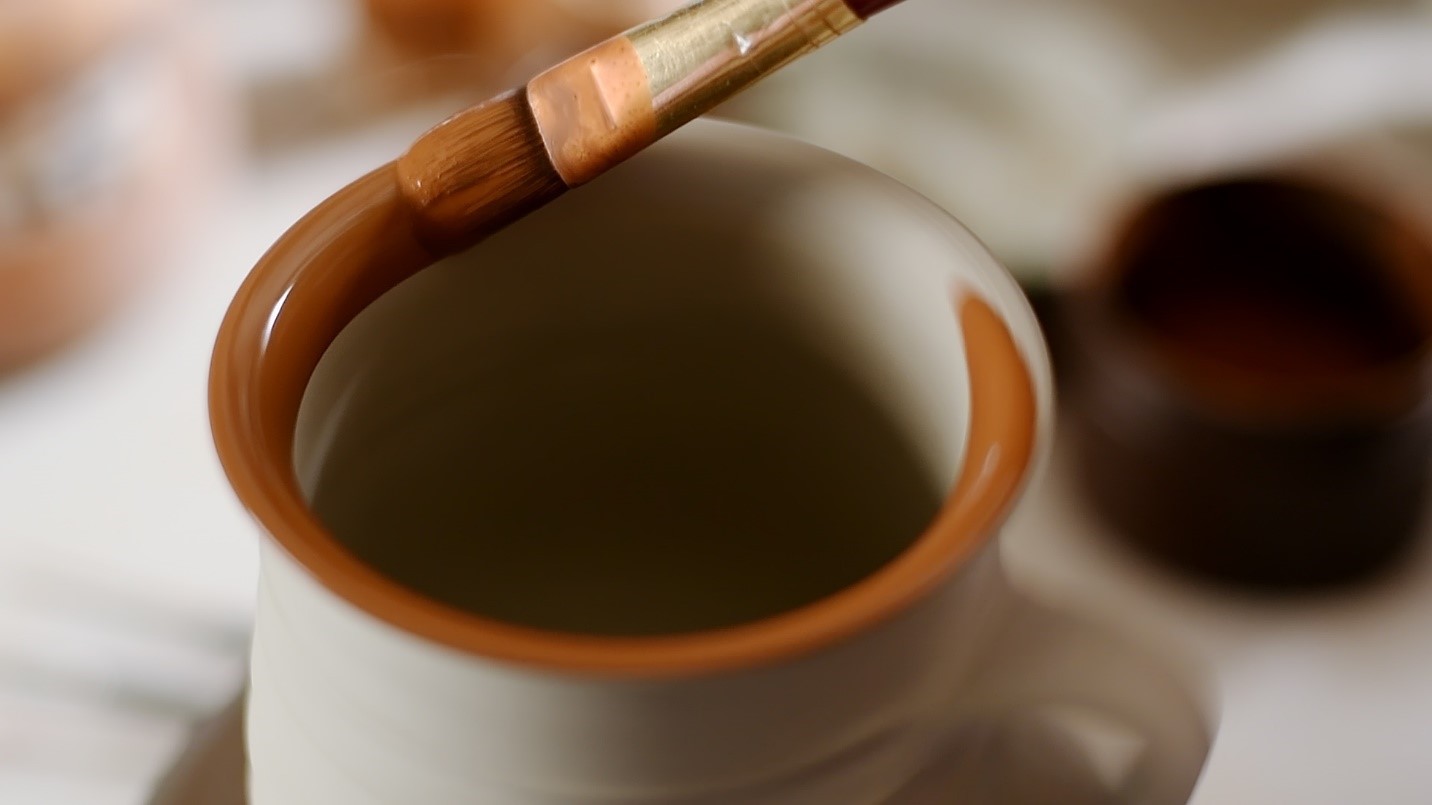
First of all, you must apply the glaze all over the pottery body evenly. If the glazing is not spread everywhere on the bisque-fired pot surface with the same amount of thickness, then the glaze won’t adhere to your piece adequately. It will gradually lead to the formation of uneven surfaces and cracking of the glaze, post-firing. So, ensure that you are using the right methods to apply glazing to your pottery piece. The glazing mixture must not be too thick or very thin; it should have a creamy consistency.
To ensure that the glaze is spread out evenly, make sure you use the right brush for glazing purposes. The Sterling Edwards glazing brush comes with a convenient curve to help you get a firm grip when applying the glaze. Its resin material doesn’t break off easily even with daily use.
-
Make Sure Your Glazing is Completely Dry Before Firing:
Once you are done applying the glaze, let it sit for 24 hours or more to become completely dry. Even a minute amount of moisture content in the pottery body might lead to the explosion and breaking of the ceramic ware. So, it is better to make sure that the glazing is completely dry before you put your pot inside the oven.
-
Place Your Pottery in the Right Position and Set the Required Temperature:
Take your dry glazed pottery and put it inside the oven at the center of the oven rack. Adjust the rack and make enough space for your pottery to get appropriately heated. We have already said that it is vital to distribute the heat evenly about the ceramic ware to let the pot become heated properly from every nook and corner. The same thing goes for glaze firing too.
You need to place the pot upside down to distribute the heat evenly. The process should be followed by setting the right temperature for the oven. Set the highest temperature of your oven, as the chemicals present in the glaze need to go through some critical changes. Allow the ceramic ware to stay inside for 1 hour or more.
-
Take Out the Pottery from the Oven:
Once the glaze firing is over, turn off the oven, and allow it to reach the normal room temperature. After 20-30 minutes, open the oven door and replace the pottery piece from the rack using a holder to avoid burning your hands.
-
Consider Re-Firing:
If you are thinking of putting another coat of over-glazing, then you have to re-fire your pottery. Choose a pottery glaze suitable for your piece, apply it as an overglaze, and then follow the previous steps. Once your pottery is dry, allow it to go for another session of firing inside your oven to adhere to the glaze onto the pottery body nicely.
Note:
- Firing in a regular oven after glazing can’t make the glaze reach an accurate maturation level.
- It won’t give you a satisfactory finish or a durable result. It will only help you understand the technique of glazing in the beginner stage.
- There’s no way to get success while firing silica glaze in your home oven. Here are some of the substitutes that you can use.
| Coloring compounds | Final Result |
| Enamels | These give a glazing-like effect and don’t contain any silica. |
| Acrylic paints | They are quite easy to apply using a brush on your pot’s surface. Also, multiple bright colors are available in acrylic paints. These colors are safe to use in ovens. |
| Pigments or mica powders | These refer to other coloring compounds, which can be easily applied on a pottery body to get bright and colorful shades like glazing. |
Please note that none of the techniques mentioned above will give your pottery food-safe glazing. Alternatives are only applicable to give your pottery aesthetic satisfaction. Or you can consider using those pottery pieces for decoration or other purposes. There’s no alternative to making food-safe pottery in a regular oven unless you fire it at a very high temperature after applying a lead-free glaze.
Why Firing in an Oven Cannot Make a Food-Safe Glaze?
While firing a glaze in a kiln, it meets a higher temperature, which is more than 2000°F. At this high temperature, the glazing compounds go through several transformations. The chemicals present in the glazes undergo oxidation, reduction, fluxing, fusing, evaporation, and so on. These several changes gradually benefit by eliminating the harshness of those chemicals from that pot.
At the same time, this allows the glazing to adhere to the pottery surface permanently so that it doesn’t come off while using the pottery for the long term. Also, the clay gets a waterproof shield and becomes food and drink-safe. But firing in a home oven doesn’t meet that temperature, At the same time, this allows the glazing to adhere to the pottery surface permanently so that it doesn’t come off while using the pottery for the long term. Also, the clay gets a waterproof shield and becomes food and drink-safe. But firing in a home oven doesn’t meet that temperature, which reduces the chance for the glaze to undergo all these necessary changes. That’s why it is important to fire your pottery glaze inside a kiln to make it food-safe. And the regular oven can’t be a substitute for producing food-safe pottery.
ch reduces the chance for the glaze to undergo all these necessary changes. That’s why it is important to fire your pottery glaze inside a kiln to make it food-safe. And the regular oven can’t be a substitute for producing food-safe pottery.
Conclusion:
So, if you are a beginner or love to create your pottery items at your home for your personal use, then using a home oven might help you to some extent. But having access to the kiln is very important to make your coffee mugs or cups food-safe and durable. We hope that this article will be beneficial to you.
Happy sculpting!


