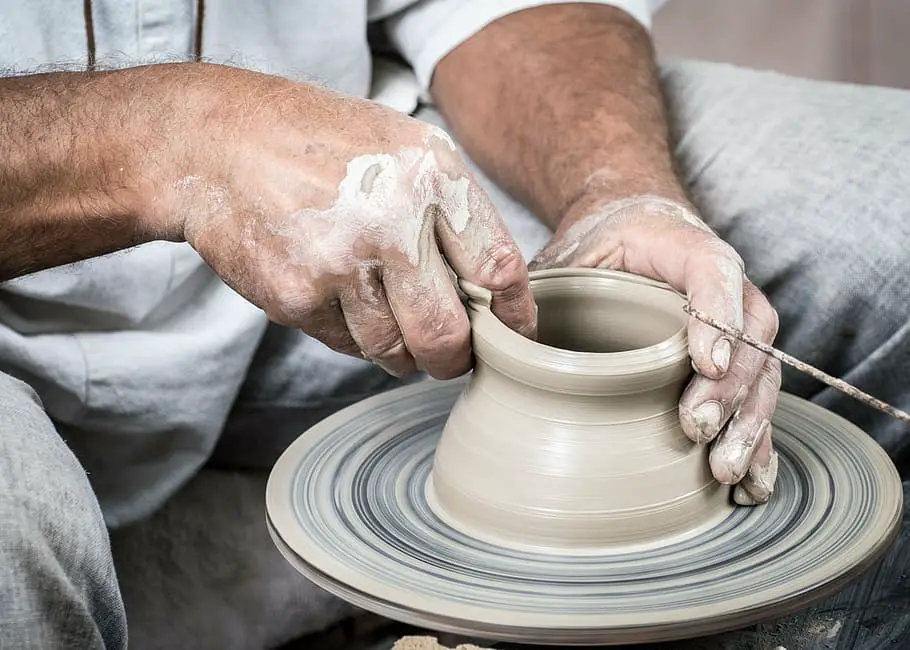
While working with pottery, several troubles show up to ruin the situation and your efforts. Starting from throwing the clay onto the pottery wheel to ending up firing the clay inside the kiln, you may face problems at any time. So, to prevent the issues, you need to be careful and attentive enough in every step you take while making a pottery piece. No matter whatever the ingredients you might be using, if the process of implementation is not appropriate, then it will ruin your entire project.
Pottery making is skill-based work. The more you practice it, the higher the chances of achieving perfection in the job. However, for that, you need to learn and practice each step correctly. While making a pot, you might face many problems like decentering of the clay, asymmetric pottery body, or even your pottery might become lopsided. Though it’s quite frustrating to face such issues, there are specific ways in which you can fix them. In this article, we are going to tell you the solutions on how to prevent pottery from getting lopsided every time.
Problems that occur, when your pottery gets lopsided:
While working on a potter’s wheel, if you follow an incorrect technique, the wall formation of your pot might be wrong. It might turn out to be uneven or crooked. No matter how much you try to make it stay in the right shape, it won’t. Once the pottery build gets lopsided, it becomes too frustrating to tackle the piece further.
Here are the problems that occur when your pottery piece gets lopsided.
- The clay body adapts an uneven structure.
- It looks as if a significant amount of clay has gathered on one side only.
- The perfect cylindrical structure of your pot turns out to be an imperfect one.
- It’s difficult to trim your lopsided pottery.
- The entire project looks a mess unless you find beauty in an asymmetrical structure.
What are the reasons behind your pottery getting lopsided?
Well, there are many reasons behind your pottery getting the wrong shape. In case you are a beginner potter, then you are going to face these issues quite often. Both the ingredients and techniques that you are using might make you suffer from these troubles. The following are the reasons that make pottery lopsided:

1. Choosing the Wrong Clay:
The type of clay you are using decides everything about your pottery project. No matter how much effort you give to form the pot, if the clay is not of top-notch quality, then you will have to struggle with it. The substances present in the clay, its plasticity, and its drying capacity; everything influence your pottery project.
Besides, the amount of clay you are using for your pot also plays a vital role in providing an appropriate shape to the piece. Additionally, your clay must have a moderate consistency, neither too thin nor too thick, to be able to hold the overall weight of the pot. In this regard, make sure that your clay is homogeneous and maintains the same consistency throughout. Otherwise, uneven areas can also lead to irregular shapes resulting in higher chances of getting your pot lopsided.
The following table will give you a brief idea of the wide varieties of clay and their properties that can be used by either beginners, experts, or both.
Clay | Suitable for Whom? | Properties |
| Porcelain | Professional Potters | It has low porosity and elasticity, a high level of mechanical resistance, and high density, and is considered to be quite hard. |
| Earthenware | Beginners | This clay comes with high plasticity and is suitable for throwing, sculpting, and hand-building. Also, it is malleable and holds its shape, thereby preventing your pot from getting lopsided. |
| Polymer | Beginners and Professionals | It is incredibly soft and contains no typical clay minerals. Also, it is perfect for strong and detailed sculpting. |
| Stoneware | Beginners | It’s tough, plastic, and thus, holds its shape and remains non-porous even after firing. |
| Ceramic | Professional Potters | This particular clay has excellent hardness, strength, durability, and low electrical and thermal conductivity. Also, it’s unreactive to other chemicals. |
2. Moisture in the Clay:
Now, it is a prevalent problem, which is even known to beginners – the water issue in clay. If there is too much water in the clay, it will cause you trouble while throwing it on the wheel. If you can’t throw it accurately, it will eventually bring down the process of clay centering and pulling. At the same time, the lack of required moisture in the clay also hampers the process.
3. Improper Coning of the Clay:
Coning the whole length of the clay is one thing that many people overlook while centering. If the bottom of the clay cone is not narrowed down, it can affect the diameter of your pot and lead to being lopsided. Uneven finger pressure on the cone leads to a lumpy off-centered base and can arouse the problem while you begin to open up the clay. Any form of wonkiness in the bottom can destroy the shape of your piece as you start to structure it.
4. Wrong-Way of Centering by Pushing the Cone Down:
Even if your clay is good and has an appropriate moisture content in it, then also you might face problems because of the wrong way of clay centering. If you don’t center your clay correctly, it will tend to fall off the wheel. Besides, it would also become challenging to build a structure out of improperly centered clay.
Also, pushing the clay mushroom cone down with extreme pressure can make it go off-center or store water underneath. It affects the entire process by ripping off the clay while doing pulls or coning it up.
5. Not Controlling the Speed of Your Pottery Wheel:
It might sound natural, but as you increase the speed of your wheel, the more it becomes more difficult to control your clay. However, it must not be even spinning too slow as it can come up with other issues then. Opening or lifting the pot faster can put a lot of pressure on the clay body, tearing it off or making it go off-center. Not only this, if your hands move faster than the wheel, then it can create an unwanted spiral shape in your clay body, which can get lopsided eventually.

6. Improper Clay Pulling:
It is probably the main reason that promotes lopsided pottery. Besides all the secondary causes, if you perform clay pulling wrongly for the whole time, then it would lead to lopsided pots. Also, being too fast while clay pulling after centering might worsen the problem.
7. Inappropriate Technique of Opening Up:
The correct procedure to open the clay is another crucial factor to look after. If pressed directly on the clay body to begin the opening-up process, then the rotating clay might even twist your finger. And it can get your clay off-centered, which further affects the sides of your pot.
8. Uneven Glazing:
It might not be known to everyone, but too thick or too thin glaze coats can affect the shape of your pottery. Applying a thicker glaze can cause streaking of the texture of your clay body and also lead to the formation of absurd shapes.
On the contrary, too thin a glazing layer can make the glaze dry and rough, causing your pot to crack or craze. It will not only make your piece look bad after getting fired but there would be a high chance of the pottery getting lopsided on the cracked portion.
9. Air Bubble in the Wall:
Another very common reason, but one of the most crucial things to take care of is air bubble formation in your clay wall. If air gets trapped in between the clay’s wall and the wheel, then the head of the pot might get lifted up from one side, making your piece uneven. However, if you still try to throw that pot, the lip tends to get jagged, resulting in the formation of lopsided pottery.
How to Fix It?
There are no such problems regarding pottery that you cannot fix. If you do it in the right way, you are going to excel in the game quite quickly. So, here is how you can fix your lopsided pots.

1. Opt for the Right Way of Clay Centering:
You need to follow these tips to learn how to center your clay correctly.
- Always make sure your clay is sticking onto the wheel properly and is steady. There shouldn’t be much water on the wheel.
- Pat the clay ball down to make sure there’s no air trapped in the way. Then, proceed by making the clay ball surface smooth, while adjusting with your fingers, as soon as the wheel starts to spin.
- Start spinning the pottery wheel fast while centering the clay, and slow down the speed during the time of shaping its walls. Always keep your hands in the proper position while doing this step.
2. Cone Up the Entire Length of the Clay Adequately:
Below are some of the steps that must be followed to cone your clay appropriately.
- It is always necessary to include the base of the clay while coning. You can do so by starting to cone the first half-inch of the clay. And after that, move on to the next half-section and so on.
- Do not position your hands above the bottom portion of the cone. While centering, make sure that the bottom of the clay cone also gets narrower in diameter.
- Keep yourself and your hand pressure steady on the clay body. Both hands must be moved with an equal amount of pressure. You can try bracing your arms against your legs and body to stabilize yourself.
3. Know the Correct way to Manage the Wheel’s Speed:
It might get confusing sometimes to keep the wheel at the correct speed to achieve the perfect shape without your pot getting lopsided. You can slow down the wheel up to a specific limit along with your hands if you are a beginner.
However, there is no key to understanding what is the ideal speed of the wheel, and it depends entirely on the skill of the potter. So, you can keep experimenting with the wheel speed to find out how fast you can shape the clay appropriately, without losing its control.
4. Open Up your Clay Right:
You can opt for the following steps to open up your clay correctly.
- After centering your clay, don’t press your finger or thumb directly on the clay at 90o Keep it between 30 o-60 o upon the wheel head by angling your finger in a V shape.
- You must exert even pressure on both the outside and inside fingertips and move up the pot wall evenly. Keep your hands together without poking in the middle and maintain enough gap between your fingers to avoid a lumpy off-center wall.
- Always keep your thumb right above the center of the clay before beginning the opening-up process.
5. Get Your Clay Pulling Game Correct:
Here are some tips on how you can correctly pull the clay to prevent your pot from getting lopsided.
- You need to be quite steady during the pulling of your pottery clay. Don’t be impatient and hurry over while pulling the clay pot from the potter’s wheel.
- Don’t be too quick during clay pulling; instead, try to slow down the process. The speed of vertical pulling should be low enough to execute the clay-building process properly.
- Look at the position of your hands while pulling. Don’t take off your hands too quickly. Always anchor your hands one on another to ensure the stability of the clay on the wheel. Make sure you are moving your hands evenly to make every pull complete. Do pass your hands throughout the clay body.
- Always make your pottery rim thicker than its walls.
6. Choose the Right Clay:
Though it is a secondary reason in the case of lopsided pottery, using the right clay is quite crucial to get the desired results. Here’s what you should look for in clay while making a perfect pottery piece:
Properties | Importance |
| Plasticity | This property of clay decides its ability to get molded in the shape you want, along with an unbroken surface. |
| Softness | The softness of the clay must be considered to tackle it well on the wheel. If your clay is not soft, you will be facing problems to center it because of its too-hard texture. On the other hand, if your clay is too soft, it cannot be shaped adequately. |
| Wetness | This property of the clay affects its working ability. If your clay is too wet, then it will tend to become runny on the pottery wheel. At the same time, a lesser amount of moisture will not allow the clay to stick to the pot’s surface properly. |
So, always choose the right pottery clay for your project, if you don’t want your clay to turn out to be the villain in such cases. You can use DAS Air hardening Pottery Clay for a better experience.
7. Avoid Air Bubbles:
Air bubbles can destroy your entire pottery and extinguish all your efforts. Follow the below-given steps to protect your clay from air bubble formation and getting lopsided.
- Always make sure your clay is ball-shaped and smooth enough before you throw it on the wheel head. It will prevent your clay from trapping air in its walls.
- If your clay is lumpy or concave, then it’s natural that it will trap air as you throw it onto the wheel. So, to avoid it, you can stop the wheel for a while and pop those bubbles using a needle. Then fill those cavities with a lump of clay and re-throw the wall.
- Again, wedging the clay well and coning it several times can also prevent the formation of air bubbles.
8. Prevent the Clay Wall from Getting Collapsed:
You must be very careful while throwing your clay on the wheel head to avert the walls from being collapsed.
- Avoid using too much water and try to smear as little water as you can, while throwing the clay.
- Always keep your hands moving from below to the top and never press downwards. It can collapse the wall and break the shape making it a lopsided pot. Also, don’t give much time to centering and throwing. The more pressure you provide, the more the structure loses its strength.
- Give much emphasis on pulling, as the more you pull, the softer the clay becomes. But try to get your desired height within 3-4 pulls.
9. Applying the Correct Glaze Coating:
All you need to understand about the correct glazing application is whether your brushing method is okay or not. Different glazes have different properties, and that is why you should always read the instructions before using them. It will suggest to you how many coats are applicable to get the desired color, effect, and texture. Try to apply it evenly throughout the piece to provide it with uniform thickness and strength, thereby preventing your pot from getting lopsided. Also, make sure to stir the glaze well before using it.
Conclusion:
These are the temporary yet unwanted problems that every potter faces at the beginning. Pulling and centering requires a lot of effort as well as patience. Practice is the only possible way to solve this problem. So, all you need to be is persistent enough to practice the skills of pottery until you ace the game.
Happy Sculpting!


