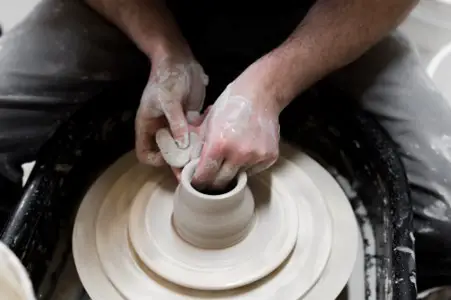
Getting started with pottery may seem exciting, and you feel thrilled thinking about the new experience. However, when you sit to begin creating your work of art, your clay doesn’t seem to stick to the wheel. Instead, the clay may keep coming off the wheel for various causes. So, even though there are no set guidelines for pottery creation, you still need to understand how clay works and behaves.
It might be an issue with your technique or a problem with the clay. Pottery takes years to perfect, and like everything new you learn, you can anticipate making mistakes as you go. One of the most crucial aspects of throwing clay on a wheel is keeping it stuck to the wheel. You don’t want to spend an interminable amount of time trying to keep the clay on the wheel.
So, here in this article, we will go through some possible reasons why your clay keeps coming off the wheel. We will also give you some much-needed tips on how to get better on the wheel. So, go ahead and check them all out!
Reasons Why Your Clay Keeps Coming Off The Wheel
Here are the top 7 reasons your clay keeps coming off the wheel.
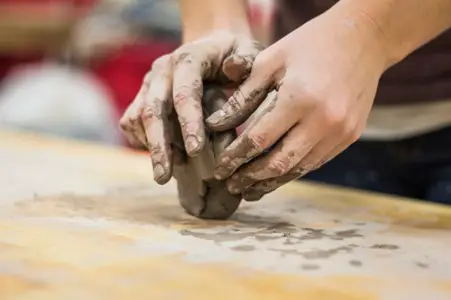
1. Not Wedging Or Kneading Your Clay
Wedging or kneading is one of the crucial aspects that you must do before beginning to work with clay on the wheel. Wedging helps remove any air pockets in the clay, allowing it to stick better on the wheel. Unfortunately, air pockets in your clay may not allow the piece to stay attached to the wheel. As a result, you will struggle to work with unkneaded clay. It may even cause a problem once you finish making the pottery.
It is not wise to try to avoid wedging your clay in the hopes that doing so will allow you to save time. Ineffective wedging might make it challenging to work with your clay or to keep it on the wheel. You can get air pockets developed in your clay if it feels like a continual struggle to keep it on the wheel.
Since air is lighter than clay, working with air pockets or a single huge one will always cause your clay to be thrown off-center. Moreover, incorrect wedging will create more air pockets rather than eliminate them. The only option is to remove it from the wheel, start over, and adequately wedge another piece of clay.
Different Ways Of Wedging Clay
Here are some ways you can wedge clay and how you can do it.
Way To Wedge Clay |
How To Do It? |
Benefits |
| Stack and Slam Wedging |
Two clay pieces are pressed down onto a hard surface after being piled on top of one another.The two original clay pieces are cut through the middle of the flattened piece.Once more smashed down, the two fresh chunks of clay are layered on one another.Repeat several times to blend the clay or give it a uniform consistency.
|
Easy to execute and learn |
| Ram’s Head Wedging |
Begin with a little clay.Press the front of the top end into the center of the clay as you rock the clay up towards yourself.Continue pressing and rolling the clay until there are no air bubbles left and it has a uniform consistency throughout.
|
Efficient for small and medium quantity clay. |
Spiral Wedging |
Similar to Ram’s head wedging.To press the top of the clay into the center, first, rock the clay back towards yourself.You may make a spiral if you keep doing this. |
Works well for a large amount of clay. |
2. Not Centering The Clay
Not centering your clay is probably one of the reasons why your clay keeps coming off the wheel. Moreover, improperly centered clay is exceedingly difficult to deal with. All the latter phases of throwing are easier to manage when you have correctly centered clay. The issue is that as you start drawing the walls thinner, any slight variations in the clay from the beginning get over the top.
Clay can occasionally appear and feel balanced yet still be slightly wrong. If that’s the case, the wonkiness will become more obvious as you work on it. Make sure your body is firmly supported as you center your clay. Some potters will tell you that you should brace your body as much as possible.
However, you must balance between pressing the clay and holding it firmly. It can skid off the wheel if you push it too hard in one direction. So, keep in mind to use both hands even when applying pressure. Likewise, strike the ideal balance between bracing and not pushing yourself too far in one way.
3. Choosing The Wrong Clay
Pottery wheel
While technically, you can use any clay for throwing on a wheel, some varieties might have a stiffer texture and more taxing on your hands. The clay you are using may have more suitability for hand-building than throwing if you are having trouble keeping it on the wheel. It may also seem like you are throwing sandpaper. To keep your clay on the wheel, you want smoother clay.
Since it takes longer to center and raise the walls of the clay, it is ideal for novices to pick clay with some grog or sand in it, like Craftsman Natural Air Dry Clay. Otherwise, if you play with too smooth clay for a long, it will crumble. Keeping your clay on the wheel will also be challenging if it contains both hard and soft regions.

You may struggle to apply consistent pressure on your piece once you open it up. It will result in inconsistency in your piece. Therefore, making sure that you select the right clay is essential. It is frequently one of the most crucial errors that cause throwing issues.
Make sure to test a variety of clay, but choose the softer one to start with so that you can quickly build a smooth surface.
4. Your Wheel Is Moving Too Fast/Slow
The clay becomes more challenging to handle if the wheel spins too quickly. While learning, it is better to slow the wheel and keep your hands down. However, you must ensure the wheel is not going too slowly. The clay will open, pull, or lift in front of the rotating wheel.
The clay may get under strain if you do this. The clay may rip or become misaligned as a result. Try different wheel speeds until you discover one that allows you to mold the clay. However, do not go too quickly, so the clay’s movements get out of control. On the other hand, when your wheel is spinning too slowly, it will cause the clay to get out of the wheel.
You will discover that keeping the clay on the wheel is easier when you speed up the wheel. You may slow down your wheel after your clay is in the center. Once your clay is centered, you can maintain a medium or medium-low speed until you discover the best pace. Increasing the speed of your wheel to at least medium-high provides you greater control over the clay lump. It helps your clay stick to the wheel more efficiently.
5. Wrong Placement Of Arm And Body Positioning
Sometimes, even with the nicest clay available and correctly wedged still feels too difficult to keep on the wheel or shape. This is because your body and arm position is probably set improperly. You must master the art of arm placement if you want to throw on the wheel. Even so, it won’t seem natural without proper body alignment.
You will have enough control on pottery centering if you place your arms on your thighs or the side of your torso. However, you should never forget that creating pottery requires the correct technique and positioning. The only true benefit of using excessive power is that you will get exhausted quickly.
To apply the proper amount of pressure with your upper body to keep the clay on the wheel, constantly pay attention to where your arms and hands are about your torso. With your elbows up, centering becomes more challenging. In addition, you have less control over your clay in this position. If you place your arms appropriately, you will find it much simpler to operate the wheel.
Look at how you should position while concentrating on various aspects of working with clay.
How To Position While Keeping The Clay On The Wheel? |
How To Position While Pulling Up The Walls? |
Keep your elbows in front of your body. |
Avoid pressing your arms up to your body. |
Keep your body solid, your back upright, and your elbows in check. |
Maintaining a straight back. |
Apply firm pressure to the clay but without using excessive force. |
Maintain constant hand and finger postures throughout. |
6. Not Coning The Whole Length Of The Clay
You must cone the entire length of the clay when trying to keep it on the wheel. It is crucial to ensure that the bottom of the clay cone is also becoming smaller in diameter. The base of the cone will not stay on the wheel if your hands are placed above the bottom of the cone. As you create your artwork, any slight wonkiness in the clay’s base will become more pronounced.
The wobbling will become more pronounced the more you open up the clay. You may get closer to the base that isn’t entirely on the wheel as you continue to work with the clay. As you make the cone, incorporate the clay’s base. One tip some potters offer is to consider coning the clay in segments.
It means you should concentrate on making the cone the first half inch of clay before moving on to the next half. You ensure that the entire structure receives your attention by doing this. If your clay resembles a mushroom, push down on it to the side like a karate chop. You must maintain tight control with your anchor hand to prevent the formation of a mushroom.
7. You Are Pulling Away Your Hand Too Quickly
You may ruin your sculpture by removing your hands from the clay too fast. Taking your hands away will make the clay come out of the wheel. It might also sway the clay and undo your hard work. Most novice potters experience this. Releasing the clay too quickly may cause the clay to move out of alignment.
It’s best to move slowly. You should always take your time taking your hands out of the clay. One technique to ensure the clay stays on the wheel is to seal the clay to the wheel. It will stop additional water or air from getting beneath your clay as it sticks to the wheel and centers. After throwing your clay onto the wheel, push it as near the center as possible. Then use the clay ball to press down all around it to seal the bottom.
One way to ensure the clay stays is when your clay is on the wheel and centered. It spins with the appearance of being still. Another method is to feel the clay while closing your eyes. Your clay is centered once your hands have stopped moving. Once you have reached that state, it is fantastic. Your clay will stay with the wheel.
Winding Up
If you focus on the minute details, you can easily make your clay stay on the wheel. In addition, you can make your pottery experience much smoother using simple techniques and tricks. Ensuring all the points, we mentioned in the article will help prevent the clay from coming off the wheel. Mastering the craft of pottery requires perseverance and practice.
It takes practice to become an expert on the wheel at knowing the proper pressure to use and the appropriate texture for your clay. Learning to make pottery is a talent that takes time to master. Pushing your creative bounds will lead to the strategies you may utilize to hone your skill.


