One question that people tend to have is can you make pottery without a kiln? The answer is yes; you can make pottery without a kiln. You can fire pottery without a kiln, and here, we’ll discuss how you can do so, and even some ways to make alternatives to a traditional kiln, and why it’s essential to know this.
Why Fire without a Kiln?
You may wonder why you should fire clay without a kiln. Well, some people have reasons for doing so, and they are the following:
- Kilns are expensive.
- They often take up a lot of space.
- They’re something that may not be feasible for you right now.
- If you’re not sure whether you want to dedicate time to this hobby, it may not be monetary-wise
When it comes to outdoor firing though, you need this to get to at least 1000 degrees F. You can’t just do this inside. That’s another consideration why. With clay, different types are fired to different levels, and usually, with this, you really can only work with earthenware, since it is a low-fire bisque that works for you. With modern kilns, you can get up to 2400 degrees, but if you’re looking to work with clay that isn’t super high-fire, you don’t have to rely on a kiln. Most common clays, however, especially beginner clays start to melt around 1900 degrees Fahrenheit.
Now, firing without a kiln is something that tribal people do for a few reasons, and they are:
- You can contain the clay at a higher heat.
- You can create a bonfire-type setting to get wood kindling to make it burn.
- It’s relatively easy to contain.
That’s why this type of pit firing is so popular since it is simple to contain, and does work wonders.
Can’t I just Use an Oven?
No, you can’t fire pottery in the oven. You can bake it of course, but you can’t fire it. That’s because, firing pottery clay in the oven just isn’t possible, and there are a few reasons for that.
- Ovens don’t get nearly hot enough to even begin it to get red-hot.
- They often, when you push them to such extreme temperatures, can potentially combust and explode.
- If you’re not careful, it also can melt the clay, or crack it.
You can always bake clay in the oven. That’s where those kid-friendly clays that are easy to use come from. But actual firing doesn’t happen, and you’d be quite talented if you did manage to get the oven that high, which is why other kiln-less means are used.
Of course, you can always air-dry it, but the problem with air-drying clay is the fact that it really can’t be used. It’s decorative, and there is a chance that it may not hold itself together. If you want to fire, there are alternatives, and you can follow those alternatives below.
Pit firing Clay Setup
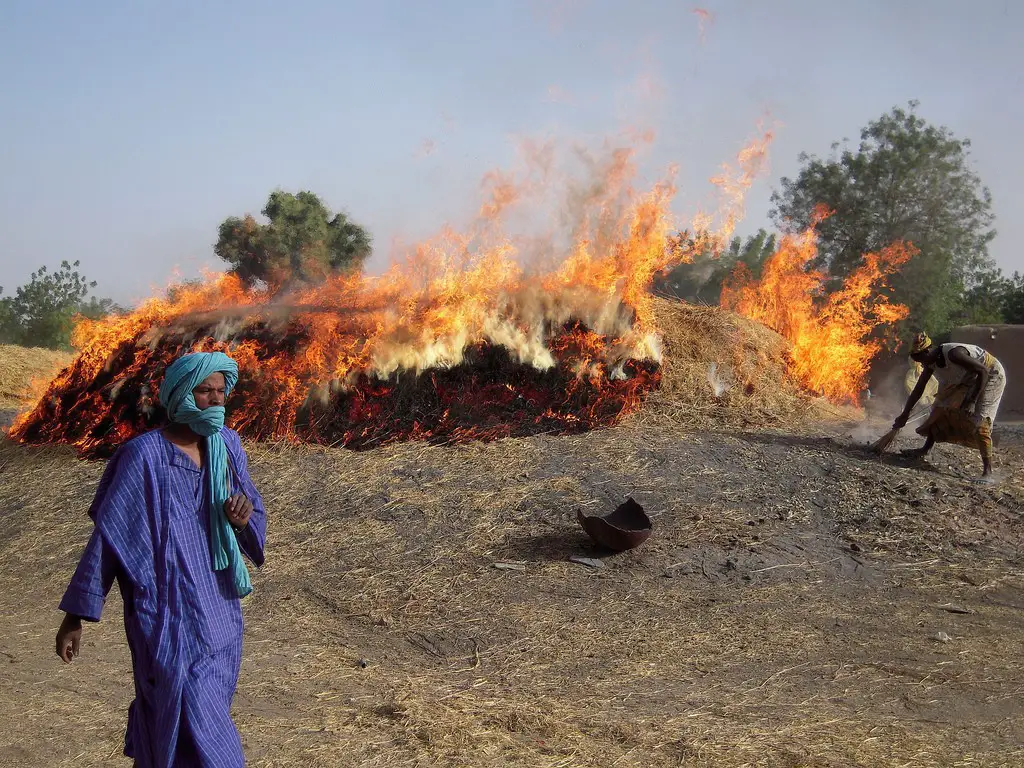
- Setting up your kiln for pit firing is often quite a challenge, so we’ll talk about how you can pit fire clay outside. To do so, begin with the following:
- Get a hole dug and a pile of kindling wood together. You can create a small pit that has steel, stone, or brick around it, and make sure the area is clean, so the fire doesn’t spread.
- From here put the pottery on top of the kindling wood, and you should stack it so that if the wood does burn and the pots tumble, they don’t turn to ash. You can also put stones, bricks, or other old pieces there to help keep it stabilized, making sure kindling gets to it.
- From here, you can also cheat by putting scraps of roofing or tin in there, along with an exhaust opening so that the air can go around.
- Cover this with a thick layer of grass or animal dug so that the heat is held in. The moisture in the dung will keep it from burning off, and it will insulate it so that it will burn as well later on when fired.
- Some like to smear this so that it forms a thin shell, and from there it can be a grass or straw mixture.
- You will want to ensure that there is a big exhaust hole that is provided on top of this, along with multiple vent openings so that the wood air gets in and burns enough so that the clay does get to the red-hot point. This is often based on how big the firing pieces are. The openings that are around the bottom will give a place enough to ignite and allow for the combustion to enter there. The top of this does need to be large enough so that rapid airflow that enters at the bottom is enough to heat the items that are contained here.
Now, you can fire this clay, and we’ll tell you how you can fire this clay in the next section. You should be ready, but always ensure that you have anything flammable out of the area, and wear protective gear when working in this area.
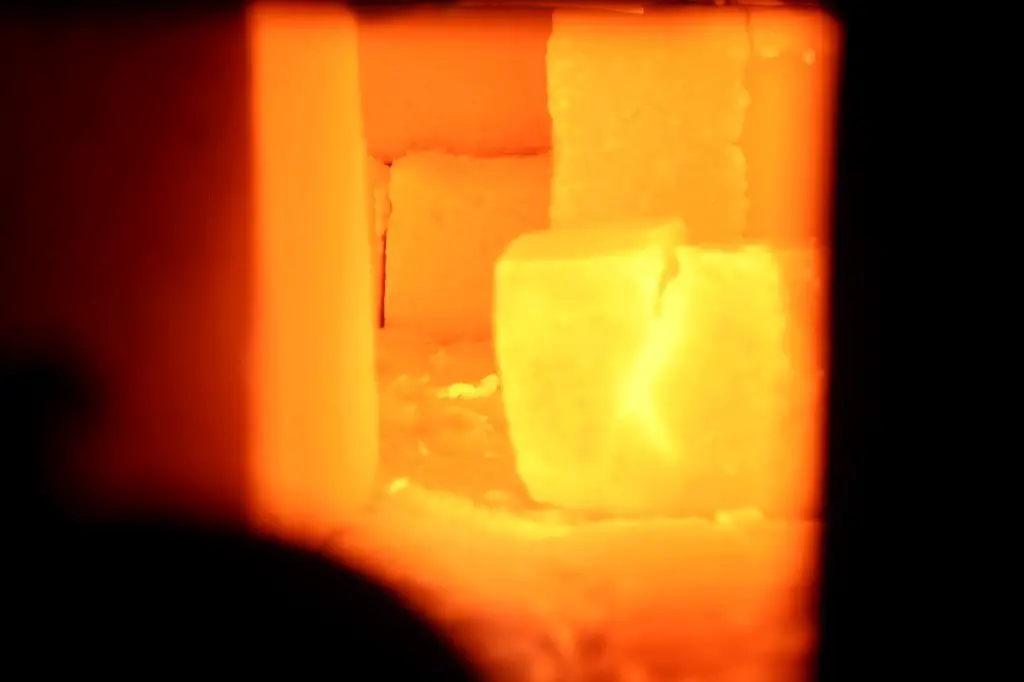
How to Pit Fire Clay?
To pit fire clay, you essentially need just to start it and watch it. You must never leave this unattended. To start it and to fire it completely, you do the following:
Begin by lighting the kindling with wads of paper.
- If you are worried about breakage, as soon as the wood begins to burn, you can cover the vent partially with tin, or pottery shards to restrict the burn and heat everything slower at the beginning. This is good if you tend to break the pottery, and from there, open it up a little bit in increments to let the fuel come in to burn until it’s red hot.
- You will from there start to move more fuel into there, continuing to burn everything and make it grow until it’s red hot.
- At this point, you’ll probably need to make sure that you do have enough kindling going, and let it sit for about 12 hours.
- Slowly let it cool, and once it’s burned, cover it with a layer of dirt or wood ashes to choke off the air if you want to make it smokier and darker, it’s an excellent way to make black pottery.
- From there, continue to let it cool until this is under 500 degrees. Don’t touch it until it’s at room temperature, but you can start to roll it out by prodding and moving it, which is a great thing.
If you do have issues, you should remember that mistakes will happen, and from there, just think about it and try it again. Mistakes turn into new ideas, possibilities, and new learning, so you’ll be quite happy with all of that.
Safety Tips
Safety is a huge part of this, and you should always make sure that you follow the guidelines. Here are just a few things that you should know about when you’re doing this type of pottery or any for that matter:
- Always make sure you’re aware of where you’re firing, and how you’re doing it.
- Always consider the local safety and fire codes when firing.
- Be wary of any open fires, and make sure that if they are strict, you know how to watch for this.
- Never do this where there is a chance that the fire will spread from the area.
- Always have a supply of water close nearby in case something does happen.
- Do watch the wind patterns, and if you notice that there is a chance it could catch other things on fire, don’t fire that day.
- Never leave these unattended.
- Make sure that if you do have a child, you show them how to do this safely, and never let them play or be near it unattended.
- Tell others to not mess with this since the temperatures reach way higher than the average cooking fire.
- When you’re removing them, always make sure they aren’t hot before you pick them up and touch them. You may also use tongs like Kemper Dripping Tongs to keep your hands safe from heat and fire.
- You should wear safety goggles, and fireproof gloves, and keep your hair and any flammable clothing away from the air since there is always a chance that it can catch fire.
By knowing basic safety when firing, you can have a more pleasant experience, and from there, you can prevent the worst from happening.
Problems of pit firing and its solutions
Though pit firing of clay is a great alternative to creating pottery without using a kiln, it may have some problems associated with it. So, here we will discuss what issues your pots may face if pit-fired and how you can solve them.
| Problems | Solutions |
| Cracking of pots | Use clay that responds well to heat shocks. Carry the pit firing process in cold weather so that the fire can cool down slowly and gradually. The use of polyurethane varnish is also an excellent way to strengthen cracked pots. You can varnish the inside by pouring it into the pottery and pouring it back into the tin. Paint the outside with varnish normally. |
| Ugly scars | Sometimes people tend to throw sticks and beer bottles into the fire. Do not do so, as the beer bottles may hit and smash your clay pot. Also, the glass may melt and stick to your pottery. This phenomenon will leave an ugly lump on your piece. The glass may contract at an unusual rate to the pot and pop off, giving it a bad scar. |
| Pots turn black | It is generally the consequence of covering fire with sand. It results in a massive reduction of fire, turning pots black. Refrain from doing so. Let the reduction process be limited so that you get your pots fired well. |
Using a Dustbin to Fire Clay:
Then there is smoke firing in a dustbin, which you’re unsure of whether or not you should fire; this is another good option. This is also great because it has extra benefits that pit firing doesn’t have, and other safety benefits too, including the following:
- It’s smaller, so fits in better spaces.
- Because of that, it’s easier to contain.
- You don’t need as much protective gear.
- You don’t have to worry about restricting where children play since it is smaller.
- If you do it right, you can create some cool pottery.
The one downside to this is that there are more chances to screw up, especially with burning pottery, but if you follow the steps, and make sure that you know what you’re doing, you should be fine.
To do this, begin with the following:
- Get either a metal incinerator or a trashcan/dustbin for this and make sure you gauge how much air you can get into this.
- Also get a lot of sawdust, leaves, and small twigs, and don’t underestimate how much you need.
- If you want to burnish your clay model, before you put it in, rub it gently with a spoon until it’s smooth and shiny.
- From there, let them dry out before you fire them since there is a much higher chance of breakage if there is a lot of moisture in there. When in doubt, you should place your hand near the bottom and see if it is at room temperature. If not, it means there is still water within.
- Build up the pottery and sawdust in layers, making sure that it’s not all in one area.
- Light the fire at the top, and when it does die down, throw the lid on.
- Let this burn slowly for at least 12 or so hours, and from there, you can take the handle off.
- It might take longer because the pots do take a while to be cold enough for handling.
- This a reminder that the dustbin gets hot and there is always a danger the pottery may crack or explode, so don’t leave it unattended or children near it.
By following this, you can get some unique pottery. While there are a few downsides, this is undoubtedly a great way to ensure that you get the most from this and fire it easily.
Pottery using BBQ
If you want to do pottery, but avoid the extra expenses of an electric kiln, you can cook up some BBQ pots. It is easy and convenient, and possibly your old and loyal BBQ grill can get a new job to do. A BBQ grill is a fantastic alternative to a kiln and gives you surprisingly good results.
One of the grills that yield beneficial results in making pottery is the charcoal BBQ grill. You can use it to pitfire greenware on it. It is suitable for making pots with walls having a uniform width of 3/8 inches without thick bottoms or narrow rims. You must dry your pottery meticulously before you opt to fire them. Make sure to use clay varieties that can effectively resist any thermal shocks such as Raku clay, paper clay, groggy stoneware, etc. You don’t need to use mica-based clay.
Now, let’s look into the process stepwise.
- Before beginning the procedure, ensure that the BBQ charcoal grill is properly cleaned. Remove any remnants of partially burnt coal or ashes present underneath.
- The next task is to get it started. Pour lighter fluid onto the heap of charcoal and light it.
- Once the coal gradually starts smoldering, begin preheating the pots by placing them above the cooking grid.
- Wait for about 15 minutes. When the periphery of the coal begins to turn gray, swiftly yet carefully shift the clay pots. Slowly take off the charcoal grate, outspread the coal, and put the pottery directly above the heated coals.
- Do not forget to wear protective gear like goggles and gloves. One may opt for IRONCLAD Welding Leather Gloves whenever you are handling pots at BBQ grills from putting them onto the grid to taking them out of the coal after firing is complete.
- You must cover the grill to preserve the heat but keep the lid a bit inclined for the passage of air. Be cautious; don’t make the hot rim of the cover touch the plastic handle of the BBQ, as it may melt the handle.
- After about 30 minutes, you can take out your pots.
- Now, test your pots by tapping them to check if they make a ringing sound. Use your nails to scratch them and find whether the clay has been appropriately heated and does it gets deformed or not. In case your pot makes a sound, and the scratches do not distort it, then you can conclude that you have fired your pottery correctly.
But your clay won’t get vitrified fully in this way, and your pottery will be unable to retain water. But this should not make you worry much, because, these finished grilled pots will not decompose in water like the way greenware does. Coal alone can get heated to a temperature of about 1100°F which is adequate for firing smaller-sized pots. In the case of larger pots that are 2-3 inches tall, you can augment the firing temperature by piling pieces of wooden scraps surrounding them, to facilitate uniform firing throughout the pot. To get the heat to rise even higher, you can blow the air into the charcoal grill with the help of a fan. However, it is possible that repeating this action too many times can reduce the lifespan of your BBQ grill, specifically of the charcoal cooking grid.
Tools that are must-haves for pottery
Whether you make pottery with or without a kiln, you must possess specific tools to craft your pot. Here is a list of a few necessary tools required for pottery.
| Tool | Why use it? |
| Ribs and scrapers | These tools are used in throwing, shaping, and smoothening pots as they are created on the wheel. Rubber ribs and scrapers generally offer the smoothest finish. |
| Fettling knives | These are thin-bladed knives with a hard or soft temper. The hard ones are inflexible, whereas the soft ones are bendable into any desirable curves. Initially, these were designed to remove the fettles, but now they are used for trimming slabs and thrown pots or cutting certain areas of the hand-built pots. |
| Sponges | It is one of the most prevalent tools utilized by potters to absorb and distribute water on the clay during throwing. |
| Potter’s needle | These are long, hefty needles with wooden, metal, or plastic handles, used for neatly trimming the top edges of the pots that are still on the wheel. In the case of hand building, these are generally used for storing coils and slabs. |
| Brushes | Brushes are very commonly used tools for letting water slip onto specific areas when you are working on the clay. These also find uses in painting and designing the finished pottery art. |
| Cut-off wires | These are some of the most frequently used pieces of equipment for cutting large lumps of clay. Also, it finds its use for removing thrown ware from the wheel. Fishing lines and uncoiled springs being flexible can be used as cut-off wires. |
| Loop, Wire, and Ribbon Tools | These tools are useful for trimming greenware and for its implementation in hand-building pots. These are also used for hollowing hand-made pieces. |
| Protective aprons | Pottery is a messy business as a whole. Mainly the firing process is quite dangerous. So, wearing protective aprons will not only save you from the flames of the fire but also prevent you from getting clay all over your clothes. |
Get Started with non-firing clay today!
If you’ve been curious about firing clay, but you’ve been unsure of whether or not you want to do it, then try these methods. They do take longer, and there is a risk for breakage, but if you’re not prepared to deal with higher temperatures, and if you’re unsure whether or not you’re ready to dedicate time and money to this hobby, trying out clay without firing in a kiln is quite possible. If you have space, know how to handle fire, and know basic fire safety, then you should be fine. Plus, if you’re curious about taking this further, there are some great kilns that you can try out, and a lot that you can easily obtain, so you can learn even more amazing pottery techniques as well.


