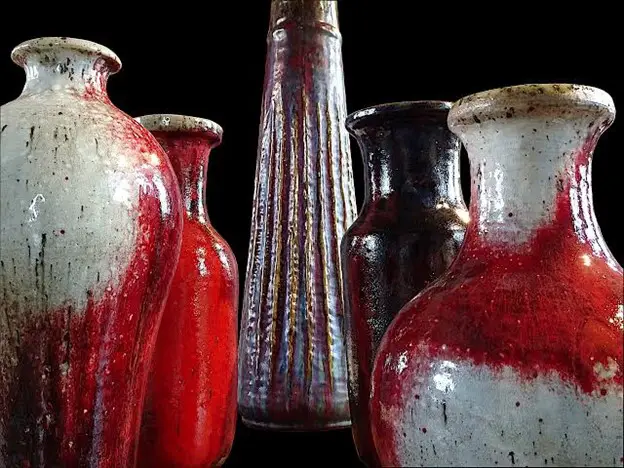
Glazing your pottery pieces requires skill and experience. It can be a messy experience even for talented pottery artists. If you are a beginner, this process might seem cumbersome and time-consuming. However, it makes your pottery piece just as glorious and unique. Your pottery work can be decorated in various other ways, but glazing is something that makes your pottery work stand out from the rest. No two pieces turn out the same with glazing, making it unique.
But is there a technique to it? Understanding the process of glazing a pottery work requires a lot of research and practice. But, before you start practicing these techniques, you need to understand more about the glazes and the glazing process.
What is glazing?
The glaze is a glass-like coating added to a pottery item’s surface. It gives your artwork a matte, glossy, smooth, opaque, clear, or textured finish. Different types of glaze compositions can result in a massive difference in the output of your final product post-firing. This is because each component within a glaze has its function and helps transform the pottery piece.
Most pottery glazes comprise three basic components that include:
- Glass-Forming Ingredients (Boron or silica trioxide)
- Stiffening or Refractory Components (Alumina)
- Flux Component
Potters can mix other additives with the basic components to achieve a different final output. For example, they can add to the color factor, ascertain the glaze’s opacity, or create other finishes.
Glazes are vitreous substances fused onto the pottery piece through the firing process. The glaze has three basic functions. First off, a glaze seals the inherently present porosity in earthenware vessels. This makes the vessels ideal for holding any liquid item.
Next, glaze gives your ceramic piece a tough and durable surface. Lastly, glazes help enhance the pottery’s underlying texture, carving, painted design, inscription, or any other features. When fired, these components & additives undergo a chemical reaction that changes their appearance.
Now that we have covered the definition of glazing, let’s find out what types that fall under the category of glaze.
Type of glaze | Temperature | Type of Clay | Color tone |
| Low fire glaze | 1828 degrees Fahrenheit (998 C) to 1945 degrees Fahrenheit (1063 C) | Earthenware Clay | Bright, vibrant, and glossy finish |
| Mid fire glaze | 2167 degrees Fahrenheit (1186 C) to 2262 degrees Fahrenheit (1239 C) | Porcelain and Stoneware clay | A little duller |
| High fire glaze | 2280 degrees Fahrenheit (1249 C) to 2345 degrees Fahrenheit (1285 C) | Porcelain and stoneware clay | Muted and dull |
Now let us move on and decode the techniques that can be used to beautify your pottery pieces.
Beautiful Techniques for Pottery-Glazing
Glazing isn’t bound by any techniques, and you can experiment as per your requirements. However, there are certain basics you can follow to master the art of glazing. They are practical and provide foolproof results. Moreover, they help you familiarize yourself with the glazing patterns and best practices.
1. Dipping technique:
If you are starting to learn the use of glaze, the best way to go about it is to work with the dipping technique. It is among the easiest techniques and is popular among amateur potters and experienced ones. For this technique to work, the glaze should be finely sieved. Dipping gives you a smooth & fined-textured result.
Dipping can be used for two practical applications. First, it can be used as a base layer before the final decoration. In this case, you might have to dip the pottery piece twice after the final decoration is done. This helps the decoration stay in place.
Second, it can be used for the application of solid colors that don’t require any decoration. In this case, potters need to dip the product twice in the glaze until it attains a thickness similar to a T-shirt. Start by mixing the glaze properly. Next, sieve it & stir it continuously for some time to create a homogenous mixture. Then, depending on the texture you require, you can determine the consistency.
When trying your glaze for the first time, test its consistency on tiles or other waste pieces. If it is perfect post-firing, you can work with the same consistency. Before you start glazing, clean the pottery piece using a damp, clean sponge.
Find out the strongest section of the pottery piece and hold it with tongs. Dip it into the glaze. Ensure that the firm has griped. While you lower the artwork into your glaze mix, make sure you do that slowly so as not to form any bubbles or splashes. Dip the glaze for 3 to 5 seconds & remove the piece vertically.
When removing the piece, pour out the excess. Shake the piece a bit but not too strongly. Make sure you check that there isn’t any excess glaze that remains in the pottery piece. If your artwork has any drip marks, tong marks, fingerprints, or inaccuracies, use a soft brush or Q-tip to make these parts uniform.
2. Dripping/Pouring technique:
It is an amazing technique used for covering artwork. Dripping is generally associated with the decoration of the pottery piece while pouring. Dripping & pouring are the same. The pouring technique is divided into two parts. First, the key is to achieve a base or single layer through the pouring process.
Pour your glaze on the pottery work & let it stay in place for 4 to 5 seconds. Next, pour the excess glaze right back into the bucket. By now, the piece would have absorbed most of the glaze & you will finally see an even distribution of the same.
Now, you need to cover the exterior of the pottery work. Hold your artwork over a small bowl and start pouring the glaze in a pattern you desire. You need to cover the entire piece to create a pouring design if you want. To create a smooth texture, potters can remove any extra dripping liquid using a soft sponge or Q-tips.
Next, select a colored glaze that is contrasting with the base color. Fill the same in a squeezable bottle. Move the bottle along the pot’s rim. Squeeze enough so that the glaze pours down to the end of the piece due to gravity. Dripping techniques create a beautiful technique, especially if contrasting colors are used.
3. Brushing technique:
The brushing glazing technique can be ideal for base layer coating as well as decorating. Most brushing glazes have a unique formula that can be used for bisque wares. Brushing can also be used on greenware. However, it can get tricky, especially if you are a beginner.
Given that the organic ingredients within the greenware haven’t yet burned off, it can cause certain issues. For example, gases that escape from the drying clay can cause your artwork to look patchy and blistered.
4. Spraying technique:
Yet another important way to glaze pottery is spraying. Application of whole layers and decoration is done through an air gun or spray gun. Since the spray gun can’t be moved frequently, you’ll have to move the pottery through the banding wheel. Spraying works best for the application of the base coat. Compared to other glazing techniques, spraying makes designing a little difficult, as it doesn’t result in the finest textures.
Even though spraying doesn’t work beautifully when creating patterns, it does wonders while creating gradient textures. Through the spraying technique, you can create fog, sea, and desert effects. Layers of different colors can be created, which looks pretty great.
5. Splattering technique:
Another exciting way to glaze your pottery is splattering. For its application, usually, a stiff brush is used. Splattering is a piece of cake, even for beginners. You get dot-like splatters of streak and glaze effects. One of the best ways to decorate the pottery pieces is to apply a base layer through splattering and then top it up with splatters of contrasting shades. Bright colors will look amazing on a plain white base. Black splatters will look great on red, white, yellow, and green solid bases. You can also achieve a great attractive piece of art just by splashing the brush randomly on the pottery.
6. Stippling technique:
Even though it might seem similar to splattering, there’s a thin line of difference between the two. In stippling, the glaze is applied using a soft brush and its tip. If you’re looking for a shade-like effect, then stippling is the best option you could go for. One of the most preferred techniques in stippling is to pick glaze in small amounts at the brush tip. Make sure to take the minimal product and don’t overload it as it cancels out the texture.
To get a better stippling effect, vertically hold the brush. To make it more beginner-friendly, the use of colored underglaze is highly recommended. Apply a layer of slight hue or completely clear glaze above it.
7. Sponging technique:
To create interesting textures, you can use either natural or synthetic sponges to apply the glaze. The process of applying glaze to pottery work becomes faster due to the amazing absorption power of the sponge. Have you seen the amazing repetitive patterns around the dinnerware plates? Well, that’s the result you get after using the sponging technique. It’s strongly advised to choose synthetic sponges over natural ones as they can be given a particular pattern or shape by cutting them.
The kind of patterns made depends upon the type of sponge you are using. While intricate patterns come from fine-grained sponges, rough, firm, and large sponges help in the coverage of a larger space. Sponges can be used to work on glazed surfaces to create patterns. Not only that, but they also work great while making the base layer of the pottery.
8. Glaze Trailing Technique:
If you aim to create abstract as well as natural artwork on potteries, glaze trailing is your buddy! It can be used for both glaze works on already glazed pottery and glaze works on clay pottery. The technique involves the use of a tiny and squeezable bottle with an aperture tip called the slip trailer. All you need to do is dip the tool inside the glaze or fill it up completely and start making the pattern. There’s a very thin line of difference between slip trailing and glaze trailing. In the latter one, the lines melt, while in the first one, the lines rise. Glaze trailing becomes a little trickier when it comes to working on an already glazed surface. You’d need some practice to attain mastery in it. And you’re going to love the result once you master the technique.
9. Wax Resist with Glaze technique:
Using glaze in association with wax-resist will yield amazing results as the wax-resist will repel the underglazes and glazes. This will lead to glazes not sticking to areas where wax resistance is applied. Use your creativity and take advantage of this technique to create unique artwork. Put the wax-resist initially and let it dry. Paint the entire piece with a glaze after that. After it dries completely, wipe off the glaze using a sponge or cloth. The glaze will be wiped off from areas where wax-resist was applied previously. Wax-resist is also applied over a glazed surface to protect it from other coatings of glaze. The bottom part of pottery can be secured from unwanted glaze through the application of wax-resist. This technique allows you to get creative and exhibit your skills. So, get right on it.
10. Mocha diffusion technique:
This glazing technique aims to provide perfect finishing to your piece of artwork. It produces tree-like patterns or organic veins. This is where all your acid and base experiments from school are applicable. The result is nothing but a reaction of an acid and base. Start with coating the area. Then make a mixture of cider vinegar and mason stain. In the next step, put this mixture over the slip with the use of your paintbrush. Once the vinegar touches the slip, the spread will begin.
Conclusion
All the ten kinds of techniques discussed in this article cannot be suitable for everyone. Some of them might be harder than others, and they’ll vary individually. The result will also vary depending on the technique used. So, you will have to choose a way that can create the patterns that you have in mind. One common thing among all these techniques is that you will end up with a unique and interesting piece of artwork.


