One way to create pottery is by throwing it. You might think that you’re tossing pottery, but that’s not the case. It’s something different, but it’s a huge part of pottery. What is it? how do you do it? Well, you’re about to find out.

Throwing Pottery
Throwing pottery might seem like you’re throwing a piece of clay to make it magically transform into a shape. However, that’s not the case. Lots who begin with this think that it’s that, but it’s got an exact definition.
Throwing clay as a process is actually the time that elapses between two points, and they are:
- When you put the clay on the wheel
- When the wheel is stopped
When you throw pottery clay on a wheel, it’s essentially the time that elapses between shaping the clay on the wheel and finishing it.
Essentially, throwing pottery involves certain steps, and they are:
- Pre-centering preparations
- Wedging the clay
Centering it on the wheel- Opening it
- Throwing and putting up the walls of the clay
We will go into greater detail about what exactly each step entails later on, and in other posts as well to help you get the most from this.
But, throwing is a specific term as well, and it refers to the act of actually doing this.
You throw by bending the clay between the fingers, and as you do this, you keep one lower than the other, which forces the clay to bend. If you’re right-handed, you’ll put the right lower than the left, and this will make it bend. You essentially will move your fingers upwards, and the clay will be stretched, and this forces it upwards.
What does this do for the clay? Well, it’s a big part of shaping bowls and vases because it does the following:
- Increases the height of the bowl
- Can help reduce the thickness of the walls
So if you want a bowl that’s high and thin at the top, you use this.
So what Determines a Good throw
What does determine a good throw? Well, there are a few conditions that you will want to keep in mind, and they are:
- The pot is taller
- The edges are much thinner
- They’re uniform in terms of thickness
When you first do this, you’ll notice that your walls will be thicker at the bottom, but thinner at the top. This is a sign that you need to hone your skills.
The best way to hone this is to do this with your eyes closed. Might sound crazy, but that’s the best way to focus the attention on the feeling of the hands, and you’ll be able to feel the thickness, along with the uniformity, of these walls as you throw the clay.
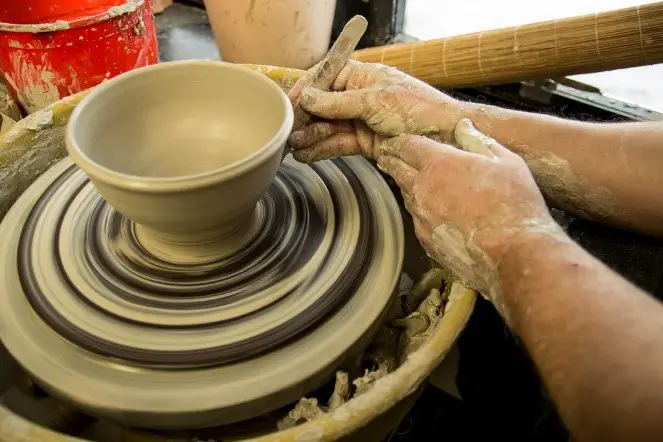
Centering the clay
Let’s first talk about the centering of the clay. It’s important to understand how to do this since this plays a key part in the throwing.
First, you want the clay to be well mixed and lubricated. That will help with the actual wheel process. From there, you want to center it, and most people use a bat to help center it on there. You essentially smack this onto the bat and get it as close to the center. It’ll also attach it to the throwing surface, but keep fingers out of the way.
Now, once that’s there, you want to make sure it’s lubricated again. Clay dries out super fast, and if you don’t lubricate it, it’ll go off-center and it won’t be easy to control. You will want to make sure that you have the wheel rotating, and if it’s at full speed, you’ll center the clay.
Now, you’ll want to make sure as your center, you begin with the following:
- For bowls, center the clay into a low dome
- If you’re throwing a tall form, you will want to create a narrower dome, but you’ll want to make sure that the clay has an opening wide enough to reach all the way down
- If you have one that’s equal to the base, you’ll want to make it an average shape
From here, you’ll pull the clay, which essentially means that you’re putting some pressure on the hands as you pull it to you, and you’ll force the clay towards the middle. You can then use your fingers to control the tops and sides and then pull them into a dome shape. You should make sure that you use this for small numbers of clay.
Then there is pushing, which is used for smaller amounts of clay. You put your hands at the sides once again and then put them in the center. From there, you’ll want to control the top with your thumb area and then keep the lower edge mostly centered, almost gently pulling it to you.
Finally, you’ve got a braced palm, which works with larger amounts, and you should make sure to have it on the hell of your palm, either flattened or a fist, and it can then be braced to the center, pushing the clay inwards, and from there, you can then create a fist from the top of this to the center.
Now, there are a couple of advantages to this, and they are:
- It’s easier to just use your fist to get the center of it down
- You can use a sponge at hand
- It’s much easier to lubricate so you don’t have to stop the process.
Now, you can use wedging at this point, and this is used to align the platelets to make throwing easier. You can put some water into this and make things more homogenized in a sense.
You do the following to create this:
- Put clay in the center
- Push into the middle, creating a unicorn horn shape
- Bring it back down so it doesn’t fold over itself, but instead swells up
- Reform the dome
You’ll want to do about three cycles of this to make sure everything is even and aligned. This is a bit of a more complex one, but it’s a form of centering that does work.
Opening the clay
This is the next step in all of this, and if you know how to do it, you’ll be able to throw the clay in a much easier manner.
To begin, there are a couple of things that you’ll want to make sure that you don’t do, and they are as follows:
- Don’t rush this
- Don’t poorly place your hands
- Don’t leave the surface unlubricated
- Don’t leave the wheel stopped
- Don’t have uneven movements
It’s best to make sure that everything is firm and smooth and make sure that they’re slow. Don’t push the clay, since it will mess up the centering. You can find the center by putting the fingers of your dominant hand across the top of the clay so that it’s over the midpoint. Put the tips of your left hand behind the right-hand ones, and then gently open up the center.
Now at this point, you can open it up, and essentially, you want to gently push downwards on this with your right-hand fingers, keeping everything straight. Your fingers will be across the center area, and they will move away from the pressure so it’s opening and centered.
You will want to make sure that you get it to the depth that you want, and also well-lubricated as you gently push downwards on this. You should leave about half of an inch of clay at the bottom of this.
You can use a potter’s needle to check the depth, about half, and a quarter inch.
From here, you want to create the floor of the pot. You should make sure that this is both well-lubricated, and about half of an inch.
To do it, you must do the following:
- Put your fingers against the wall and pull towards yourself. Make sure that the floor is parallel to the bat
- As you pull, curve your fingers to create a bulge against the fingertips to create a wall thickness
- Create the floor so that it’s as wide as you want it to be. It will shrink, so take that into account too
- When it’s done, use a sponge to remove any extra liquid. You should run it over pressing down
- Make sure not to move the clay, but instead, use your fingers lightly to compress the clay to reduce the chances of it either cracking and to help strengthen it
Once this is done, you can then create the wall. Essentially, you want one hand outside and one inside, with the wheel, slowed down and the clay lubricated.
The hands should be opposite from one another so that they are together with the clay between them, push it up the sides so that it becomes straight and it has an even thickness.
If you want it to be narrow at the top, you should put the walls in a truncated cone rather than a vertical cylinder. Why is that? Well, it’s much easier to control that shape rather than trying to create a huge vertical cylinder.
Get rid of the extra liquid, and now, you can throw it.
Throwing and finalizing
Now, you want to throw and finalize this. You should make sure everything is lubricated so that you’re able to move the clay easily. You can also make sure that you keep them straight too.
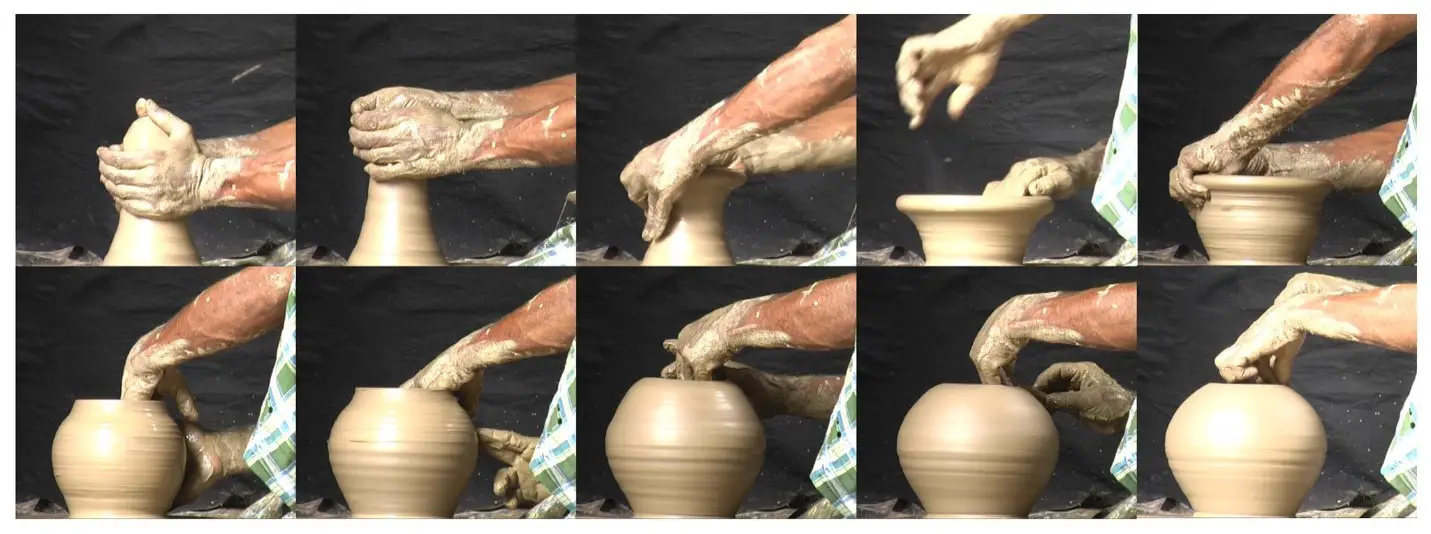
Now, with throwing, your speed plays a huge part in this. You want to make sure that you have it at a slow speed to begin. Probably the biggest mistake those that begin throwing make is they tend to throw a lot faster and then they end up ruining the pottery. You want to go slow since it’s so much better.
When you start to throw, your speed should also focus on the following:
- The movements are firm and smooth
- You make contact with the clay and smoothly release it
- You won’t be jerky with it since it can knock stuff off-center
- If you knock it off-center, you’ll probably have to redo all of it, since it might be impossible to fix
When you’re doing this, you should try to make sure that your hands work in tandem together to throw the clay effectively.
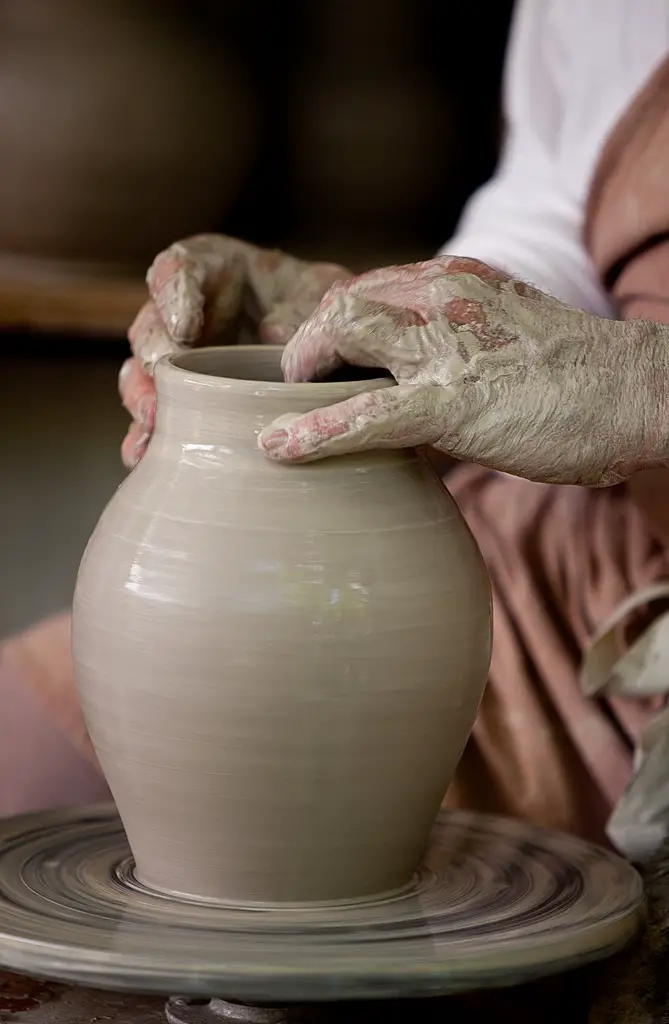
Compressing the Rim
Every time you throw, you’ll need to do a few things, one of them being compressing the rim of the pot. You can do this with either of the following:
- Your fingers
- A chamois
The latter is usually better when you’re doing the final compression.
To do this, you want to put the ends of your fingers against the edge without moving. You should gently apply the pressure to each side, with the fingers supporting the clay. It’ll compress and make stronger the rim of the pot. You should make sure that once you do this, you get rid of any extra liquid from the floor of the pot, and make sure to re-lubricate each of these walls.
Now, with throwing, you definitely should know a few of the mechanics behind it.
The first is that you should know how to push the sides of it together. The pressure should be very gentle, and you want to make sure that you do the following:
- Keep everything either vertical or inward
- Control it so that unless you’re throwing a bowl you don’t move it outward
- You should make sure your fingers work in tandem, with one slightly higher than the other
- Remember that the farther the wheel rotates, the more force you will have working against you when it comes to maintaining vertical walls
Remember that the higher you go towards the top of the wall, the less pressure you should put on there. Otherwise, you’ll end up thinning out the wall too much, and it will make the bowl not as strong.
Once you get to the top, you should leave the higher hand there as the other one climbs to the top. From there, you should then create the rim to help you make sure that the top of the pot is strong.
Now, remember, when you finish a throw and compress the rim, you always need to clean up the liquid from the bottom of the pot. It’s been discussed multiple times the importance of why you need to make sure that you keep the area well-lubricated, but what happens if you leave the liquid n there? Well, it can actually create the following:
- It will weaken the bowl
- It will cause it to crack during firing
- It will cause the shape to become malformed
If you are going to finish a section of the pottery, you essentially need to get rid of the liquid within the pot with a sponge, make sure that the walls are properly lubricated, and then go back to throwing it once more.
So how long do you do this?
How long do you do this? Well, in general, you need to do about three different cycles of throwing on an average pot to make sure that the walls are thin enough. If you have a small pot that you’re beginning with, it might take just a throw, but if you’re throwing something larger, it might end up requiring more.
You want to make sure that the walls of this are at the right levels of thickness. If you hit the right levels of thickness, you should do one final compression and remove the liquid. From there, you can lubricate everything as needed, and then move on to the next part, which is glazing and firing.
This article told you all about throwing, and why it’s important to know how to do this. You can try firing everything at this point, and from there, create pottery that you will enjoy.
If You Enjoyed This Article Please Share and Pin it. It is Greatly Appreciated. 🙂


