Crafting out of clay can be a tedious process, and there might be times that you need to replace a part or add one. Now, the process of adding or replacing a piece might not be as simple as you might think. There is an elaborate process that requires you to scratch the hash marks before you join the clay pieces. This particular process is termed scoring.
However, when done in the wrong way, it could be a big disaster. So, make sure you know your deal before starting to score your pottery.
What is Pottery Scoring Technique?
When we talk about putting together two pieces of pottery, the first thing that comes into your mind is the slipping & scoring technique. In the pottery world, slipping& scoring are essentially two sides of the same coin. The slipping technique helps join two parts together, while the scoring technique helps create essential hash marks for the pieces to come together and stay in place.
You might have seen your local potter using the scoring technique to create a place for the pieces to latch on together. This is done before brushing on the separately prepared slip. The technique is termed scoring & slipping because the potters first need to score the pottery piece & then slip it, later on, to add two pieces together.
Why Do You Use the Scoring Method?
Generally, the need for scoring is to join two different pottery parts together or replace an existing one with another. When combining two pieces, you simply don’t score but also make use of the slipping technique to complete the process.
The process of scoring is applicable in the following instances:
- Mating different coils together
- Attaching the handles
- Attaching different types of decorative pieces onto the piece like embellishments or an emblem
Keeping this in mind, let us learn more about the scoring technique and top 10 tips you need to keep in mind.
1. Score after Completely Drying the Piece:
Clay is loaded with moisture, and that is what makes it highly moldable. Many potters make the mistake of scoring the piece while molding the design. However, if the pottery piece is a single ensemble, you might not require any scoring to be done. Alternatively, if your pottery item involves the connection of multiple pieces, you might think about scoring.

The thing to keep in mind when opting for scoring is to wait for the pottery piece to dry out completely. Clay, when fired, undergoes a substantial amount of shrinking depending on the clay type you are using. If you do score before the clay dries out, the joints might shrink substantially and eventually loosen up to fall down from its place. This could leave unnerving scars in the pottery piece that cannot be amended as it has been fired. So, the first thing you need to do is prepare your slip using a good amount of water. Next, wait for the base design to dry out completely. Keep the piece in an airy place and let it dry for a minimum of 24 hours.
Once you feel that the piece has dried out completely, start by forming the hash marks on the places you want your piece to be added. Once you are satisfied with the marks created, ensure that the extra pieces fit into it properly. Start by placing the slip on the hash marks using a good-quality brush. Now, join the pieces as required. You can also use some glue in the mix, such as ModPodge, to add to the rigidity of the joints.
Allow the joints to dry up completely. In case there are inconsistencies in the joints, you can always correct them before firing.
2. Use the Right Tools:
When talking about scoring your pottery piece, you cannot make do with anything. As a beginner, you need to be aware of the tools that are used for scoring purposes. You need to have the right tools in place to start scoring with ease. Here is a quick list of things you must have by your side:
- Pen or pencil
- Needle
- Knife or forming tool
- Pin
- Chopstick
- Exacto knife
- Tools with sharp edges
- Toothbrush or a big brush
Truth be told, you can virtually use a lot of tools in order to score your pottery piece. The technique is what matters when it comes to scratching the surface in the right way. Scoring isn’t as hard as you think, rather with a bit of practice, you can easily craft some amazing pottery pieces.
Here are some ways you can use the tools for scoring purposes:
Scoring Tool |
Usage |
| Feather Texturing Brush | This scoring tool is designed in the form of a brush, but instead of hairs, the bristles are made out of steel to create perfect hash marks or short strokes |
| Double-Headed Scoring & Smoothing Tool | This particular tool features a serrated end with very short bristles. The other end of this tool helps in smoothing out the joints. It helps reduce any hand cramps given its unique saw-tooth design for scoring |
| Needle | This scoring tool helps create hash marks that are far apart from one another. This cannot be achieved with traditional scoring tools |
| Toothbrush | With a brush or toothbrush, you can remove the remnants from scoring the pottery piece. This helps keep the workspace as well as pottery piece clean |
3. Use the Remnants from Scoring:
When you scratch the surface for scoring purposes, you will get a lot of dried clay coming off from the piece. Instead of throwing this away, you can collect these remnants in your slip pot and prepare the slip for attaching the pieces.
This will ensure minimal wastage of the clay. Plus, your workspace would also look neat and clean. You can use a toothbrush or similar brushes to collect these remnants from scoring and make use of it.
4. Determine the Location to Attach:
Before you start the scoring process, you need to be able to determine the exact position where the piece should go in. You surely wouldn’t want your piece to be attached someplace else when your plan to enter it someplace else. Once you fire it, you surely wouldn’t be able to restore the piece in any way. Your hard work would completely go to waste.
So, the key is to use tools to measure out the exact location at which the parts would go in. Ensure that everything is balanced out in the entire piece. For example, if you are placing hands on two sides of the pottery piece, make sure you measure out the exact location for the same. Measure from the top and the bottom to ensure they are exactly in the right position. This will ensure that your pottery piece isn’t lopsided & everything is completely balanced out.
5. Use a Good Amount of Slip:
When it comes to scoring and joining the clay pieces together, the key is to keep it all as wet as possible. The higher the amount of water between your clay particles, there is better the chance for the clay pieces to get attached to one another.
The key is to slobber a good amount of slip onto the space where you plan to attach your pottery piece. Even if you plan to attach the pieces when the clay hasn’t dried off, it could surely be easy to mold. However, keep in mind that you should add a good amount of slip. Doing this will ensure that even after shrinking, your pottery pieces do not detach themselves post-firing.
6. Balanced Slip Usage:
Your scoring would go to waste and won’t help join the pieces in the right way if you have added more slip in one part and less in another. In the main base piece, make sure you add the exact or close amount of slip as you do in the piece that is to be attached to the main piece.
As the clay piece dries, it tends to shrink. The physical water present between your clay particles starts evaporating. This brings the clay closer to one another. Now, remember, if one of your pieces has less water than another, you might see more shrinking in the former piece. This could lead to an uneven attachment after the piece has been fired completely. The attachment could also fall off due to this. So, ensure that you add equal amounts of slip to both pieces. If you feel the hydration isn’t equal, you can add more slips to the same.
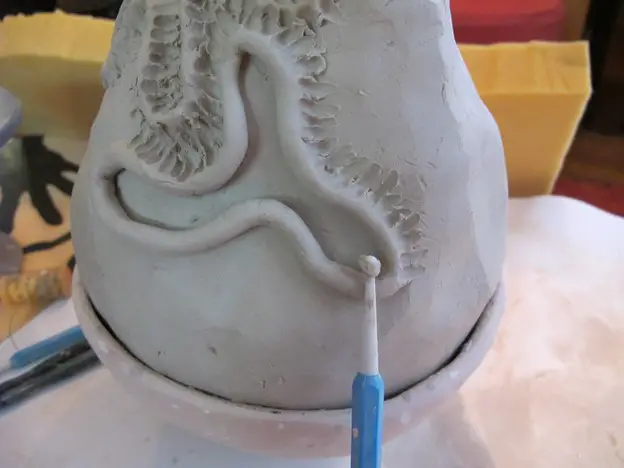
7. Hash Marks should be in Criss-Cross Shape:
When scoring, you mustn’t just randomly create hash marks on the place where you are going to fix your piece. The key is to give your base as much surface area as possible to latch onto with ease. In order to achieve this connection, you can create hash marks in a criss-cross pattern. Doing this ensures that you can ensure a better bond between two parts.
Cross-hash patterned grooves help your parts set deeper as compared to the light scratches made on the surface. Create this pattern on both the base piece as well as the part that needs to be attached to ensure it sets well into the design.
8. Allow the Slip to Set Post Application:
When you apply the slip on your scored area, you will naturally see a lot of dripping from the same. On the very first go, you cannot surely expect it all to stay in place. This is why you need to opt for layering. When you first apply the slip on the pieces, make sure you let it sit for a while. When you see that the slip has been set and there is no dripping, apply another layer to the same. Keep doing this until you feel that there is enough slip in the scored area.
As the slip seems less slippery & sticky, you can place your piece to ensure it sticks well.
9. Apply Pressure:
This is an unsaid rule that you need to follow when joining two pieces together in pottery. Applying a bit of pressure is necessary to ensure that the pieces stay in place when joined together. However, keep in mind that you do not press down a lot, and the scored area might crackdown. So, make sure the pressure is a tad light yet firm.
Doing this will help get rid of any possible air pockets that might form when two pieces are stuck together. If there is any space or air-pocket present in the area, the pieces might fall off post-firing or even as they dry. Use your fingers to hold the pieces together for a few minutes and then slowly release them. If the pieces aren’t connecting together, you can simply wriggle it a bit to give it a great fit.
Alternatively, you can also wrap the pottery piece in plastic & allow it to sit for quite some time. This will help keep the pottery pieces in place without you having to hold them or put in your manual effort. You can use cling wrap to ensure that the pieces stay right in place.
10. Keep a Spare Cloth or Sponge Handy:
When scoring or using slip on your pottery piece, it would surely lead to a lot of mess. With a spare cloth by your side, you can keep your workspace clean and clear of any dirt or muddy water. Plus, you can also use the sponge to dab the extra slip out of the piece and from spreading out here and there.
The sponge also helps put in the required amount of slip, nothing more and nothing less. This helps prevent the scored area from becoming wetter than needed. You can use Mudtools Cleanup & Shaping sponge to keep your workspace perfectly clean. Its kidney-like shape fits in perfectly in your hands to ensure dab in with ease.
Conclusion
When starting out, you need to make sure you start small. Do not do it more than you can handle. Do not put in a lot of decorations in the first go. Initially, test out the scoring and slipping technique on a small piece with minimal parts. Once you get hold of the technique, you can experiment with more complicated designs.


