
If you’re a potter who doesn’t want to deal with spending copious amounts of money buying a wheel, there is always the option of making them. A DIY pottery wheel is perfect for those potters who don’t want to spend a ton of money, and it’s quite easy to create. How do you do it? Well, read on to find out.
Why a DIY Wheel?
Why the heck would you build a DIY wheel? Well, they’re substitutes for pottery wheels in a sense, and while they’re not like the real thing, there are benefits to this. Some of the benefits include the following:
-
Demonstrations a portability
-
You’re making a wheel for kids
-
You’re making it for someone with a very low skill level
-
You want to try out what a wheel does and how to work with it before you buy
Sometimes even having an extra wheel around is great because it allows you to work with certain types of clay. There are even some potters that want to have a porcelain-only clay wheel. Yes, it may seem strange at first if you’ve never used this, but, if you’re working with different types of clay, such as red clay, or even porcelain clay, it reduces the cleanup and other issues by manifold. Trust me, if you’re going to be working with a variety of clay, it’s in your best interest to get one of these, or make your own. You’ll save yourself so much time.
Is it Cheaper to Build?
It’s much cheaper to build on your own. It literally can cost you maybe 50 bucks in some cases, and if you have the items around, you’re saving yourself a ton of money. In contrast, the average wheel is about 500-1000 dollars, that is if you want a good one.
But, are there advantages to buying? The answer is yes, and you should consider the following:
-
Probably more streamlined
-
Quieter
-
Usually is super quiet in comparison
But, in contrast, building a wheel allows you to take advantage of the following:
-
You’ll save a whole lot of money
-
If you have the supplies, you can just get onto using
-
You can even use kits to put it together
-
You will feel the satisfaction of building your first pottery wheel
So again, what you choose is up to you, and you just have to look at what you’re going to utilize and make in terms of the type of wheel that you can.
A Pottery Wheel from a Treadmill Motor
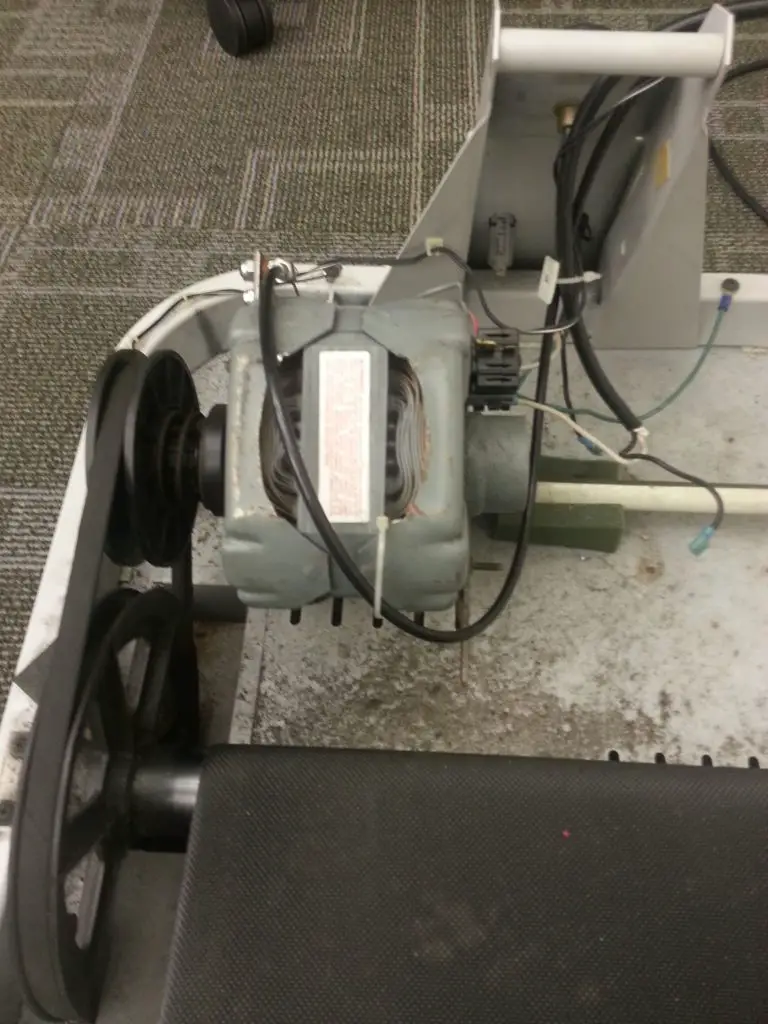
This sounds crazy, but you can do it like this. You can use an old treadmill motor as a potter’s wheel, and this is a super awesome DIY one that allows for a lot of great success.
To make it, you must do the following:
-
Get a treadmill motor. These operate at different speeds, and you can get a used treadmill for $35 and that’s something pretty nice.
-
Disassemble the unit by taking the treadmill apart, and getting the motor out. You should also take any wiring related to this out, including the speed control knob, the circuit board, and the coil.
-
Preparing the wheel by getting the motor and pulley/wheel that should be put in place, with several grooves on it that accept the serpentine belt.
-
Create the base by putting together a pottery wheelbase out of simple plywood, and you can build it on top, and around the sides, and you can then laminate it with Formica to make it easy to clean up.
-
Put the Wheel together by using two ball bearings and pillow blocks with the bearings being held, you can then assemble this. You can look into finding wheels, such as car tire wheels, to utilize here.
-
From here, mount the main shaft, the pulley, the wheel shaft, the wheel, and the motor together onto the base itself.
-
Build the wheel head, ideally out of thick Corian.
-
For the splash pan, you can use a small container, cut it on the side, and put it into the base.
-
Add the wiring together to this item. Add a plywood panel to the underside of this.
-
Cut out some chain bats, drilling the underside of this to accept the pins on there, and then sand down after you cut these, due to how sharp they can be.
As you can see, this is one of the more involved types of pottery wheels, but if you don’t want to spend a ton of money, this can ultimately cost you less than a hundred bucks. However, this can be a little bit confusing if you’re not savvy with tools and creation, and if you don’t know how to mount a motor onto a wheelbase.
A Washing Machine Wheel
Yes, you can build a pottery wheel from a washing machine. It’s a little different from what you may imagine, but if you want to go super cheap with this, you can. It also takes out the need to constantly kick the wheel as well. Plus, it’s super simple if you do already have the materials for this. Here, you’ll learn how to easily make this, and any tips you need.
-
First, find a washing machine, the old-style washers have the best results from this.
-
You want a washing machine that runs anywhere from 70-90 RPM, not too fast, since you don’t want to be overwhelmed. The newer models rotate too fast for most beginner potters.
-
Look at the different mounting arrangements that are there. You should ideally choose a Maytag, because that’s what’s used here, and you may have to make a few changes.
-
Once you’ve got this, get rid of the tub, and from there disassemble the chassis of the machine to extract the transmission and the drive motor.
-
Keep the leftovers for future projects if you want to.
-
Inspect the drive components so that they can be used or modified.
-
For some Maytag units, you’ll need to cut the housing to about ½ an inch, in order to give engagement to the head and to stop wobbling.
-
Cast epoxy to make a serviceable head for the wheel.
-
Once hardened, find the center and mount the HX 7/8 of an inch split taper H to the underside of this
-
Test the fit to the spindle, and squeeze the split taper onto a vise until it fits snugly onto the shaft of this.
-
You can then add a rubber grommet to prevent the leaks between the spindle case and the pan, allowing you to have a splash pan that’s simple to remove.
-
Create the frame by filing the saw into different angles on the chassis.
-
Frame the two fitting long sides of the triangle to the side legs, and then up the unit between the boards, in order to allow the spindle shaft to get about three inches through the top.
-
Add a top covering a quarter of ½ an inch of plywood, lining it up, and then cut a 1 ½ inch hole over the board so the spindle is fit in.
-
Put the lid into position, and from there, drill the countersink areas for the screws, and fasten it all to the frame.
-
You can make a foot treadle for instant shutoff by taking the cord from the machine and putting it on a switch you can control. However, you may need to implement more wire for the hookup.
-
You can also make a variable speed head to accomplish this, and from there, you can use a speed system through the use of a transformer to a radio transmission. However, this is a little bit confusing for beginners.
Again, this is another type of pottery wheel that takes a lot of work to learn, and it might be a bit much for the average beginner. But, if you’re looking to master the making of a pottery wheel, you can try this one, and the truth is, it will easily cost you less than 100 dollars, which is a steal compared to some of the prices on other wheels you see.
Creating a Pottery Wheel from a Fan
That’s right, you can create a pottery wheel from a fan. It involves a fan, a bucket, and some plywood. You’ll want to make sure that you waterproof the plywood since it is going to get messy. You can do that with Formica or another chemical to treat it. There is also a chord that you can cut off from old appliances. You’ll also need lumber, machine screws, electrical tape, and wire nuts.
To do this, begin with the following:
-
The goal of the fan is the motor, so you need to take off the blades and the sides and take the bolts off to remove the motor.
-
You’ll see power wires and electronics, and a connector that holds it together. Take off the connector, since you want to put the wires onto the other side.
-
Pull the wheels to bring it through.
-
Take a wire with a hook end and shove it through, hooking other wires through this.
-
Pull the wires back and twist them.
-
Take the string, create a noose, and then, pull it through to bring it to the other side.
-
Reattach the electronics by lining them up with the right colors, and then wind them together, with the pink being attached to the pink and having a wire knot put into there.
-
Once done, you put the white power wire into the white wire, and the black one can be into the black one.
-
You should have wires only on one side, and if you think the wiring is too confusing, take before and after pictures.
-
Test it to make sure that the wire is correct by holding the outside and not the outside.
-
Take the inner spindle off with a hacksaw.
-
Keep a vacuum running so no material gets into the motor.
-
You can use sandpaper or a Dremel to smooth off the edges of this.
-
Create round support by tracing two big circles, cutting them out, and then drawing paper onto this and folding it in half. And then quarters.
-
Put the paper on top, and put a nail there to mark the center and from there, you attach the motor to the plate completely.
-
Take off the metal piece holding the wires there, and then from there, drill a hole about ¾ of an inch there, drilling four holes. Cut off the tabs at this point, and then put the wooden support onto there, and then the metal disc, and then the screw. Lift it up, and then put the rest of the screws in. Cut off the edge of the screw points so that they’re not hurting you.
-
Put the bottom of it on the other side. It should be about 5.5 inches in distance, and you can then mark the bucket at six inches in different spots.
-
Take four scraps of wood, line these with the top of that, drill them in, and hold it in place.
-
Put the boards on the bottom, then the motor, and then rub the area with a pencil and then crayon at the bolt holes.
-
Place the center onto another piece of wood, bolt it into there, and then put it on top after you’ve nailed holes into this.
-
Using the drill, drill the five holes around the wheel, and from there, you’ll put it on top of the fan motor itself.
-
Insert the screws into there and tighten this.
-
Connect all of the electronics, and that’s done by flipping it over, mounting a peanut butter jar, connecting some holes, putting the jar on top, and then screwing it down. Add the guts of the wires together and then put them through a peanut butter jar. Put the pull chain through this, and from there, you take that power chord and put it into the side of the bucket.
-
Pull the chord all the way through, and then connect it to the bottom. Place it on top, test out the electronics, and then there you go!
Putting together a pottery wheel from a ceiling fan is unconventional, but it’s something you can do if you feel like you want to be a little bit different with how you make your items, that’s for sure.
Here is another way to make a cheap DIY Pottery Wheel
Simple Pottery wheel
Here is a super simple pottery wheel you can make. You need a circular mop bucket, plastic pots, and bins, a plastic drip tray, a strong glue such as hot glue, and a spirit level.
To do this, you do the following:
-
Fill the bottom of the spin bucket with stone to give it weight, and to help stop it from going out of control.
-
Put it in a suitable order, using the spirit level to check that everything is okay.
-
Glue the plastic pot onto the inside of the spinning mop that you have, keeping it level.
-
Spray paint the mop bucket gold.
-
Glue another plastic flower pot on the underside, also spray paint this gold.
-
Put a blue rubber container as a splash pan on the side.
-
Re-design the plastic paper bin where you want to put it and put the plastic pot tray in the throwing location and surface that works for you.
-
You can add a foot pedal onto this as well if you get really ambitious, but usually, you literally can spin this, make this, and from there, you’ll be able to create a beautiful piece of pottery.
This pottery wheel is so good, that you can create basic pots and bowls on this if you feel a bit inspired, and the control on this is worthwhile.
Now, I do suggest this one if you’re feeling like you need something simple, and yet effective, and if you’re looking to create a great one of these, make sure it’s at an ergonomic height for throwing so that you’re not hurting yourself as well.
You can throw with this one in a bunch of different ways, including the following:
-
Centering the clay traditionally
-
Coil throwing by joining it together and then spinning to throw this
-
Slabbing the clay and shaping it onto the wheel
If you do finish this, remember to always fire your pottery, and glaze as needed, for you can keep it in beautiful shape because of this
A couple of Things to Consider
There are a couple of things to consider if you’re looking to make your own. Here are some various factors you should keep in mind when building this.
First, there is water, and many times, people will work with dry, or with a little bit of lubricant. The best way to create a pan for you to work with is to do the following:
-
Do consider where the electric motor is, and protect it so that water won’t leak or slash
-
Extra water can be pushed off a tube connected to the splash basin around the wheel
-
Make sure couplings don’t have water that drips onto the wheelbase, or anywhere within the motor if there is one
-
Usually, putting a bucket below the hose will empty this into the clay water as needed
You can always utilize a splash pan too, and you should definitely consider this so that you’re not spraying water over them. Most of the videos put these around the wheel and make sure they’re large and pretty deep so messes can be avoided.
Also, let’s talk about hand placement. One big thing that I do suggest when building these, is building them to your size. That’s because it affects hand placement.
The reason why hand placement matters are simple, and that is the following:
-
It gives you more control
-
You’ll have more leverage on your pottery
-
Allows you to shape it on the wheel better
Some people like to have a hand rest, and for beginner potters, I highly encourage them, since let’s be honest, hand placement can hurt how you spin the wheel. Some seem to find it useful, some don’t need to have it if they don’t use it.
How do you fix this though? Well, simply do the following:
-
Next to the turntable, but put in a way where it doesn’t hurt the rotation place a piece of wood, hard plastic, or metal
-
Make sure it’s put in a location where your hands will use it
-
Screw it in there to keep it as a permanent “arm steady”
This is a point that some people do end up finding important, and if you’re looking to build up the potter’s wheel, you should consider doing this. Pottery wheels are often quite important and if you want to make it easy on everyone, do this
If you don’t want to build your own
Brent C Wheel
This is one of the most popular pottery wheels and if you don’t have any mechanical skills to build your own. Read below to see a great ready-made Pottery Wheel.
This is one of the premier pottery wheels, and if you’ve used something smaller, and you want to move to a bigger, more productive wheel, then this is the way to go. There are many notable features to this, and it’s important to know a bit about them before you begin.
Click Here to Read the Reviews on Amazon.
So why choose this wheel? Well, think of the following:
-
This bad boy handles 225 pounds at once
-
You can use electronic control speeds to allow for the best torque
-
Allows for smooth responses when you use the wheel both clockwise and counterclockwise
-
It’s very durable and with the tensioning, it allows for a premier performance
This is a wheel for those ready to handle a lot of clay. I started with the first one, and I moved on to this one, and one thing that I noticed when I did graduate from this, is how smooth it feels once you get used to this. I think starting with something basic until you get to something bigger is ideally the way to go, but I love this one since I’ve grown into it.
Hand-built pottery wheels do take time and effort to make, and if you’re going for electric wheels, it’s important to have some experience in electronics under your belt. But, one of the best ways to ensure that you’re doing this correctly is to test it. And, if you do well with this, usually you’ll feel happy with the way it turned out. Now, remember that it does take some skill, effort, and in my opinion a lot of extra time to make these, so I do suggest that if possible, give yourself ample time, and if you need help with learning how to put the parts together, you can always consult someone familiar with electronics before you begin too.


