Coil pottery, an ancient tradition spanning millennia, remains cherished for its intricate designs and personalized touch. Unlike wheel or slab methods, coil pottery uses long clay coils to craft forms, showcasing humanity’s enduring creativity. Mastering coil pottery demands not only skill but also the right tools. The clay knife, banding wheel, burnishing tools, paddle, and puki are pivotal in shaping and refining clay, ensuring accuracy and refinement in the creative process.
What is the Coil Pottery Method?
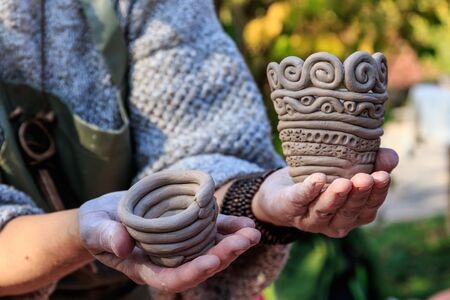
Coil pottery is proof of humanity’s enduring creativity. It dates back thousands of years and is an ancient form that continues to be practiced and loved today. Coil pottery doesn’t rely on a wheel or slab construction like other pottery methods. This method uses long coils of clay to build forms. This method allows for the creation of intricate designs, unique shapes, and personalized touches, making coil pottery a favorite among artisans looking to express their creativity.
However, mastering coil pottery isn’t just about skill and practice. This method requires the correct use of the right tools. The tools used in coil pottery play a significant role in shaping and refining the clay, allowing artisans to create with accuracy and refinement. Its comprehensive step-by-step guide will examine the key coil pottery techniques and the tools required to master them.
Mastering Coil Pottery Techniques with the Right Tools: Step-by-Step Guide
Now that we understand coil pottery, let’s discuss the process and the right tools. Here, we have given a step-by-step process:
Step 1: Getting the Right Tools
Starting your coil pottery process requires preparing the necessary tools. Each instrument has a distinct function, helping transform clay into extraordinary art pieces. Here’s a breakdown of the crucial tools needed to master coil pottery techniques:
| Tool | Purpose |
| Clay Knife | Cuts and shapes the clay |
| Banding Wheel | Shapes the pottery pieces |
| Burnishing Tools | Smoothens and polishes the surface of clay pottery |
| Paddle | Compresses and shapes coils of clay |
| Puki | Refines the interior of pottery pieces |
Step 2: Preparing the Clay
After setting up your tools, the next critical step to mastering coil pottery techniques is to prepare the clay. This essential step ensures that your clay is devoid of flaws and air bubbles, resulting in a smooth and uniform surface for your coil pottery product.
Begin by placing your clay on a clay wedging board, a solid surface for kneading and wedging. Wedging involves repeatedly folding and pressing clay to remove air bubbles and produce consistent consistency throughout. This step is essential because it avoids potential cracking and uneven drying during the fire process.
Pay attention to the texture and flexibility of the clay when kneading it. The clay should feel smooth and supple under your fingers.
Step 3: Shaping the Coils
Once the clay has been correctly wedged and prepped, you can shape the coils as the foundation for your pottery creation. Divide the clay into manageable chunks with your hands or a clay knife, ensuring they are the same size and weight.
Roll each clay section between your palms to create coils of equal thickness. The size and shape of the coils will differ based on the design and planned size of your clay piece. Experiment with various coil sizes and shapes to create the appropriate look for your product.
Consider the consistency and texture of the coils as you shape them. The coils should be smooth and precise of fractures or air pockets to ensure that the building process runs smoothly.
Step 4: Building the Form
With your coils shaped and ready for assembly, it’s time to begin constructing the form of your coil pottery sculpture. Start by laying the first coil on a flat surface, like a pottery wheel or a workbench. Using a paddle or your hands, carefully push and mold the coil into the desired shape, such as a bowl, vase, or sculpture.
As you add more coils, integrate the edges evenly to create a smooth surface. The goal is to design a cohesive and unified structure to retain its integrity throughout construction. Take your time with this stage; paying close attention to detail will produce a professional-quality finish for your coil pottery work.
Step 5: Adding Details
Once the basic shape of your ceramic item has been determined, you can start adding details and embellishments to improve its visual appeal. Using your clay knife, rib tools, and texture tools, create complicated patterns, textures, and designs that express your artistic vision.
Experiment with techniques and surface treatments to find the right look for your coil pottery creation. Whether you favor robust geometric designs or delicate floral motifs, let your imagination go wild as you add one-of-a-kind and personalized touches to your masterpiece.
You can use the Wood Clay Pattern Rolling Pin for the perfect texture of artistic floral designs.
Step 6: Refining the Surface
Once you are happy with the details, check for rough edges or unwanted bumps on your coil pot. Use a metal or plastic knife to smoothen out these rough edges and remove excess clay. Next, use a wooden spatula to even out the shape. It also helps remove irregularities from the surface before the pot is ready to be fired.
Step 7: Drying and Firing
Allow your coil pottery item to dry completely before firing it in a kiln. Proper drying is necessary to avoid cracking and warping during the fire process.
Follow the specified firing schedule for your clay type and glazes to ensure your ceramic item is fired at the proper temperature and duration. This step is critical for drying the clay and establishing a robust, long-lasting finish on your coil pottery project.
Conclusion
Coil pottery, an ancient tradition extending back thousands of years, is still famous today for its beautiful designs and personalized touch. This approach leaves out the wheel or slab building, instead depending on long clay coils to create forms. Mastery of coil pottery necessitates not just ability but also the proper tools. These tools, including the clay knife, banding wheel, burnishing tools, paddle, and puki, help with precision and refinement.


