Most artists assume that air-dry clay or normal clay is the only creative option you can work with, and polymer clay is for kids. However, polymer clay is much more than that. There are so many things you can do with polymer clay when you use it the right way. So, if you plan on exploring the mystery behind polymer clay, read through this guide to understand everything about it.
These colorful clay pieces can help you craft some amazing artwork that includes miniature figurines, jewelry, picture frames, pots, and so much more. So, let us learn more about it!
What is Polymer Clay?
A popular modeling clay variant, polymer clay contains PVC or Polymer Polyvinyl Chloride. Keep in mind that it doesn’t really have any clay minerals added to it. However, it is just as easy to use and moldable enough in a fashion similar to normal clay.
Once you are done molding your clay into a shape you desire, pop it into an oven and let it cure until it hardens and becomes permanent. Curing the polymer clay doesn’t actually shrink it like air-dry clay; rather simply hardens it to a durable form for the shapes to stay in place. Given how fun it is to mold and craft, it is hugely popular among kids.
Unlike air-dry clay, polymer clay doesn’t dry out when exposed to air. It can be perfect for someone who is just starting out as an artist and needs some time to craft the perfect piece. It is way better than Play-Doh as you get to solidify the object and keep it forever with you.
You might have come across polymer clay packages in your local art and craft supply store, but the variety might be limited in terms of brand and colors available. So, the right option is to shop online and grab the best block and prepare something interesting out of it. One brand you can try out is the CiaraQ Polymer Clay. This 24 colors starter kit is non-toxic and safe for oven baking.
Polymer Clay: Composition Study
Apart from the Polymer Polyvinyl Chloride resin present in the polymer clay, it is also comprised of liquid plasticizer, filler components, and coloring agents. This particular combination ensures that polymer clay can be categorized under the plastigel genre. Any plastigel material features considerable plasticity that gives it a chance to be easily molded into any form. However, it cannot be molded anymore after it has been heat-treated.
Is Polymer Clay Dangerous?
When using polymer clay, there are two rules that you need to keep in mind. First off, don’t ever eat it, and secondly, do not ever let it burn. So, naturally, there are safety concerns related to the use of polymer clay. Certain plasticizers can be detrimental to your health when you are exposed to them in the long term. They are known to affect your endocrine system. Readily available clay shouldn’t have 0.1 percent or more of the list of restricted plasticizers.
Almost every brand follows this protocol when manufacturing polymer clay, so you might not have to worry about it after all. Technically, polymer clay isn’t toxic. However, you need to ensure that it isn’t ingested accidentally, especially if there are children involved. You must also keep in mind that polymer clay mustn’t be burned. When done the right way, your polymer clay model will turn out fine. It is important to work with polymer clay in a well-ventilated space. In case you do burn a small portion of the polymer clay, it might release a small portion of HCL gases that could lead to nose or eye irritation.
If a situation like this comes up, ensure that your doors and windows are open and the irritant can escape with ease. In case you are concerned about the fumes, they can be baked inside a properly sealed bag. Even with fully cured polymers, there is a chance for the plasticizers to leach out. However, you must refrain from using it for storing or handling food products as polymer clay isn’t food safe.
In case you are using the cookie sheets for baking, ensure that it is lined up with wax paper or foil. Once you are done baking, you can throw it away. Make sure you refrain from using kitchen tools to cut, craft, or shape your clay. Keep them separate so as not to ingest the remnants accidentally.
Finally, always practice washing your hands after you are done molding or using polymer clay.
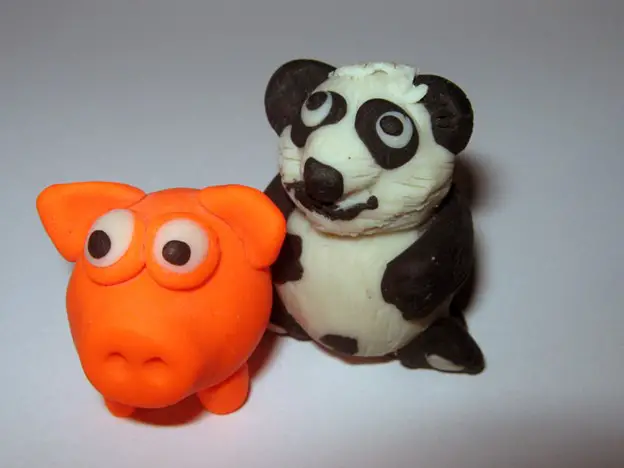
Polymer Clay: What can you craft with it?
Polymer clay is ideal for creating a range of craft items such as home decoration, jewelry items, pottery, sculpture, and scrapbooking. Techniques to use this clay the right way are mostly similar to that of metalworking, textile, glass-making, sculpture, ceramics, and more.
This clay can also be used for covering objects that don’t burn during the firing process, such as pens, frames, mirrors, and wood. In order to create new colors for polymer clay, you can formulate it with paint or get colors into it with chalk, powders, glitter, ink, colored pencils, or powdered makeup.
Post-baking, the polymer clay artwork can be buffed, sanded, or even painted to create a beautiful sculpture. The choices with polymer clay are endless. So, you can craft whatever you wish, except for anything that is used for eating and drinking.
Can You Mix Two Different Types of Polymer Clay?
Yes, you can absolutely mix two different brands of polymer clay depending on the project’s needs. Mixing different brands of polymer clay can help you change or customize the weight, color, or baking stability. However, do read the instructions that come with the packaging, and in case it is advised by the manufacturer not to mix it with other brands, you must refrain from doing so.
Precautions When Using Polymer Clay
As a hobbyist, you can safely use and bake polymer clay in your home oven. However, you need to ensure that the baking area is properly ventilated in order to prevent any harmful fumes from being inhaled. There are several polymer clay crafters that use toaster ovens for baking purposes. This works fine as long as you keep the baking temperature in mind mentioned in the packaging. However, polymer clay should never be baked inside any machine that is used for preparing food. During the baking process, fumes from the clay tend to remain in the filaments and might make their way into the food in case you bake something else without cleaning up first. This can be a potential health disaster waiting to happen.
Apart from this, you also need to keep in mind that the polymer baking sheets or cookie sheets should be lined using index cards/cardstock or foil during baking to avoid the structure from burning. If you plan on using toys, or kitchen items for molding or crafting purposes, make sure they are never used for food preparation ever. Additionally, make it a practice to wash your hands after every crafting session to avoid any clay remnants from entering your body through your food. You must also supervise small children using polymer clay to avoid accidental ingestion.
How Should You Store Polymer Clay?
If possible, try to store the polymer clay piece in the original packaging. Also, keep the piece away from sunlight or direct heat. Refrain from leaving your clay inside a vehicle in the hot summer months as it might initiate the baking process due to the convection heat design inside the closed vehicle. This would render your clay unusable.
In case you lose the packaging, it is ideal for the artists to wrap it up using wax paper and then store it in a durable, airtight container. Refrain from storing it in any food storage container or Tupperware that would later be used for food purposes. Instead, most artists recommend storing your polymer clay in a freezer or refrigerator. This will keep the clay completely dry and doesn’t expose it to sunlight in any form.
Polymer Clay Conditioning: What is it?
Conditioning is an important part of any clay preparation process. In simple words, it is the process that helps you warm the clay during the kneading process. This makes it more malleable and easy to craft. Further, it also enhances the polymer clay’s pliability & reduces any breakage risks. Polymer clay can easily be conditioned within minutes through the stretching and kneading process. If your polymer clay is stiffer and stronger than other options in the market, you can use a pasta-making machine to get the job done. You can simply cut the clay piece into multiple chunks & feed it through the machine multiple times before you start molding it into the desired shape.
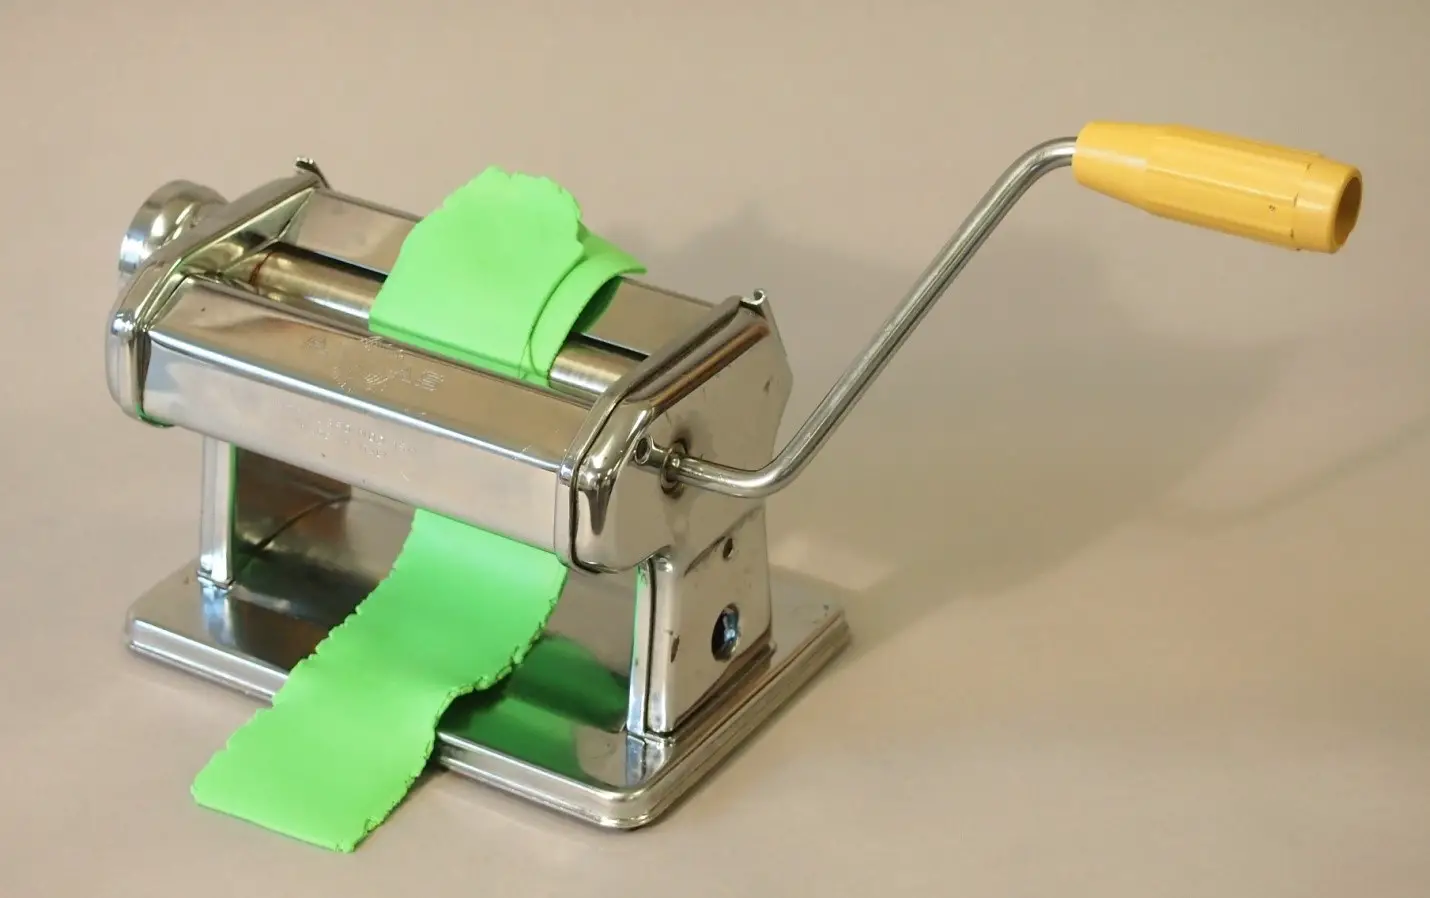
Pasta machines can be used for more than conditioning the polymer clay. It can be used to blend and roll the clay. The machine can help ease the conditioning for stiff clay. It can also be used in case your hands are tired. It also helps roll out the clay in uniform layers and thicknesses.
How Should You Bake the Polymer Clay?
Polymer clay, depending on the brand, can vary in terms of baking time. So, make sure you follow the instructions mentioned in the packaging. First, start by preheating the oven & baking the clay on foil, ceramic tile, or index cards. Post-baking, allow the polymer to cool down and cure completely prior to touching or handling it. In case you want your polymer craft to have a shine, you can do that as well. First, start by sanding it down with the help of wet-dry sandpaper while exposing it to running water. Next, buff the item with the help of a clean and soft cloth. You can also apply water-based acrylic paints or glaze after the baking process is completed.
Can you paint a polymer clay craft?
Any type of clay can easily be painted over. However, the process could vary depending on the type. The best way to paint on polymer clay is to apply water-based acrylic paint in multiple layers. However, you need to keep in mind that the layers should be thin. Applying thick layers can lead to flaking issues after drying.
In order to make the paint doesn’t come off, make sure you seal the colors with the help of glaze.
Using Polymer Clay: Quick Tips for Beginner Artists
- Polymer clay is perfect on its own and doesn’t have to be glazed or sealed
- Polymer clay originally doesn’t become shiny on its own after curing; it needs to be buffed with sandpaper
- A proper baking process is very important to make the clay permanent. With the right temperature, your clay craft will stay by your side for years
- You can easily paint on polymer clay
- Polymer clay isn’t toxic in nature, but it might vary depending on the manufacturer
- You cannot get the same results with two different brands. The ingredients and the manufacturing process can vary, which can alter the results
- Improper storage of the clay can ruin it. The ideal storage solution is to keep it in an airtight container
Is polymer clay water-resistant?
Polymer clay, by nature, is very durable. It becomes water-resistant and plastic-like post-baking. The clay is strong by itself & doesn’t require sealing for protection purposes. Polymer clay by itself can withstand weather, and water, & wear better as opposed to any sealer. To put it into perspective, the sealer can break down way before your polymer clay does.
Glazes, sealers, & varnishes tend to become sticky with time. They might also peel off and become cloudy due to dust settling onto them. And most of all, you might see those annoying paintbrush strokes on the craft item when not painted on properly. So use these sealants only when you really need them. Make sure you test your varnish on a small project before using the same on bigger projects.
There might be occasions where you might plan on sealing the polymer clay. However, in case you use some surface embellishments on the craft item like foil, mica powder, metal leaf, or any other embellishments, you can make use of sealants to keep them in place. If you use acrylic paint to decorate the polymer clay, it should be sealed only if there is a risk of your paint being rubbed or scraped off.
Additionally, you can use sealers for changing the polymer clay’s gloss level. Depending on the desired result, one might plan on making the bead very glossy or matte. A sealer is perfect for achieving such results. Artists can also use water-based varnishes for sealing the polymer clay. Most people love to use an acrylic varnish that is popularly used for the protection of art paintings. These varnishes come in satin, gloss, & matte finishes. However, there is a catch in this scenario. Some brands of varnishes never completely dry on polymer clay. On top of that, if you paint on varnish over the acrylic layer, it could lead to additional stickiness.
Why is my polymer clay crumbly and hard?
At times, polymer clay can get crumbly as the product ages. This type of clay can be very difficult to craft. However, this type of clay in itself isn’t actually damaged. You can surely salvage it with the right tips. With a bit of work and smart thinking, you can soften the clay. The best way to soften polymer clay is by warming it slightly. However, you need to keep in mind the fact that the temperature shouldn’t be too high as it would cure permanently. Slight warming will make the clay softer & easier to condition.
Additionally, you can place the polymer clay package in a Ziploc bag and place it inside a bowl of hot water. This will help soften the clay to its best possible condition and make it easy to mold into a craft item. The last and best way to soften your polymer clay is to mix in a drop of two of liquid clay or mineral oil. Most crafters report amazing results when using this method as it is easier and faster.
Polymer Clay: Are You Baking It Right?
We cannot stress the fact enough that polymer clay needs to be baked at the right temperature. When baked properly, polymer clay becomes durable, strong, & attractive. However, under baking can lead to breakage & abrupt color changes. You need to use an oven thermometer to check whether the temperature is just right. Remember that different brands have different temperature parameters for baking purposes. Do not go lower than the recommended temperature. A lower temperature can cause incomplete curing.
First, you need to preheat the oven and then maintain the recommended temperature. Next, you need to bake for the minimum time period as stated by the manufacturer. Once the pre-heating process is complete, start the timer and begin the baking process. Most artists and professional crafters agree with the fact that with polymer clay, longer baking can ensure stronger finishing.
In order to protect the project against any type of browning issues or color changes, you need to ensure that the project is covered from all sides when kept inside your oven. Most crafters use 2 aluminum-based foil pans to cover the project. In order to shut the foil pans, you can use binder clips to clamp them together. Doing this helps prevent your heating element in the oven from toasting the project.
Crafting with polymer clay: What are the tools needed?
In order to craft with polymer clay, you need to use the right set of tools. So, how can you get started? Here are the basics you need to have by your side for an easy and faster crafting process.
1. Pasta Machine:
As mentioned above, a pasta machine can help artists condition, mix colors, and make the clay into even and smooth sheets.
2. Cutting Blade:
One can use a normal kitchen knife for slicing the clay for small projects. However, you would need a cutting blade to get the job done the right way. The thin blades make cutting through polymer easy. Some variants come with handle attachments along with wavy blades to cut in a pattern.
3. Needle Polymer Tool:
When crafting with polymer clay, the needle tool is an important piece to have. It can help you create textures, nudge, poke, scratch, score, or stipple the piece.
4. Knitting Needle:
While it might seem knitting needle isn’t something you would use for polymer clay crafting, it is definitely an important one. Double-ended knitting needles made of metal are perfect for use as skewers. Artists that use clay to create beads can definitely use knitting needles to create the perfect hole.
5. Sculpting Tools:
Sculpting tools include a range of pieces that can help shape the polymer clay. They are available in plastic, wood, and metal pieces. Most crafters use metal ones to get accurate results. This is because they are strong enough to push through the clay cleanly without dragging it to the sides or corners.
6. Paint Brushes:
You can use paintbrushes to paint on the polymer clay. However, remember not to use the nylon ones and stick to high-quality options with bristles that don’t break down easily.
7. Ceramic Tile:
While this might not exactly be a tool, it is an important part of the curing and baking process. Apart from this, you can place a ceramic tile in your work area to ensure easy cleanup, cutting, and molding of the polymer clay.
Polymer Clay Tools |
Usage |
| Pasta Machine | Used for conditioning, mixing, and flattening the polymer clay |
| Cutting Blade | Used to cut through the polymer clay with precision |
| Needle Polymer Tool | Used to create textures, nudge, or poke through the polymer clay |
| Knitting Tool | Used to poke holes through the project |
| Sculpting Tools | Used to shape, add texture, and design the artwork |
| Paint Brushes | Used for painting, glazing, and sealing the project |
| Ceramic Tile | Used as a stand for baking the polymer clay. It can also be used as a base in the work area for easy cleaning and crafting process |
Conclusion
Now that you know the right way to use polymer clay start crafting your masterpiece. Make sure you work in a well-ventilated area when baking the clay to avoid exposure to any toxic fumes. Never remove the polymer clay right after baking. Let it sit inside the oven until it cools down. If your clay feels soft to the touch, it isn’t cured properly. Polymer clay that is cured the right way would be hard and strong.


