More often than not, I have met a few pottery beginners asking me how they can fire their pottery pieces without a kiln. I understand that Kilns are expensive especially if you are not a professional potter. Usually, there are commercial Kilns in most cities but just a few registered potters are allowed to bring their pieces for firing. The commercial kiln operators are selective about the pottery pieces they fire to reduce pottery-in-kiln explosions. Most times, commercial kilns have specifications on the type of clay, glaze, and pottery that can be fired. Your artwork might not fit in this category or meet the specifications. The last resort is to fire your pottery without a kiln. Although, if you love pottery, and you want to go pro, you will have to get yourself a kiln.
As we’ve discussed in previous articles, the essence of glazing cannot be overemphasized in pottery. Apart from beautifying the pottery piece, glazing preserves and strengthens pottery. When you are done with overglazes (which can be done through spraying, painting, or dipping), you will need to fire your pottery. Firing is the most essential part of glazed pottery. Without firing the overglazed pottery, the glaze will be useless. The problem now is your lack of kiln, so what are you going to do? How are you going to glaze your pottery without a kiln?
Traditionally, pottery is usually fired to about 1,400 degrees F (760 C). The heat involved in the firing process removes the molecular water trapped in the clay. The high temperature converts clay molecules to air-tight molecules that do not dissolve or slake in water. Kilns were invented to contain heat to reach higher temperatures with less fuel. It is traditional to use an outdoor bonfire type of firing that is fueled with dry wood kindling under the pottery to exceed red glowing heat during the burn. The traditional kiln has been used for years and is still in use today. Most polish pottery pieces are fired in traditional kilns.
Uses of Kiln in pottery
Before we dive into the methods of firing your pottery without a kiln, let’s take a moment to discuss the importance of a kiln.
According to Wikipedia, the following are the uses of a kiln.
- Annealing: This involves fusing and deforming glass, or fusing metallic oxide paints to the surface of glass. Pit-fired kilns are often used as both pottery kilns and also glass kilns.
- Heat treatment for metallic workpieces: Large industrial kilns are used by not only potters but also blacksmiths in treating their metals.
- Ceramics: Obviously, the importance of kiln in pottery and ceramics cannot be overemphasized.
- Brickworks: Bricks are derived from earthenware clay. The clay is being molded and fired at high temperatures.
- Calcination of ore in a rotary kiln before smelting
- Pyrolysis of ceramic materials.
- Heating limestone with clay in the manufacture of Portland cement, the Cement kiln
- Heating limestone to make quicklime or calcium oxide for glazes.
HOW TO FIRE GLAZED POTTERY WITHOUT A KILN?
| METHOD | COMPLEXITY (OUT OF 10) |
| Pit Firing | 8/10. You really need to put in work to fire your pottery in a pit. |
| Smoke Firing | 5/10. It is less stressful and complex than Pit firing. With just a trashcan, you are good to go. |
There are a few methods to fire glazed pottery without a kiln and they are:
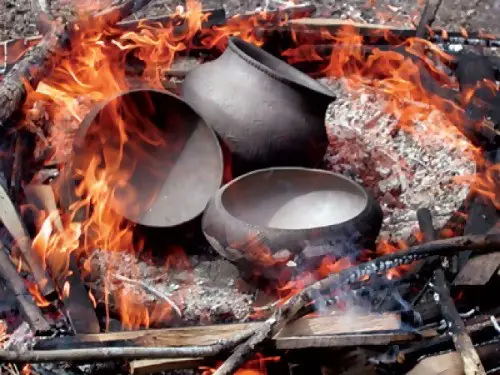
1. Pit Firing
People have been using pit fires to fire their glazed pots and ceramics for a long time – it is one of the oldest known methods for firing pottery. You do not need any complicated equipment which makes it perfect for trying at home.
- The most essential thing to do is to dig a pit. Dig a pit that is big enough to hold your pottery pieces and lots of fuel (preferably wood). If the soil is damp you may need to demarcate your pit with hardened metal or cardboard.
- The next thing to do is to fill the bottom of the pit with layers of sawdust. Several inches of layers of sawdust will be needed for this. The more inches, the higher the temperature of the pit fire.
- Add your glazed pottery pieces into the pit. Put your pots, mugs, pans, plates, and other ceramics in different directions to get different effects. It is also advisable to add copper and salt around your pieces for twinkles of colors to be produced on the finished pieces. Make sure your pieces are completely dry before trying this.
- Add layers of sawdust, dry wood, and paper to the pit. It is best to build up layers of sawdust and other flammable materials (fuel) around your pottery pieces. You will want your fire to burn for about an hour, sawdust is the fuel that burns slowly. You can try different types of dry wood and check which burns hotter and slower.
- Light your Fire. Your fire should be lit from the top of the pit and enough oxygen should be in the pit to make the pit burn evenly.
- Dig up your glazed bisque-fired pieces: Allow the fire to smolder and cool down by covering the fire with a piece of metal. When it is cool, you can dig up your ceramics. Clean it with brush and water then rub beeswax around the pottery.
2. Smoke firing (in a trash can)
Smoke firing dates back to the 12th century. It is the safest and easiest method to try. It does not need a lot of equipment or space. You don’t need to dig up any pit as it is quite easy and inexpensive.
It is the same process as the Pit Firing. The only difference is that you’ll be making use of a metal trash can (preferably an old one). You can also get a new trashcan by clicking here.
You have to make tiny holes around the base of the trash can and then build up layers of sawdust, dry wood and paper, and pottery inside the dustbin.
Light a fire on the top of the trash can, and when it dies down a little put the lid on. It is going to burn very slowly, so you have to be patient. Allow the trash can to burn for 12 to 14 hours – it may take even longer before the pots cool down enough to handle. The dustbin will get very hot and there is a risk that the pottery will explode – so don’t let the children play near it.
In this article, I have discussed the need for a kiln when firing your glazed pottery and how you can glaze your pottery without a kiln.


