
Bringing creativity and practical skills in designing personalized, functional pieces is how one creates handcrafted coffee mugs. It starts from clay selection to mug shaping and then passes on to firing in a kiln, finishing with decorative glazes. In this hands-on project, therefore, not only are creative mugs made, but valuable experience in pottery techniques is also awarded. Creating your mug is a very fulfilling way to express your creativity while learning pottery, perfect as gifts or for personal use.
Materials Needed to Create Handcrafted Coffee Mugs
To get started, gather the following materials:
| Materials | What Role Do They Play in Making the Mug? |
| Air dry/ oven bake clay | Base material for shaping the mug |
| Rolling pin | For rolling out the clay |
| Sculpting tools | For shaping and detailing the clay |
| Oven | For baking the clay |
| Acrylic/ceramic paint | For decorating the mug |
| Paintbrushes | For applying paint |
| Clear sealant | To protect the paint (optional) |
| Fine sandpaper | For smoothing any rough edges after baking |
Step-by-Step Guide on How to Create Handcrafted Coffee Mugs
Once you have all the materials required, it is time to learn all the steps needed to make a fine creation!
Step 1: Prepare Your Workspace
First, prepare a clean, flat area to work with the clay. Line this area with wax paper or a plastic sheet so it does not stick to the clay. Keep all the materials and tools within your reach. You will need the following: clay, sculpting tools, water, and other materials as per your requirements. It will make the process of your clay crafting much more organized and enjoyable.
Step 2: Choose Your Design
Choose the shape and design for your mug. You can quickly outline some ideas on paper to get them started for visualizing. You may go for a simple cylindrical mug or something creative and unique. Extra features, such as handles, textures, or decorations, help enhance the overall design of a coffee mug. You will have a more precise route of action to guide your craft, ensuring greater satisfaction with your result if you take a little time to think through your mug’s design. Let your imagination run wild to make a clay mug all your own.
Step 3: Shape the Mug from Clay
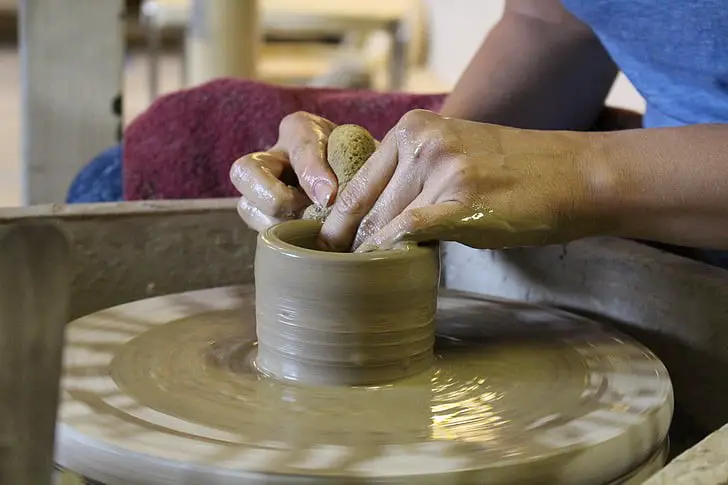
Knead clay until it is soft and pliable. Roll out the clay to a thickness of about ¼ inch. Use your template or freehand cut to shape the walls of the mug. Roll another piece of clay into a long, thin coil for the handle. Attach the handle to the mug body by scoring the clay surfaces and pressing them together firmly. However, it would help if you used a robust pottery wheel to shape the mug. You can check out the Patented Mini Pottery Wheel Kit. This highly-rated, adjustable turntable is perfect for crafting and painting pottery. It’s rechargeable and easy to use, making it ideal for beginners and hobbyists looking to create beautiful clay pieces.
Step 4: Let the Clay Dry
Allow your mug to dry completely, which may take 24-48 hours, depending on the type of clay used. Place it in a cool, dry area to prevent cracking. Avoid touching or moving the mug during this time to ensure it dries evenly and maintains its shape. Patience is key, as rushing this step can compromise the durability and finish of your mug. Once fully dry, you can proceed with additional finishing touches or decorations.
Step 5: Bake the Mug in an Oven
Preheat your oven according to the clay manufacturer’s instructions. Place your dried mug on a baking sheet and bake it at the recommended time. It hardens the clay and makes the mug durable. Be cautious when standing beside the oven to avoid overbaking. If the baking is done, let the mug cool in the oven before handling. This step is essential for a strong mug to be ready for use. All the safety precautions that the clay manufacturer recommends are vital to practice.
Step 6: Paint Your Design
Now that the mug has cooled off, you can paint it. You can use acrylic or ceramic paints to personalize your mug with patterns or images according to your will or even text. Follow your imagination. Be careful about layering the paint evenly, and once the mug is covered with the first layer of paint, allow it to dry before adding more details. You can seal the design further with sealant, giving it a glossy finish. Painting on a mug might be fun, but it’s an enjoyable way to personalize and make it yours. So, enjoy the process!
Step 7: Let the Paint Dry
Allow the paint to dry completely. Depending on the paint used, this may take a few hours. Let the mug sit in a well-ventilated area, and try not to touch it to avoid smudging. Ensure it is totally dry before moving on to the next step. It will help keep your design from unwanted mixing or damage. Patience here will ensure that the finish is smooth and professional-looking.
Step 8: Seal the Design
Apply a transparent sealant over your painted design. It helps protect it from wear and tear, especially if you intend to use the mug frequently. Choose a sealant compatible with your paint and apply a thin layer across the surface. Let the sealant dry before you use the mug. It will help keep your artwork fresh and add a hard, shiny finish. It will seal your design into the mug, making it colorful and protected for everyday use.
Step 9: Final Bake (Optional)
You can bake the mug again after painting and sealing it for extra durability. Follow the paint and sealant instructions to ensure you bake at the correct temperature and duration.
Step 10: Final Touches
Fine sandpaper can smoothen any sharp edges or problem spots on your mug. Rub gently on the places until they are smooth to the touch. Clean your mug thoroughly after sanding to remove any dust or debris. Ensure it is nice, clean, dry, and ready for use. Your handmade mug is now ready to use! Celebrate being creative and crafty by using or displaying your one-of-a-kind creation.
Conclusion
Making one’s coffee mugs must be the most imaginative and fun work. It allows you to show up with some of your characters and create something unique. With these steps, beautiful mugs can be made for any occasion.


