Polymer clay is an ideal choice when it comes to clay jewelry making. However, artists have also experimented with air-dry clay, and it can be equally good when it comes to creating some beautiful statement pieces to go with your daily wardrobe. Not just that, but they are equally durable and long-lasting. So, what are some simple yet stylish jewelry designs you can experiment with as a beginner crafter? Let us find out!
Interlinked Clay Disc Bracelet
When working with air-dry clay, a great option is to work with an interlinked clay disc bracelet. Here, small disc-shaped clay pieces are interlinked with the help of a chain with hooks on the end that go around your wrist. To create this design, start by rolling out your clay with the help of a rolling pin. You can also use a textured rolling pin to get some designs on your bracelet. Next, use any round shape cutter or any household objects that are circular. Now, add one hole on each side of the circular disc. Now, using jump rings, connect all the discs. Before that, make sure you color the discs and let them dry completely. After connecting these discs, add a hook and clasp on the ends and wear them with your favorite attire.
Tear-Drop/Leaf Pendant
Another idea that is quite popular with air-dry clay jewelry crafting is pendant making. If you are looking for an easy design, the best option is a tear-drop or leaf shape. Start by rolling out your clay to ensure it is thick and evenly on all sides. Next, use a real leaf and press it on the clay to imprint the design of the veins and the overall shape.
Once you are happy with the pattern, slowly cut out the shape using a pen knife. On the top end of the leaf pendant you just created, add a hole with the help of a toothpick. Make sure the hole is big enough for the chain to pass through once the clay has dried out completely. You can leave the clay as it is or colors it with your favorite tint. Green is always a great option if you love to keep it natural.
After the clay pendant has completely dried out, you can add a chain and wear it as you like.
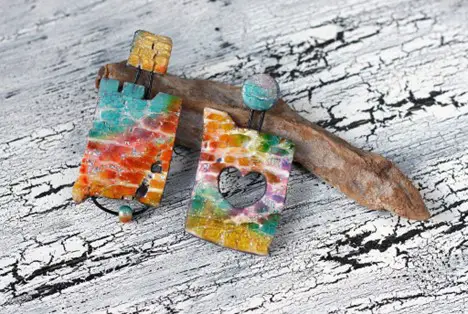
Clay Disc Earrings
If you are a fan of clay earrings, you can make one with air-dry clay. For this project, you would need earring hooks, acrylic paint, some jewelry charms, and jump rings to connect the parts. Before you start shaping up your earrings, make sure the clay is kneaded well to ensure that the clay doesn’t fall apart once it dries out completely. Next, roll out the required amount of clay and make sure the thickness of the clay is even all around.
Now, cut the clay into a disc-like shape with the help of a round cutter or maybe a bottle cap. Make sure you add holes on both sides of the clay discs and color them after they have dried off completely. Connect the discs with the jump ring and add earring hooks on the top ring. If you wish to, you can add some jewelry charms on the lower half of the earring.
Floral Earrings/Pendants
Another idea you can try is floral earrings or pendants. To make this easy, you can use cookie cutters available online. You can opt for the Elinka Flower Cutters to cut out some beautiful designs from air-dry clay. This 73-piece set contains different types of flowers, stars, hearts, butterflies, etc., to help you cut out your desired design from the clay.

Start by rolling out your clay, and then use these cutters to cut out your desired flower shape. The cutout would be perfect to start with, but if you wish to add some more details, you can do so with a toothpick. Finally, add a hole on any petal of the flower and let it dry completely. Finally, paint it with a color of your choice and add a chain or earring hook, depending on how you wish to wear it.
Conclusion
Always start with simple designs when creating jewelry with air-dry clay for the first time. Once you have a better hold over the crafting process, you can work your way around complicated designs. Do not roll out your clay too thin, or the clay might end up cracking. The key is to keep the thickness 1/4th of an inch and keep it in a warm and airy space to allow it to dry out evenly.


