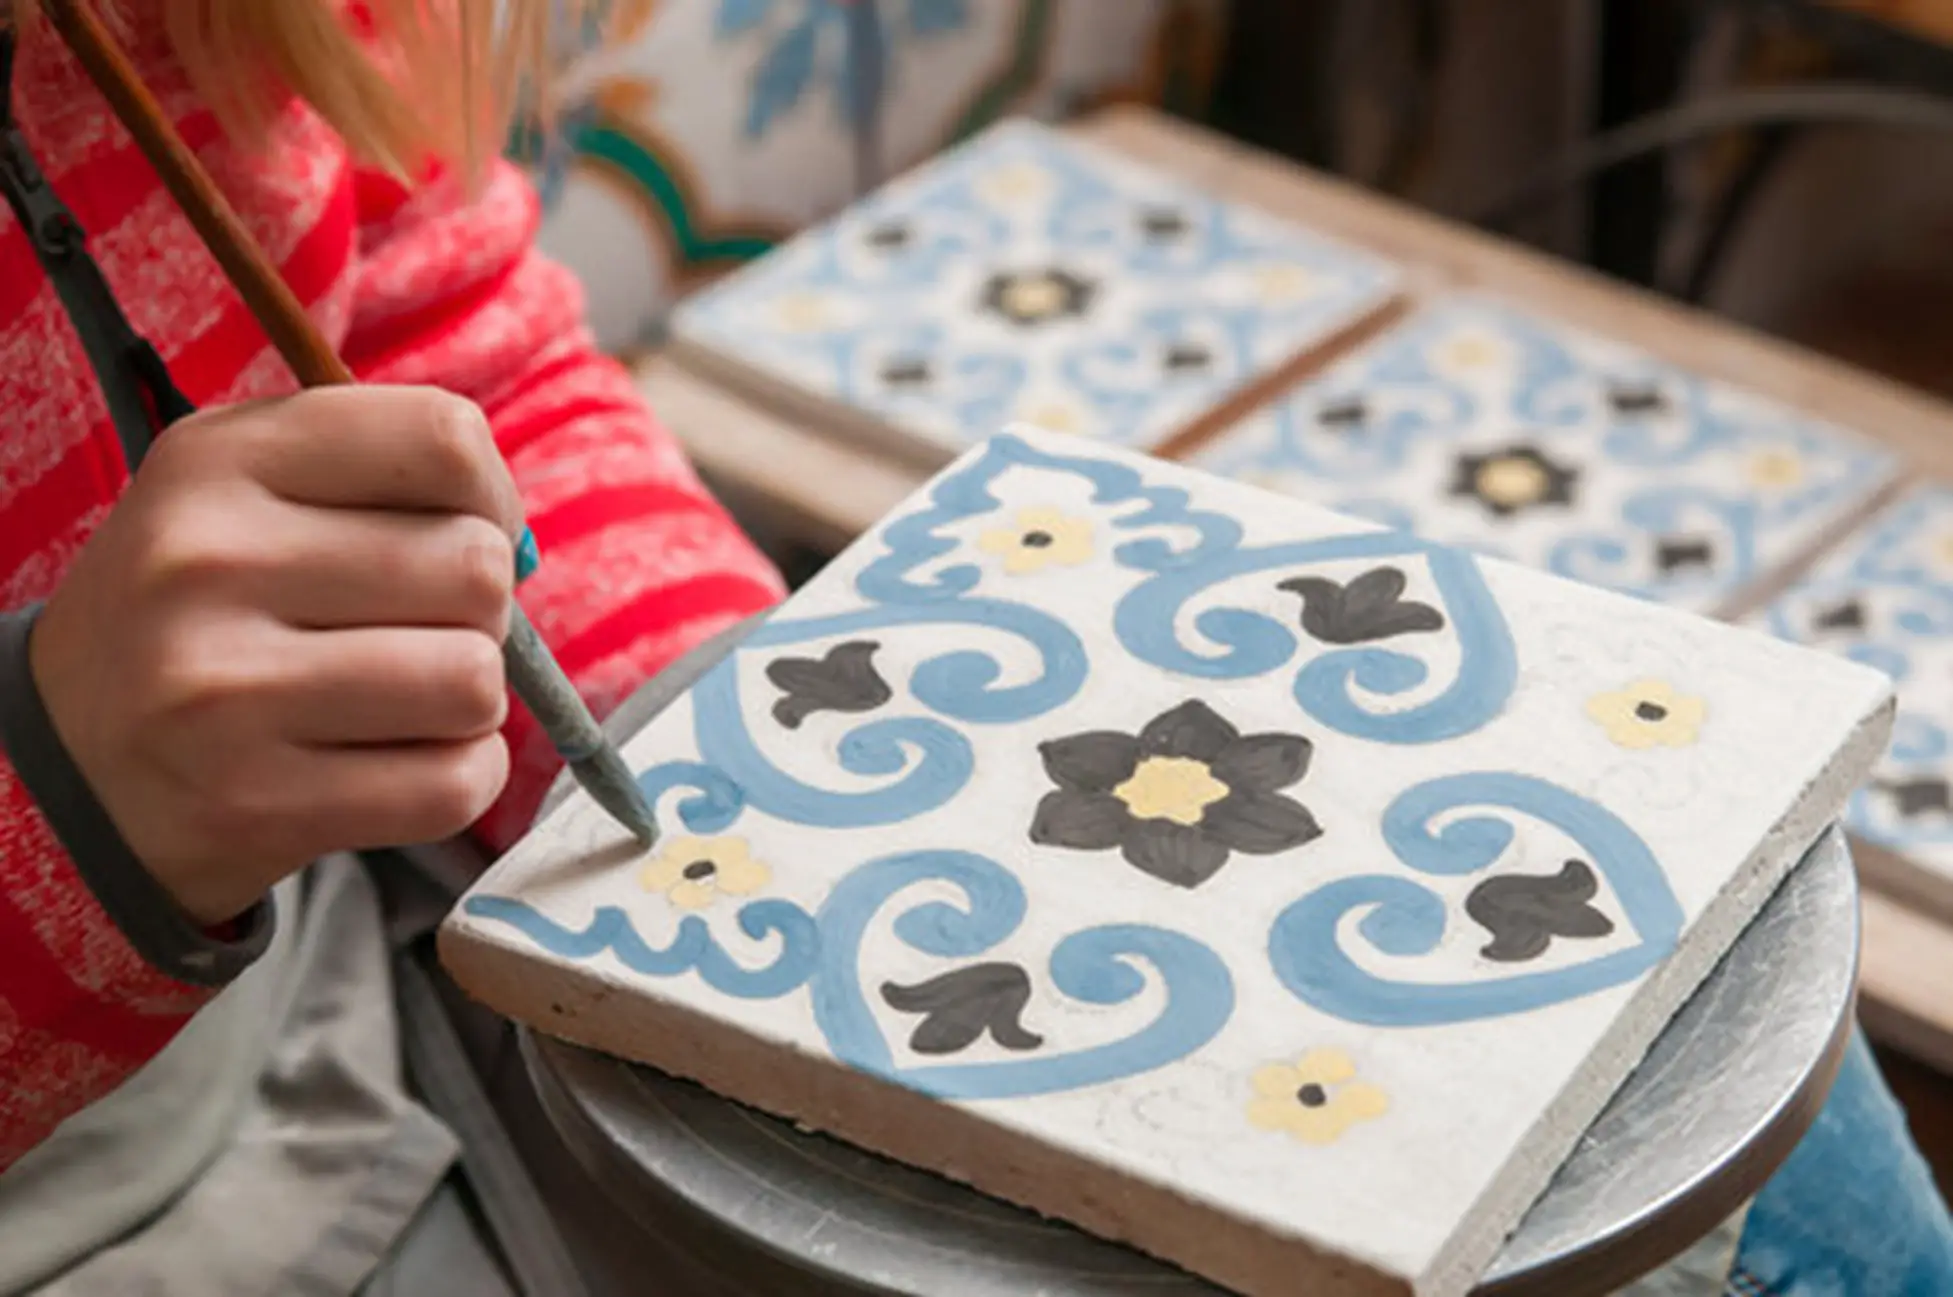
Making your pottery tiles provides immense satisfaction for a potter. It can be as simple as making a set of coasters or an entire set for your kitchen or bathroom. Creating your own pottery tiles gives you the creativity and freedom to choose whichever pattern you like.
Unlike other materials, it is a good idea to make a tile with a clay body as it contains a high amount of grog which is heavy-duty, durable, and waterproof.
Thus, this article will discuss how you can make a pottery tile. Let us get into it.
1. Choosing Clay Bodies
First, choose a suitable clay type for making your tiles. It means you need a tile with a high grog content. The primary reason for using clays is that they are majorly designed for sculpture. Raku clays are usually suitable for making tiles because of their high thermal shock resistance and low shrinkage rate.
By choosing an excellent clay body, you get the added features of durability as well as waterproofness. Moreover, good quality clay bodies mature reasonably when the fire is glazed at them. It prevents cracking and other defects. If you do not need your tiles to be waterproof, you can underfire the clay, making it flat. It would be best if you chose a proper clay type.
These are essential features, mainly if you use these tools to make tiles for your bathroom and kitchen. Tiles for these areas need to be durable and safe. Generally, it is seen that earthenware clay, which is low fire, is the worst for tiles as there is a lack of grog, and it can also be easily soiled.
Since you now understand the importance of choosing the right clay body, let us know in-depth about the types of clay.
Types Of Clay |
Features |
Earthenware |
They are more porous and have a coarse texture. One of the common earthenware clays is terra cotta. They generally require low firing and follow two types of firing, which include bisque fire temperature and glaze fire temperature. |
Stoneware |
It is a more porous and sturdy material than earthenware and porcelain. It is also quite durable, can withstand heat, and is safe to microwave. |
Porcelain |
Porcelain is a popular type of clay and is a delicate finish. Earlier, potters used it to make china ware. However, it can be challenging for beginners as it has more clay particles. These are mainly fired once to get a different style of finish. |
Ball Clay |
It is a less commonly known type of clay. Earlier, these were used for floor and wall tiles. However, you can still use it for making mugs and plates. It is quite malleable and is popular with various potters. |
2. Rolling The Clay
After selecting the clay, you must make it dry and roll it. It will reduce the warping problem. Ensure that the tiles are thick. If they are not so, the thinness can cause warping. A tile of 8 sq. inches is evenly shaped and a minimum of 1½ inches wide. It is thicker than regular commercial tiles, and you can opt for it for maximum durability.
Also, ensure not to twist your slabs in wet conditions. Otherwise, the clay will get damaged. You should roll the slabs when they are dry. Then, move them onto the fabric, and do not try to peel them off directly. Try to put a rigid board on the upper portion of the slab as soon as possible after rolling it.
Now you can flip the entire thing and uncover the fabric from the clay. Finally, make the slab slide through a board to bend it. If you find this too difficult while rolling the slabs on the board, ensure that they lie flat until they slide off. Here, it works like slab rollers. The clay remains static while the roller moves across it.
The slab must be rolled, flipped over, and then rolled again to prevent excessive distortion. It is especially beneficial if you have a single roller. However, if you have two rollers, the slab would run through, and the clay is required to be compressed by pressing both rollers equally on either side of the slab.
Additionally, when rolling over a canvas, it is vital to prevent the canvas from getting wet and the clay from sticking. You must also avoid removing the canvas from the tile. You can cover it with a variety of materials. Additionally, you can buy a canvas like Artkey Double Primed Paint Canvas. It is made of 100% cotton and has the ideal size of 8 x 10. These features make it easy for you to roll the clay on it.

In some cases, you can employ heavy Pellon. A great interfacing material available in stationary or hardware stores, it does not bunches up or stretches. It will make rolling the slab more hassle-free for you. Rolling slabs onto old lithographic printer mats or vinyl flooring is another option.
What Alternatives Can You Use To Roll The Slab?
You can use other options if you do not want to roll your slab. Wheel-throwing the tiles is one option. Try to figure out the diagonal length of your completed tile, which is the distance from corner to corner. Then weigh each clay ball and calculate to ensure that all the tiles are equally thick.
Usually, some people apply pressure on their tiles. However, you can pound the clay into the proper form by making a bottomless wooden frame. And then, wipe out the extra clay with a cut-out wire and drive the clay to the lowermost surface.
If you intend to avoid bending, utilize a wooden piece the same size as the clay and push it through. After this, you have to allow the clay to dry. You can also use edible oil to layer the wood thoroughly.
Additionally, you can cut tiles directly from the clay block. You can purchase a cutter or make one of your own for the said purpose. If you opt for the latter option, take 2 wooden strips or dowels and notch the intervals 1½-inch apart for your ½-inch thick tiles. After that, tie the wire about the wooden strips from the incision that is located first.
Next, take a wooden piece in each hand, apply immense pressure on the wire and pull them tight. Finally, slide them while pulling the wire evenly throughout the clay. However, always ensure that you hold the pieces vertically as you draw. After that, take the wire to the lower incision of the piece and repeat the same process.
3. Tile Cutting
You now understand the different processes of rolling. So, let us learn the next procedure, which is cutting. Wait 24 hours to let the clay dry before you cut them into pottery tiles.
Additionally, if you impress a design, ensure you cut the tiles and distort the shape. Designing before cutting out the tiles can distort them. Create a metal or wood-based template to ensure your tiles maintain the same size and design.
4. Drying The Tile
Flat-shape drying is essential. The tiles must dry equally on either side to avoid warping. Keep them out of draughts and cover them with plastic to dry them slowly. Tiles can be dried using one of 2 methods.
-
Place each of the tiles between 2 drywall pieces. It is readily available because it is the primary material to form walls. It is also used for fluorescent light fixtures at times. After sandwiching your tile in drywall, you can place it between the sheetrock layers and accordingly pile them up. After that, pull the moisture from both sides. As an alternative to this method, you can dry the tiles between the layers of 3-quarter-inch plywood and a layer of calcium silicate board.
-
First, place the pottery tiles on a wire to execute the other method. It will dry them and allow proper air circulation. You can use plastic grids to facilitate enhanced air circulation. You can use a variation by drying on plastic grids for fluorescent light.
Once you use the drywall technique for the initial few days, try to transfer the tiles to the wire racks. After that, it is recommended that you wax the ends of the tiles before they are dried.
5. Cutting Grooves
To make tiles more suited to daily use, you can cut the grooves at the rear end of your created pottery tiles. It would allow for a greater surface area in case of adhesion, digging the mortar bed effectively. It prevents your tiles from slipping off surfaces and causing accidents or injuries.
You can cut grooves by rolling the dried pottery tiles in furrowed cardboard. However, note that these furrows do not affect any warping.
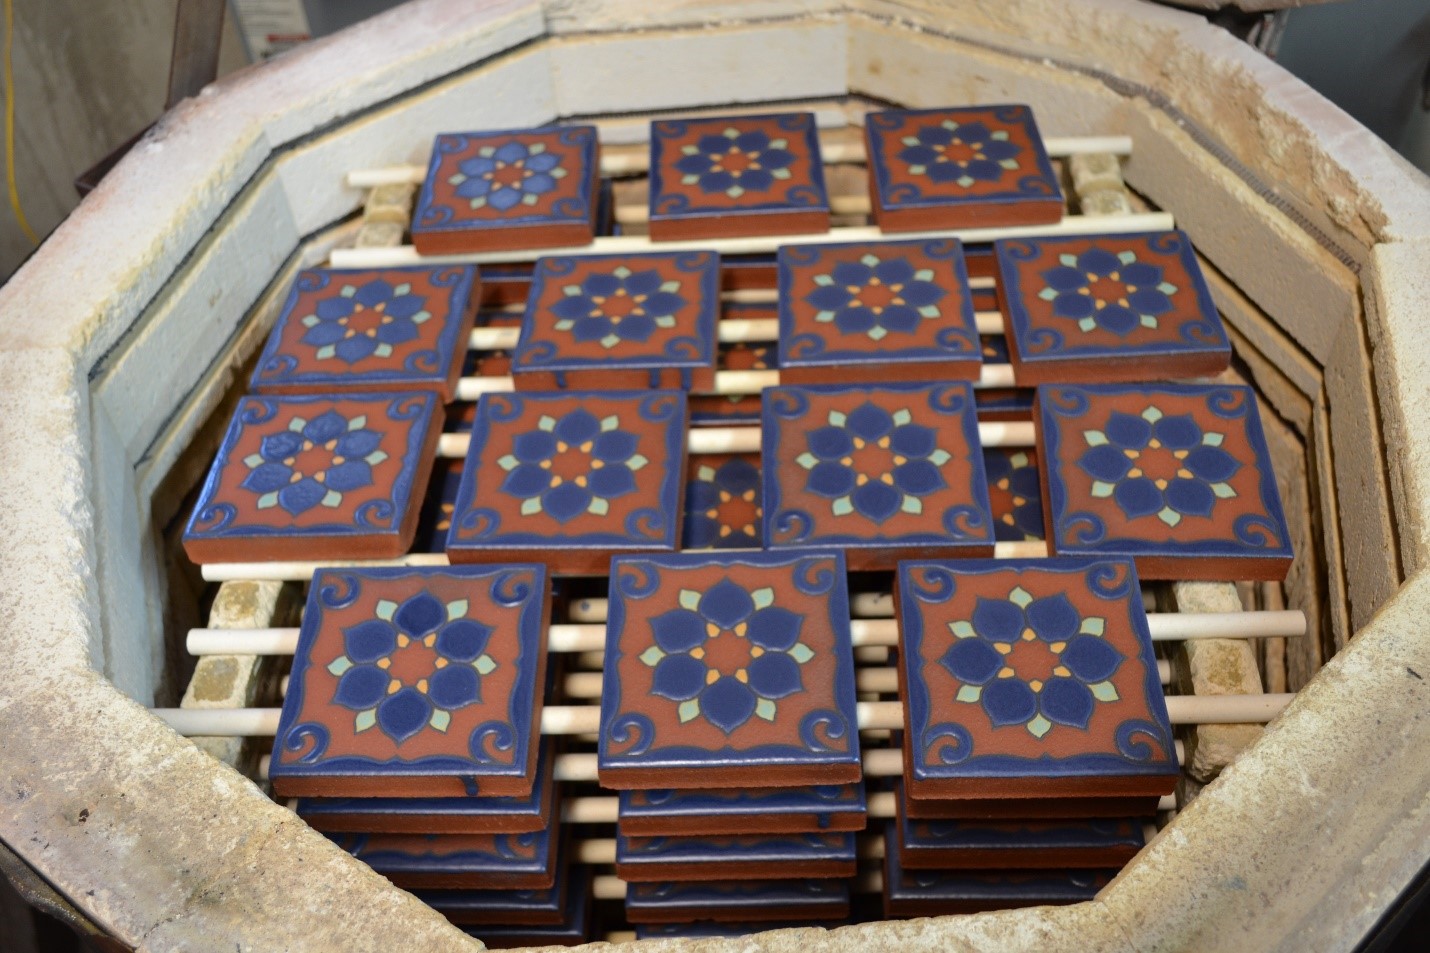
6. Tile Firing
There are different types of kilns available for tile firing. We will discuss them in the following table.
Types Of Kilns |
Uses |
Gas Kilns |
These generally use natural gas or propane. The kiln majorly consists of a chamber that is insulated with fire. The tiles can be placed in the section at the base. Here, through an opening, lit gas passes. |
Updraft Kilns |
These have burner pots on either side of the base. The gas flame travels up the side and then heats the chamber in which the tiles are placed. |
Electric Kilns |
Electric kilns are one of the modern methods for kiln construction. These generally consist of an internal chamber insulated with a refractory material. The heat is generated through the metal coil, and the tiles are fired accordingly. |
Raku Kilns |
In these kilns, the pottery is put in a closed container with some combustible material. In this case, you must remove the tiles when it is red hot. |
Car Kilns |
These kilns have a fixed base with a tunnel, and the door is positioned and locked. Here the tiles are placed in one place, then they move through the tunnel where they are fired. |
It is important to note that clays generally shrink when they are fired. So, you must calculate accordingly, especially if you plan to make a mosaic from the tiles. It can be challenging to predict how your tiles will shrink. However, grab a clay slab and make an incision of 100 mm to understand the shrinkage rate.
Now, measure this fissure at a high-fire state and note it down. If it measures 90 mm, then you would understand the shrinkage for this material is 10%. If it’s 86 mm, shrinkage is 14%. This way, you can calculate a general shrinkage rate for all your tiles.
The above are specific processes you should follow when making a standard-size tile. The following are some ways you can make a large (12″ x 12”) tile.
-
Try using a clay type with ample grog (around 10% or above.)
-
Then, try to make the tiles thick to sustain the greater width.
-
Further, round and smoothen the boundaries to prevent weakness or injuries while trying to lift them.
-
Also, make sure you use a high-cone clay type, which requires lower firing. It makes the product porous and less prone to cracks. Large tiles are more prone to cracks, so you must take rigorous precautions.
-
After that, fire the cracks for more oversized items. Alternatively, you can use a computerized kiln to manage the temperature better.
-
Then, gradually dry the tiles without allowing moving air like wind, a fan, or natural draughts to pass through them. It is vital because moving air can deform your tiles. Also, make sure you dry the tiles uniformly with wire racks.
-
Preheat it to 180 degrees for about 7-12 hours when you bisque fire a second time.
Conclusion
Today there are various formulations available for making modular tiles, larger-sized tiles, abrasion-resistant tiles, as well as granite. It is done through multiple glazes, sculpting, applications, and new equipment techniques. Automation will play an essential role in lowering costs and improving quality.
If you are a beginner, you can start to make your tiles through the processes above. However, there can be modifications to various methods to make your tile more advanced and smoother.


