Kids, with their unfounded well of creativity and imagination, can make use of coil pottery to express themselves. As parents, you should always strive to do some fun and educational coil pottery projects with your kids without worrying about them getting dirty. Such activities create a safe, creative activity for the kids to create their toys and serve as little moments you share with your kids. You can keep this little souvenir of their creativity on your desk and living room as they grow up.
If you are worried about the activity being complex, we have listed a step-by-step guide on doing fun and educational projects with coil pottery for kids. We have also listed the supplies you will need for each project. So, get yourself and your kid ready to create fun and educational masterpieces! Keep on reading to know more.
4 Fun and Educational Coil Pottery Projects for Kids
For kids who have yet to attempt to do coil pottery, let us tell you that the process is simple. All you need to do is follow the steps below, and voila! You have a masterpiece in your hands.
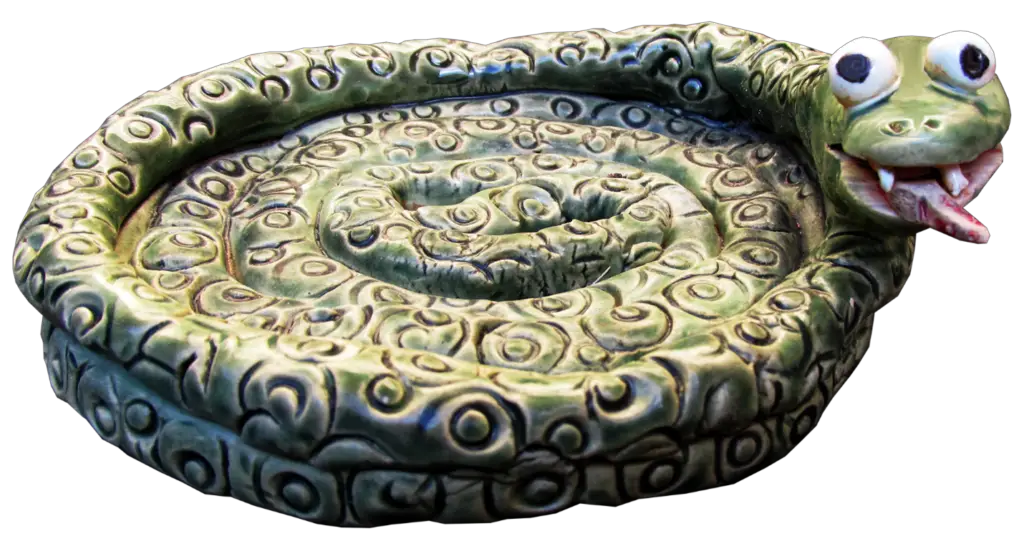
1. Coil Snake
When making a coiled snake, the first thing to do is to gather your supplies. You must have air-dry modeling clay. You can choose all the colors you like. The Crayola Air Dry Clay is one of the perfect air-dry clays for kids to work with. Next, you will need a rolling pin or a clay roller. A plastic knife or a clay sculpting tool is also required. You should also have a work surface or mat to work on to avoid getting the floor or desk dirty. Now is when the real work starts. It would help if you prepared the clay by dividing it into manageable portions. Then, roll each portion into a ball to remove all the air bubbles.
Now, roll the clay with your hands or a rolling pin into long, thin coils that look like snakes. You can experiment with different lengths and thicknesses to create several snake designs. Next, you must coil the clay into different shapes like spirals, loops, or zigzags. You can add textures or details like snake eyes and scales using your fingers.
Lastly, place the completed oil snakes on a flat surface to let them dry thoroughly. Depending on the type of clay you use, it can take up to 24-48 hours to dry.
2. Coil Bracelet
Start making a coil bracelet by gathering the needed supplies, like an air-dry modeling clay of various colors and a rolling pin. You can also use beads, sequins, and other decorative bits. Now, we get to work and prepare the clay. Divide the clay into small pieces, one for each bracelet. Now, roll each piece into a ball and flatten them into a disc shape.
Next, you will roll the clay into thin, long coils using the rolling pin or your hands. Now, you are going to shape the bracelet. You do so by wrapping the clay coil around your wrist to check the size of the bracelet. Adjust the length to your comfort, and then join the ends of the coil together neatly. You can smooth out the seams with your fingers.
Now it’s a fun time! You can add all the beads, sequins, and decorations you want your bracelet to have. Press them on the surface of the bracelet, and you are done. The last step is to lay the completed coil bracelets flat on a surface to dry. It will be ready to wear as soon as it’s dried.
3. Coil Snail
To make a coiled snail, you will need air-dry modeling clay in colors you like and a rolling pin. You will also need a plastic knife and a work surface or mat to work on. Next, you must prepare the clay by cutting it into small parts, one for each snail. Then, roll each part into a ball so all the air bubbles are gone.
Next, you need to form the body of the snail. We do so by flattening one side of the clay ball to create the snail’s muscular body part. You can use your fingers to shape the remaining clay into a spiral body. You can develop coils from the pieces and form a spiral. Now add the spiral coils on top of the muscular flat surface of the snail.
You can use smaller coils or balls of clay to give your clay snail friends eyes, antennae, and even a smile. You can also texture the snail’s shell by pressing patterns on it. Now, you leave your clay snail friends alone in the sun to dry. Place them on a flat surface for 1-2 days, and they will soon be ready for you to play with!
4. Coil Pot
It is the perfect activity if you have created all the above projects and are up for a challenge. Grab your supplies like air-dry clay, rolling pins, plastic knives, clay sculpting tools, and a mat to work on. Now, prepare the clay by dividing it into portions, one for the base and the other for the coils.
Next, roll the remaining clay into long, thin coils with your hand or using a rolling pin. Building the pot is an important part. You can make mistakes and restart if things don’t go your way. You can also ask your parents or elders to help you with this part until you champion it yourself. Place the flat slab of clay on the mat. It is the base of the pot.
Then, coil the clay around the base and layer each coil over the other carefully to build the pot’s walls. Now smooth the coils together using your fingers or a clay tool. Smooth them till they look seamless. You can shape the pot and add texture or patterns to its surface. Now carefully pick up the coil pot and put it on a flat surface to dry, and voila, you have made your very first coil pot!
Conclusion
The art of coil pottery is a fantastic outlet for your kid’s creativity. Although messy, the activity is a great way to strengthen the parent-kid bond. We hope you enjoy these fun and educational coil pottery projects with your kids!


