Are you fascinated by the elegance and uniqueness of pinch pots? Why don’t you try creating one? But, when you sculpt pinch pots, you should keep a few things in mind to avoid making the common mistakes that can ruin your creation, such as using inappropriate water quantity, improper drying, using fingertips, pushing through the bottom, etc. In this article, you will get a detailed description of the most common mistakes of pinch pottery and how to avoid them. So, get to reading right now!
Pinch Pottery: A Brief Overview
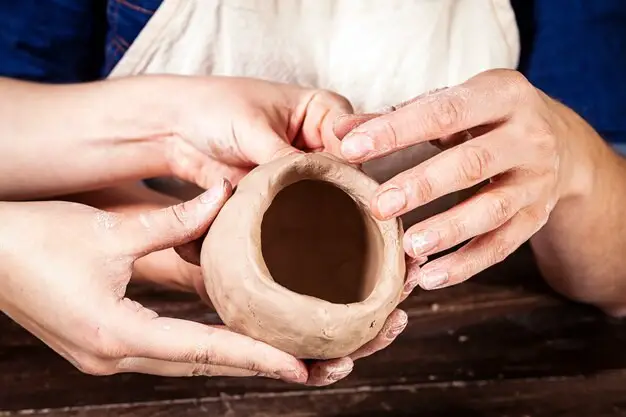
Although multiple pottery styles have been practiced since the ancient period, the art of pinch pottery holds an uncompromising significance due to its exquisite appeal despite being one of the simplest pottery forms. Pinch pottery is a seamless pottery-forming technique that involves molding the lob of clay and pinching it to give your desired shape. It is considered one of the most straightforward procedures since it consists of shaping the clay pots just by pinching them.
Common Pinch Pottery Mistakes to Avoid
Here’s a list of mistakes that you should avoid while creating pinch pots:
1. Using an Inappropriate Quantity of Water
Using excessive or less water while preparing the clay mix is one of the most prominent mistakes sculptors commit. If you use excessive water, the clay mix will become increasingly slurry and soft, making it impossible to sculpt accurately. It will make the surface look uneven and bumpy. Adding lesser quantities of water to your clay mix can make it too hard to mold or sculpt. Hence, when you create pinch pottery, add the right amount of water.
2. Forgetting to Pinch the Bottom
The bottom of the pinch pot should be adequately pinched to avoid the formulation of air bubbles. It is a common mistake that beginners make while creating pinch pots. These pots should be pinched appropriately using gentle hands. If you fail to do so, there are high chances of your pinch pot cracking up later. If you devote adequate time and pinch the bottom of the pot perfectly, the air bubbles in the clay can be reduced effectively, making it much easier to formulate the clay pots.
3. Pinching the Clay with a Fingertip
Although it is necessary to pinch the clay, you should completely avoid using your fingertips to pinch the play. If you use your fingertips while preparing the clay mix, there is a high possibility of nail marks developing all over it, giving it an unusual and unappealing outlook. To avoid this, use your thumb and index finger to mold the clay gently without involving your nails.
4. Pushing Through the Bottom
Often, people make the common mistake of pushing through the bottom of the pinch pot. It is a severe issue that should be avoided to make the clay creation look seamless. When molding the clay ball, gradually use your fingertips to reach the bottom, but do not make your fingers go through it. This way, you can easily make a hole at the center of your pinch pot.
5. Rushing the Drying Process
Just as it is vital to consider the overall clay preparation, you should emphasize the drying process equally. After you have created the pinch pot, let it dry for an adequate amount of time. Adequate time should be provided to the pinch pot for drying up. Otherwise, it may lead to the formation of cracks, joints, and fissures. Also, proper moisture retention is essential. So, you should use a plastic cover to retain the moisture level.
Top Techniques to Follow for a Successful Pinch Pottery
Below are some of the most alluring pinch pottery techniques that can impart your clay creation with a unique appeal:
1. Coiling
One of the most effective pinch pottery techniques is coiling. You can easily add advanced definition to your clay pot by adding coils. Start by rolling the clay mix into a snake-like shape to add to your creation and place it on a pot. Use your thumb to merge both ends of the coils by adjusting the size according to your requirements.
2. Foot Ring
Another easy technique to add definition to pinch pottery is a foot ring. In this technique, the artisan will be required to create a ring of clay by smoothening the surfaces evenly. Create a pot and prepare it with an adequate clay mix. Next, the base of the clay pot should be flattened using a spatula. After this, merge the ring and the pot for an enhanced appearance.
Uses of Pinch Pottery
The following are the common uses of pinch pots:
- For Storing Food and Water
One of the earliest uses of pinch pots is using it as a means to store food and water. Since It keeps food and water safe and free from pathogens, you can readily use it for storing food and water.
- Decorative Purposes
Apart from functionalities, pinch pots can also be used for decorative purposes. You can add a hint of color or texture to these pots and display them in your living room space to impress all your guests!
- Storing Jewelry
Pinch pots are great containers for storing jewelry. So, if you wish to keep all your accessories organized, use a pinch pot to keep everything properly organized.
- Planters
Ceramic pots are great for use as a planter. These pots have been used as a planter since ancient times. You can use these beautiful clay creations as planters to enhance the beauty of your garden.
Factors Affecting Your Pinch Pottery Project
Here’s a list of factors affecting your pinch pottery project:
| Factors | How Does It Impact Pinch Pottery? |
| Temperature | Fire your pinch pots at an adequate temperature, or it may melt. |
| Moisture | Improper amounts of moisture can degrade the appeal of the pinch pots. |
| Material | Use the best quality clay and wheels to sculpt pinch pottery appropriately. |
You can try out the Natural Air-Dry Modeling Clay, one of the best clays with adequate grog, perfect for creating pinch pots.
Conclusion
So, now that you know the mistakes to avoid while creating a pinch pot, follow them in your upcoming project. These tips will not only help you complete a project successfully but also add to your pottery skills.
Happy sculpting!


